The Quinfall Complete Crafting, Gathering & Economy Guide (2026)
Relying solely on combat in The Quinfall leads straight into an economic dead end. You cannot buy endgame weapons, high-tier plate armor, or fortress siege ammunition from random town vendors. Every usable piece of gear, stat-boosting elixir, fortress gate beam, and livestock feed is crafted entirely by players. The economy is fully player-driven. If you want to build wealth and gear your character without going broke, you must master the production pipeline from day one.
Quick take: The game uses a six-tier production chain where raw gathering feeds processing stations, which in turn supply combat gear, siege engines, and homesteads. Professions level from 1 to 100 before unlocking infinite Master Levels, and your primary early-game rule is never to buy starting workbenches or tools from city NPCs when the main questline in Meadow grants them for free.
Six Economic Pillars: From Pickaxe to Trade Caravan
Pressing L opens the master life skills interface. Unlike traditional MMORPGs with rigid class restrictions, your character can master every single profession simultaneously. There are no arbitrary caps on skill slots. You can fell timber, smelt alloys, tailor silk robes, and manage beehives on the same character. The entire system is divided into six specialized branches:
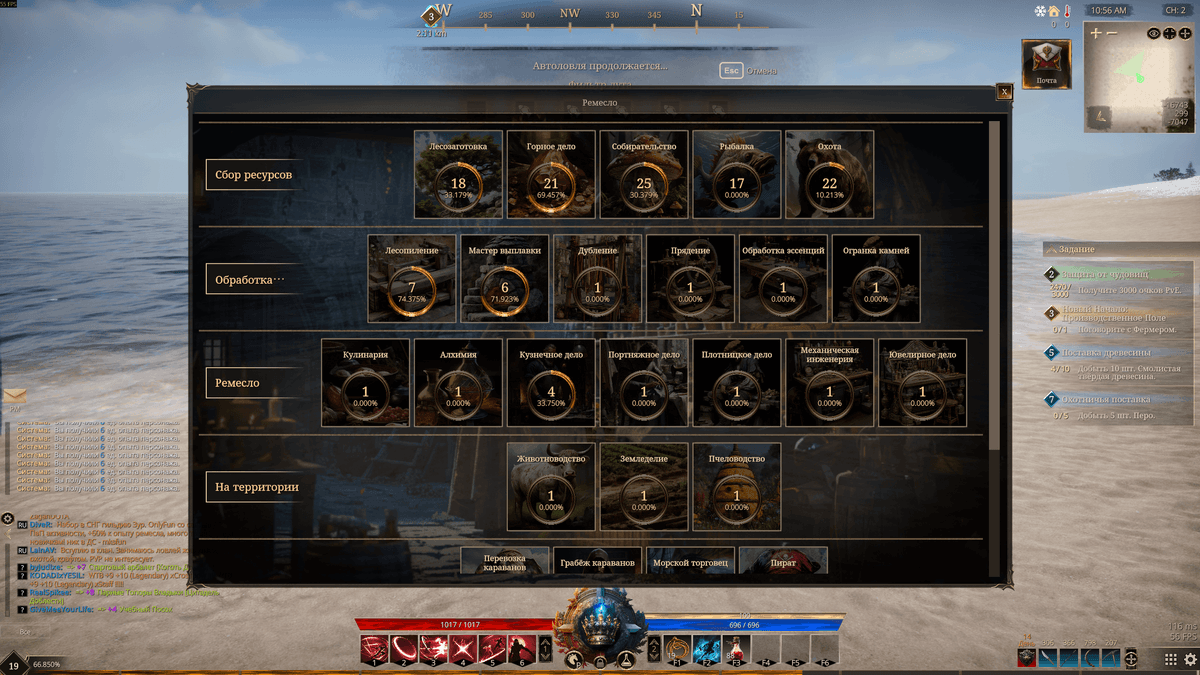
- Gathering — five foundational disciplines: Woodcutting, Mining, Harvesting, Fishing, and Hunting. This is the entry point of the entire economy, feeding raw logs, ore, plants, and hides into cities;
- Processing — six refining stations: Sawmill, Smelter, Leather Worker, Spinning Wheel, Essence Refiner, and Gem Cutter. Without this step, raw iron ore remains unusable stone and logs never become planks;
- Crafting — seven terminal manufacturing trades: Blacksmithing, Tailoring, Carpentry, Engineering, Jewel Crafting, Cooking, and Alchemy. This is where weapons, heavy armor, siege warheads, rings, and raid potions are forged;
- Property — Farming, Animal Husbandry, and Beekeeping. Passive, automated agricultural cycles tied to leased city land or private altar bases;
- Trade & Risk Logistics — Caravan Carrier, Caravan Thief, Sea Merchant, and Pirate. High-stakes overland and maritime shipping mechanics where transporting cargo across open roads exposes players to full-loot PvP skirmishes;
- Special Disciplines — treasure hunting, puzzle tombs, and cartography, unlocking rare matrices, blueprints, and socketing recipes.
Profession progression does not stop at level 100. Reaching the cap transitions your character into Master Levels (M1, M5, M20, and beyond). Each rank yields incremental material conservation perks and critical craft chances. It also registers your crafter on the server leaderboard, where the top 10 weekly specialists receive high-tier material crates and exclusive rewards. The grind pays off.
Zero-Gold Start: Manual Gathering and Storyline Stations
Rookies frequently waste their starter silver by sprinting to the town Construction Worker NPC, where tier 1 workbenches cost 60,000 gold and basic pickaxes run up to 80,000 gold. Do not buy them. Spending gold on starter gear is a rookie trap:
The game provides an organic, completely free starter progression:
- Manual Bush Harvesting — walk up to unnamed roadside bushes and press E. Hand harvesting requires zero tools and consistently yields starter Leather Logs and plant fibers;
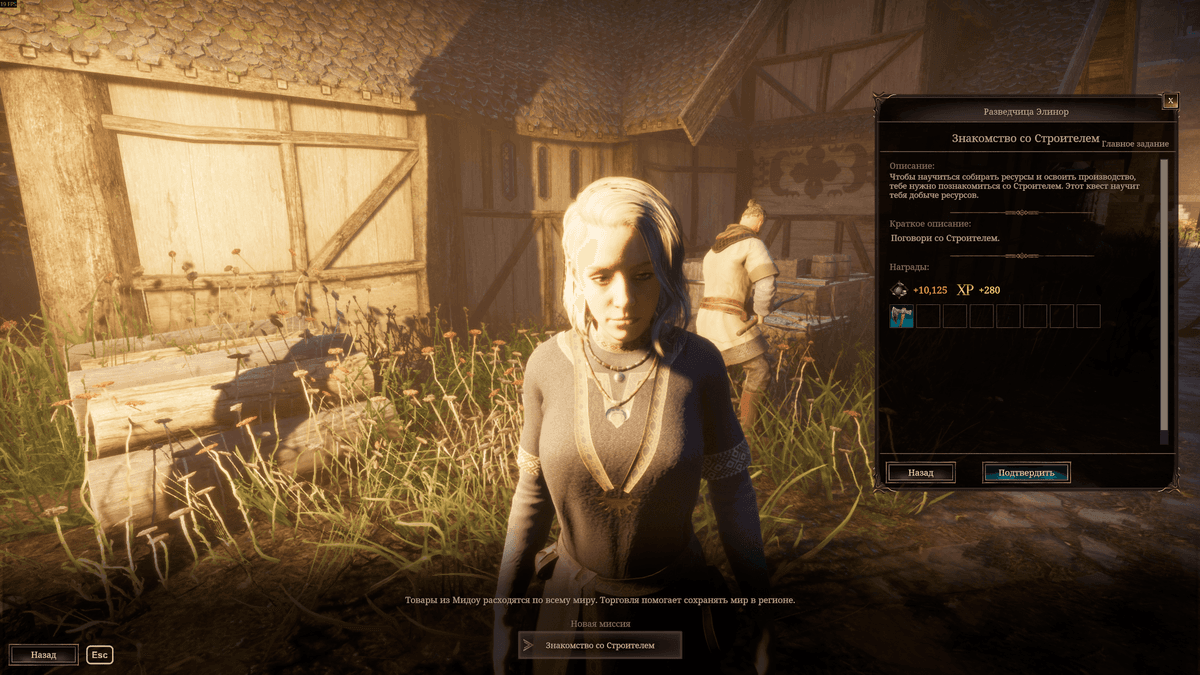
- Meadow Settlement Storyline — follow the yellow main campaign questline. Within 30 to 40 minutes, story rewards grant your character a full set of basic gathering tools, a Sawmill, and a Smelter for free;
- Primary Lumber Refining — place your gathered logs into the Sawmill. Three leather logs and two resinous hardwoods convert into Processed Lumber in roughly 20 seconds;
- Forging Your First Tool — combine two processed lumber planks with twenty common stones at the forge to craft a Simple Axe.
Having a pickaxe or sickle in your backpack is not enough. You must actively equip it. Open your inventory with I, locate the tool, and Right-Click to slot it. Until the tool icon locks into your active gathering slot, resource nodes in the wild will show a red lock icon and will not trigger the interaction prompt. Equip first, gather second.
Gathering Tools, Durability Loss, and Pet Evolution
Walking up to an ancient oak tree or an exposed silver vein empty-handed in The Quinfall yields nothing. Every resource class requires a dedicated tool type: timber requires axes, ore veins demand pickaxes, wild herbs need sickles, fish bite only on baited rods, and animal carcasses require a hunting knife. Gathering gear is not permanent equipment. It functions as consumable hardware with finite lifespan that dictates your gathering speed and overall profit margin.
Quick take: Gathering tools cannot be repaired in the field and permanently vanish once their durability reaches zero, making duplicate tools mandatory for long gathering runs. Higher grade values directly increase gathering speed while preventing stone shattering, and specialized profession pets evolved through Void Sacrifice grant permanent chances for double resource yields.
The Tool Arsenal: From Basic Flint to Steel Implements
Every gathering implement possesses its own Durability rating and a randomized Grade Value. Each swing against a node permanently depletes durability:
- Lumberjack Axe — chops tree trunks with durability loss scaling according to the tree age;
- Mining Pickaxe — extracts iron, copper, silver, and rare prismite crystals while reducing the risk of chipping worthless rubble;
- Herbalism Sickle — harvests hemp fiber, sweetroot, and rare seeds for private homestead agriculture;
- Fishing Rod — supports active manual reeling and passive automated fishing in freshwater and saltwater biomes;
- Hunting Knife — skinning and butchering tool triggered on defeated beast carcasses to collect pelts, sinew, and raw meat cuts.
Unlike weapons and combat armor, gathering tools feature no field repair mechanics. The moment an axe or pickaxe hits zero durability, it instantly vanishes from your inventory. Getting stranded deep inside the arid deserts of Deatra without a backup tool forces a thirty-minute backtrack to the nearest forge. Keep at least two backup tools of your primary gathering profession in your bags at all times. No excuses.
Quality Grades and the Level 30 Crafting Spike
Forging tools at the blacksmith forge generates variable stat rolls across common (green), rare (blue), and epic (purple) tiers:
- Tier 1 Basic Tools — crafted using simple processed lumber planks and stones at a tier 1 forge. They roll grade values between 30 and 39 with a baseline gathering speed of roughly 85% to 89%;
- Tier 3 Advanced Tools — unlocked at level 30 Blacksmithing using tier 3 workbenches and refined steel ingots. They boast two and a half times the base durability and exceed 115% gathering speed, reducing node harvest times to a couple of seconds;
- Inherent Perk Rolls — high-grade crafts have a chance to proc innate passives, such as bonus gem drop rates or critical gathering multipliers.
Profession Pets and Void Sacrifice Evolution
Gathering without an active companion wastes immense economic potential. The game features dedicated Pets for every gathering and refining profession, including lumberjack companions, mining boosters, herbalism scouts, alchemy assistants, and cooking helpers:
When summoned from the companion interface, your pet follows your character and provides passive gather speed buffs alongside chances to proc double yields. Maximum efficiency requires the pet evolution system:
- Companion Experience Accumulation — your pet gains experience points synchronously whenever you perform actions in its designated profession;
- The Evolve Button — once the companion experience bar reaches 100%, the Evolve button becomes clickable inside the pet menu;
- Void Sacrifice — the interface allows you to sacrifice duplicate, excess, or common-tier pets into the void. Consuming their essence ranks up your primary companion, unlocking massive gathering speed boosts and pushing the double-yield chance up to +20% or +25%.
Do not spread pet food and sacrifices evenly across all companions. Focus entirely on one primary companion matched to your core gathering specialty (such as mining or woodcutting). A rank 2 or rank 3 specialized pet pays for itself within two farming sessions by consistently doubling high-value raw material yields.
Woodcutting and Mining: Routes, Tree Age, and Ore Veins
Woodcutting and Mining form the heavy industrial bedrock of The Quinfall. Metals are required for casting bladed weapons and plate armor, quarry stone reinforces altar foundations and defensive bastions, and processed timber serves as the structural frame for manufacturing stations and siege machinery. Without heavy raw materials, guild progression grinds to a halt. Mastering deposit locations and felling mechanics separates wealthy industrialists from broke beginners.
Quick take: Chopping young trees is a primary beginner mistake that drains axe durability for negligible timber yields; focus exclusively on massive ancient trees for maximum wood and Resinous Hardwood. In mining, extracting rare Prismite crystals generates immense market profits, while the shoreline of Coast Harbor provides the optimal circular route to gather iron, hemp, and lilies simultaneously.
Woodcutting: Why Tree Age Dictates Your Margin
Felling timber seems straightforward until your axe shatters on its third trunk. The game implements an explicit age hierarchy across wilderness forests:
- Young Trees — thin saplings with sparse foliage. A trap for rookie lumberjacks: every swing inflicts maximum durability wear on your axe while dropping negligible amounts of basic Leather Logs;
- Mature Trees — balanced mid-tier nodes offering standard yield-to-wear ratios;
- Ancient Trees — massive gnarled trunks with sprawling canopies. Your primary farming objective: axes encounter minimal fiber resistance, and every completed cycle drops heavy stacks of timber alongside valuable Resinous Hardwood.
Forest geography is partitioned between continental biomes: the lush temperate woodlands of Kineaqla house common deciduous and pine groves, whereas the sun-baked plains of Deatra conceal resilient arid species. Dynamic weather also introduces sudden opportunities. Severe thunderstorms occasionally spawn lightning-charged timber deep inside dense forests for a limited window, providing essential components for high-tier master crafts.
Mining: Visual Vein Recognition and Mineral Value
Mineral deposits spawn across rocky ridges and mountainous elevations. Learning to identify deposits by sight saves hours of wasted movement:
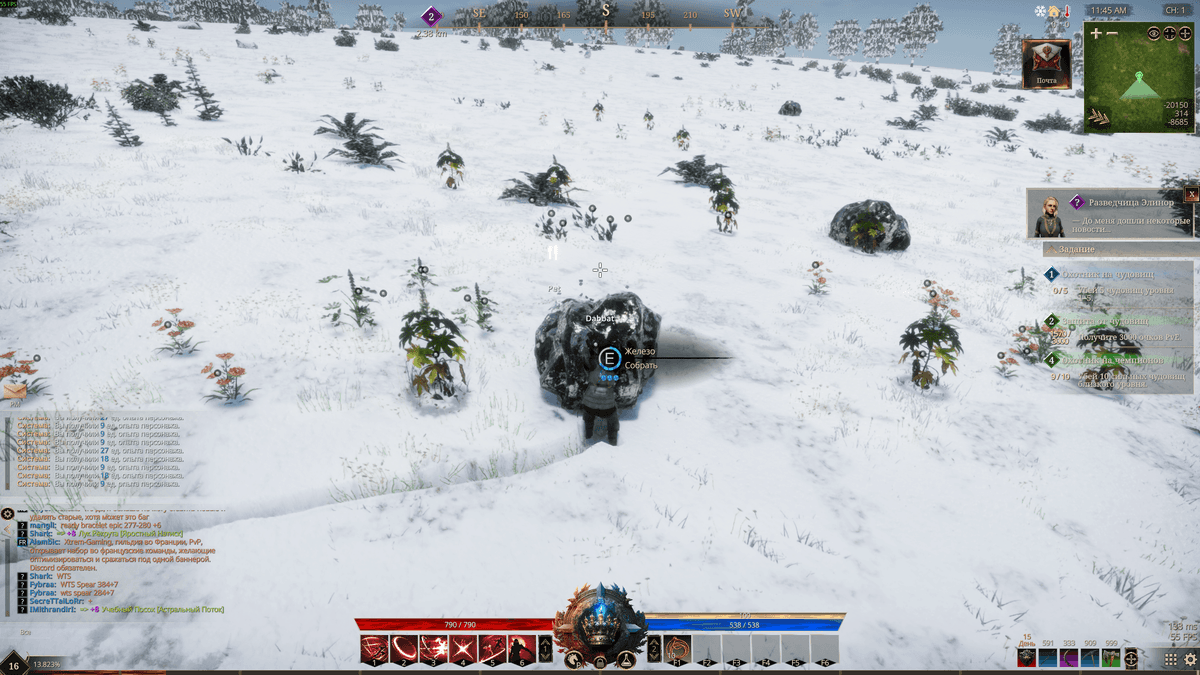
- Iron Ore — unlocked at level 1 Mining. Exposed rock faces display a distinct dark, metallic gloss finish;
- Coal — unlocked at level 1 Mining. Deposits appear completely matte, flat charcoal-black, without any reflective sheen;
- Copper Ore — unlocked at level 10 Mining, identified by bright reddish-bronze mineral streaks across the rock face;
- Silver Ore and Obsidian — advanced nodes (level 18 and above) tucked away inside dangerous highland cliffs and cavern networks.
Every pickaxe strike against an ore vein has a small hidden chance to chip away a translucent crystal — Prismite. Never sell this mineral to town merchants for pocket change. On the Central Market, raw prismite trades above 70,000 gold per unit. Jewelers depend entirely on prismite to cut gems for endgame rings and enchanted necklaces. Hoard it.
Circular Farm Route: Coast Harbor and Sky Rift Zone
The fastest leveling loop from level 1 to level 15 runs along the shoreline near Coast Harbor inside the Sky Rift Zone. Natural terrain contours concentrate dense clusters of iron veins directly alongside wild hemp and medicinal lilies:
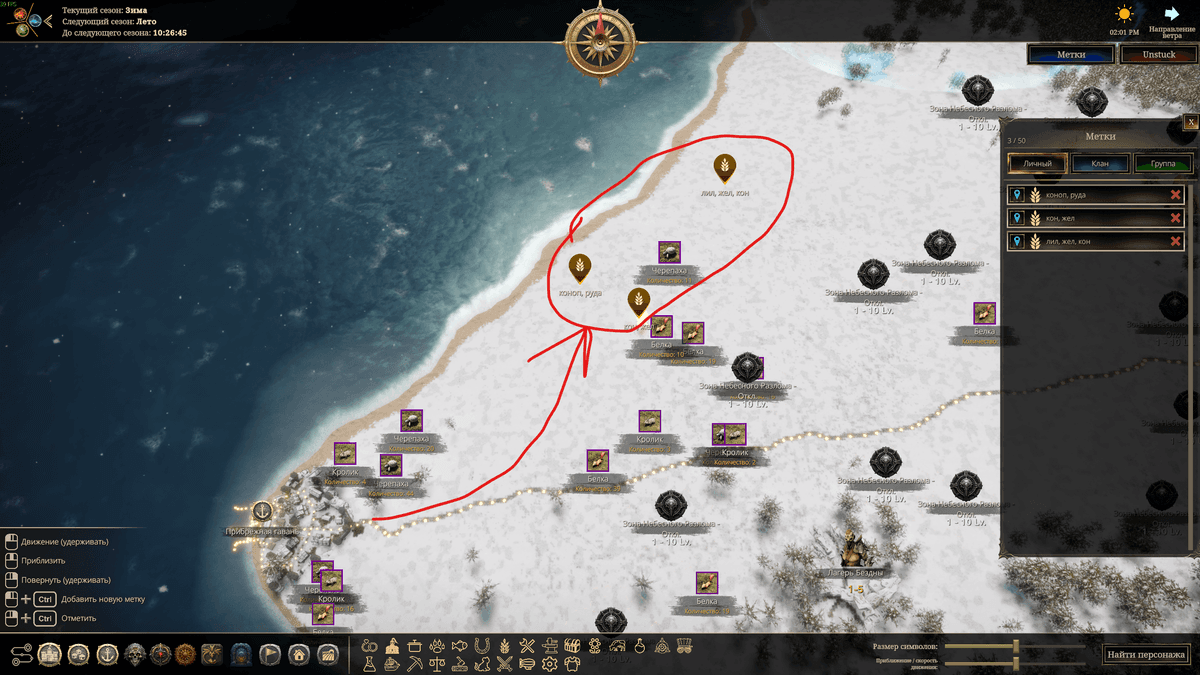
By sweeping tightly along the water edge, you farm iron, fibers, and alchemy roots in one continuous circuit without breaking stride:
Avoid aimless roaming by placing custom markers: hold Ctrl + LMB anywhere on the world map. These map pins remain visible exclusively to you and persist through logouts. By marking the loop boundary, you establish a closed circuit: by the time you clear the far end of the beach, initial nodes have already completed their respawn timer.
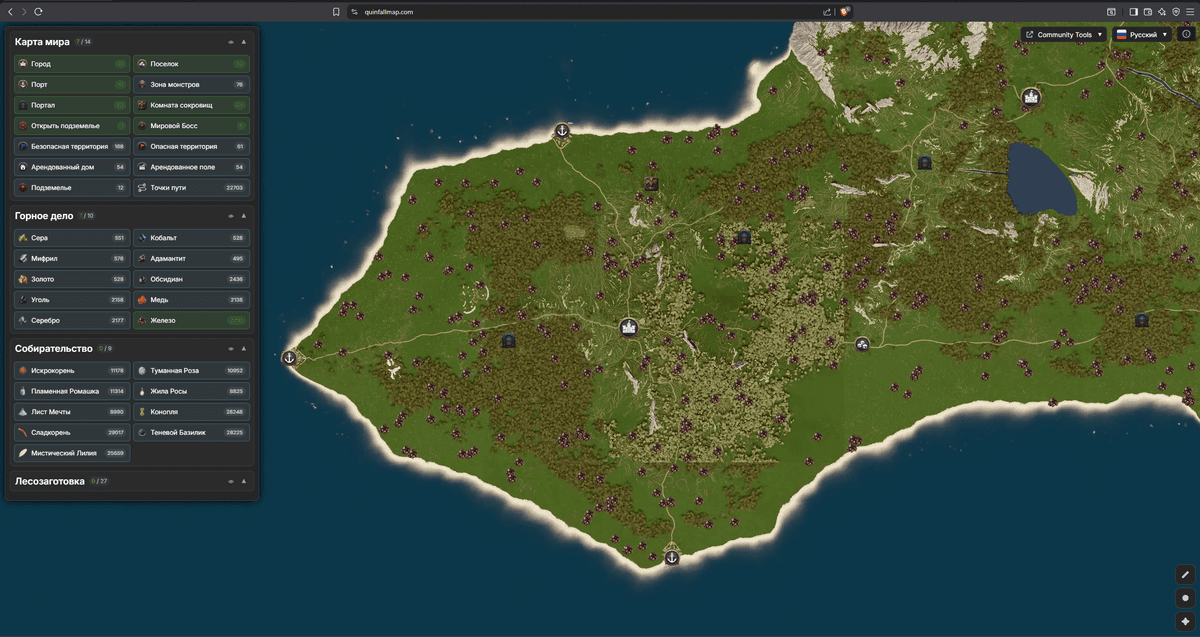
For high-tier prospecting runs across platinum, gold, and mithril deposits, cross-reference community interactive maps showing exact regional coordinates:
Harvesting, Hunting, Commercial Fishing, and Water Gathering
If raw lumber and ore form the heavy skeletal frame of the economy, wild herbs, animal carcasses, and aquatic bounties represent its vital bloodstream. High-end dungeon encounters and raid bosses are impossible to sustain without potent alchemical potions, while premium roasted meats provide decisive health and combat buffs before entering open-world PvP arenas. Combining wildlife hunting with standard quest mob clearing optimizes your leveling efficiency and saves dozens of hours in the long run.
Quick take: Harvesting wild flora with a sickle supplies alchemists with reagents and yields valuable crop seeds for private homestead farming, while reaching level 100 unlocks a cumulative +38% bonus to double harvest yield. Hunting yields raw meat, sinew, and hides via knife skinning, fishing is streamlined through an automated quality filter toggled with T, and fresh or salt water can be scooped from natural shorelines for free without paying market markups.
Herbalism: Biome Flora and Seed Stockpiling
Equipping an Herbalism Sickle allows players to gather wild plants across distinct ecological zones. The botanical map of Quinfall is divided between temperate meadows and scorching desert barrens:
- Kineakla Flora — Sweetroot, industrial stalks of Hemp, Shadow Basil, and Mystic Lily. These baseline reagents fuel health restoration draughts and provide raw plant fibers for weaving cloth at spinning wheels;
- Deatra Desert Botanicals — Mist Rose, Flame Chamomile, Sparkroot, and Dew Vein. These exotic desert herbs are required for high-tier defensive tonics and elemental resistance elixirs;
- Seed Extraction — harvesting any wild flower or crop provides a baseline chance to extract viable Seeds. Never discard or vendor them. Cultivating a steady crop of Mist Rose on your private homestead farm is significantly safer and more cost-effective than running high-risk expeditions into contested desert zones.
Gathering progression highlights the compounding returns of profession investments:
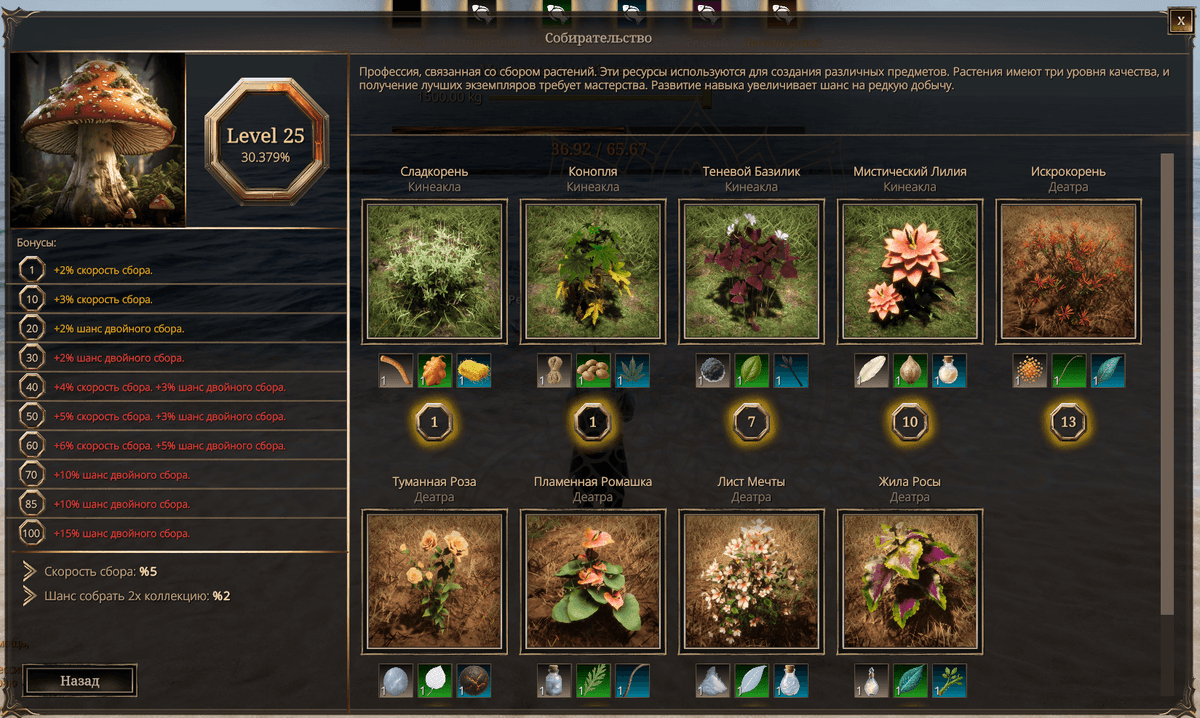
At level 1, the profession grants a modest +2% harvesting speed. Reaching level 40 increases harvest speed by +4% and unlocks a +3% chance to double resource yield. At milestone thresholds of level 70, 85, and 100, the double-yield chance expands by an additional +10%, +10%, and +15% respectively. This progression effectively doubles resource extraction speed and material output over time.
Hunting: Wildlife Habitats and Knife Skinning
Unlike passive plant harvesting, Hunting involves direct combat engagement with local wildlife. To eliminate aimless forest searching, rely on the integrated world map: zooming in reveals dedicated wildlife migration corridors and habitat Hotspots for wolves, boars, deer, and predatory felines.
After defeating a beast, equip a Hunting Knife to skin the carcass:
- Raw Meat — processed in cooking cauldrons to prepare long-lasting nourishment buffs for raid content;
- Hides — cured at tanning racks and leatherworking stations to produce processed leather, an essential material for medium armor sets;
- Sinew and Bones — specialized components required for reinforced bow grips, tool assembly, and mechanical engineering schematics.
Commercial Fishing: Manual Hooking and AFK Automation
Fishing along rivers, inland lakes, and oceanic coastlines yields cooking ingredients, specialized alchemical oils, and crafting fat. Players can choose between two distinct fishing methods:
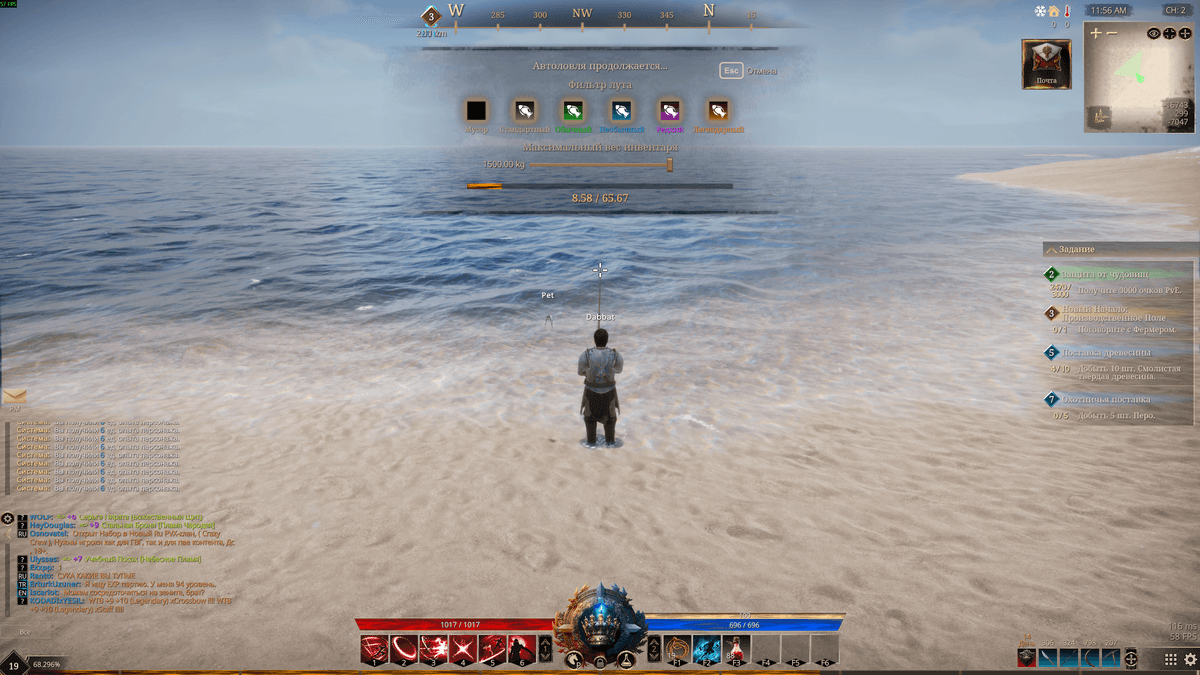
- Manual Fishing (Key E) — requires active timing and reacting to the visual bite indicator. Successfully landing catches manually extracts fish two to three times faster than passive mode;
- Auto-Fishing (Key T) — toggles background automated fishing. The interface allows players to configure an active catch filter: the system automatically discards common junk fish and retains only uncommon, rare, or relic-tier specimens to preserve bag inventory space.
A widespread marketplace trap targeting beginners is listing standard water bottles at predatory prices reaching 10,000 to 15,000 gold. Avoid purchasing water from market brokers entirely. Both fresh water and salt water required for cooking, alchemy, and mortar mixing can be collected for free: simply walk your character knee-deep into any natural stream, river, lake, or coastline, and interact with the prompt to fill water containers directly into your inventory.
Material Processing: Workbenches, Production Timers, and the Online EXP Rule
Between raw timber and a mastercrafted bow, unprocessed ore and a forged longsword, lies an indispensable intermediate tier: Material Processing (Processing). No master crafter accepts raw rough boulders or bloodied animal pelts. There are no shortcuts. Six distinct refining disciplines convert wild materials into standardized components, serving as the essential economic bridge connecting gatherers to guild artisans.
Quick take: Refining operates on a semi-automated queue timer, but requires strict adherence to two critical rules: you must remain logged into the game world when the production cycle finishes to receive profession experience, and completed batches must be manually collected from the workbench output buffer. Higher workbench tiers reduce production timers by up to 40% and unlock high-level recipes for steel smelting and synthetic Veltryn refinement.
Six Primary Processing Disciplines
Each processing apparatus specializes in a specific category of raw material and must be installed inside a rented townhouse or within your private altar perimeter:
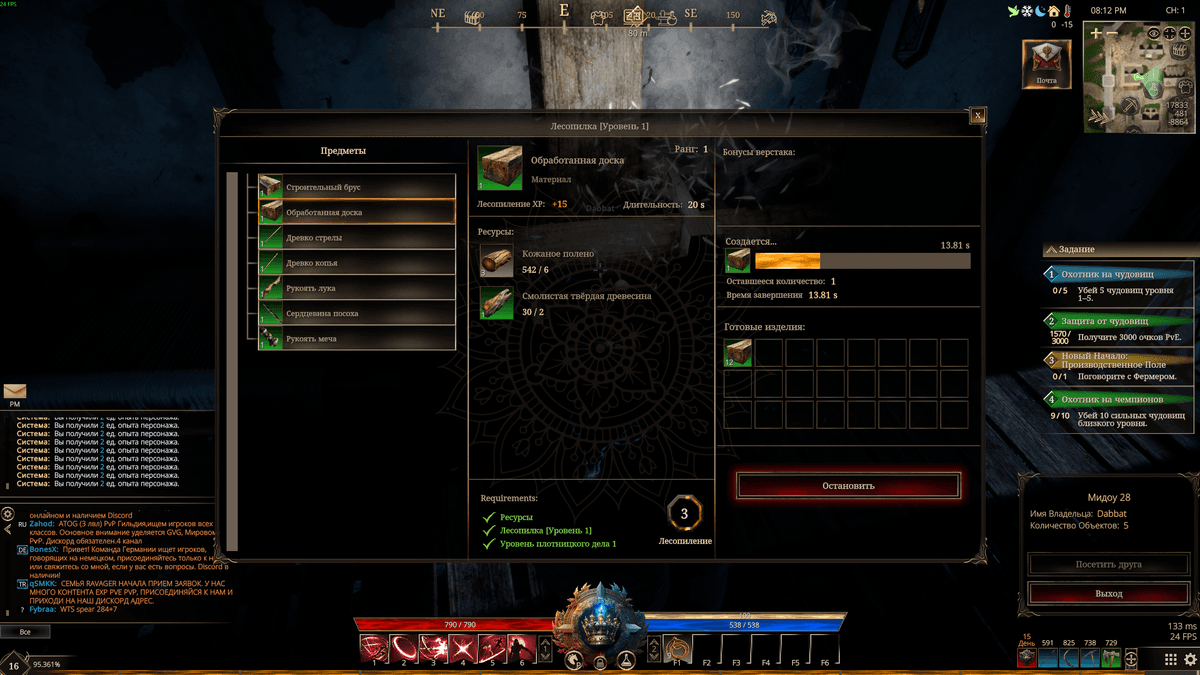
- Sawmill (Woodcrafter) — saws raw logs into Processed Lumber, structural beams, and wooden weapon grips required by carpenters, fletchers, and weaponsmiths;
- Smelter — smelts raw ore into copper, iron, and silver ingots, as well as complex metallurgical alloys like bronze and steel. Reaching level 10 unlocks an innate proc chance to double ingot yield from a single batch;
- Leather Worker — cures raw animal pelts from rabbits, boars, and bears into Tanned Leather for tailoring light and medium armor pieces;
- Spinning Wheel (Loom) — processes raw hemp fibers and sheep wool into linen and wool yarn, the foundation for woven cloth bolts;
- Essence Refiner — a specialized mystical apparatus where monster-dropped Luck Essences, creature extracts, and dungeon rift scrolls are synthesized into an invaluable intermediate reagent: Veltryn;
- Gem Cutter — cuts rough Prismite crystals and uncut geodes into radiant gemstones ready for socketing into jewelry bezels.
One of the most unforgiving design quirks in The Quinfall involves profession experience calculation. You can queue up 50 iron ore chunks in a smelter with a 5-minute production timer and freely roam the city, but if you log out of your character before the timer hits zero, the ingots will complete, but all profession experience for that entire batch is permanently forfeit. The EXP evaporates instantly. Always remain active in-game until your refinement queues finish.
Workbench Output Buffers and Workshop Limits
Another common source of confusion among new players is opening their bag after a crafting timer expires and finding it empty. Finished items do not automatically transfer into your personal inventory. They remain inside the workbench output buffer. To collect your lumber or ingots, open the station window and Right-Click the completed stack. Collect finished batches immediately: while items sit in the output slot, the station buffer remains locked, preventing you from queuing additional materials.
When planning your personal crafting workshop, keep strict construction limits in mind:
- Room Placement Constraints — standard rented town houses accommodate a maximum of two workbenches of the same discipline (e.g., two smelters) and a hard cap of three total processing stations per property. You cannot set up a full industrial factory inside a single residential room;
- Station Tiers (Tier 1–3) — advanced blueprints for upgraded smelters and sawmills are sold by the municipal Construction Attendant. Upgrading to Tier 2 and Tier 3 stations not only cuts processing timers by 30% to 40%, but also unlocks processing tiers for high-grade silver, cobalt, and mythril ores.
Manufacturing: Blacksmithing, Jewelry Crafting, and Alchemy
Crafting (Crafting) crowns the production pyramid of The Quinfall. Every gathering and processing pipeline converges at the artisan forge: refined metal ingots, cured leather, faceted prismite, and concentrated plant extracts. Choosing the right combat equipment calibration dictates your damage output and survivability in both PvE dungeons and massive PvP territory battles.
Quick take: Forging bladed and blunt weapons requires wooden Sword Hilt components crafted at sawmills. Top-tier rings and amulets are synthesized from magical Veltryn ingots alloyed with faceted prismite, while weapon and armor gem sockets are empowered through station-based Power Stone Merging combining lower-tier crystals into Tier 2 and Tier 3 gems.
Blacksmithing: Essential Subcomponents and Siege Munitions
The blacksmithing anvil consolidates the forging of blades, heavy plate armor sets, shields, and specialized ranged ammunition:
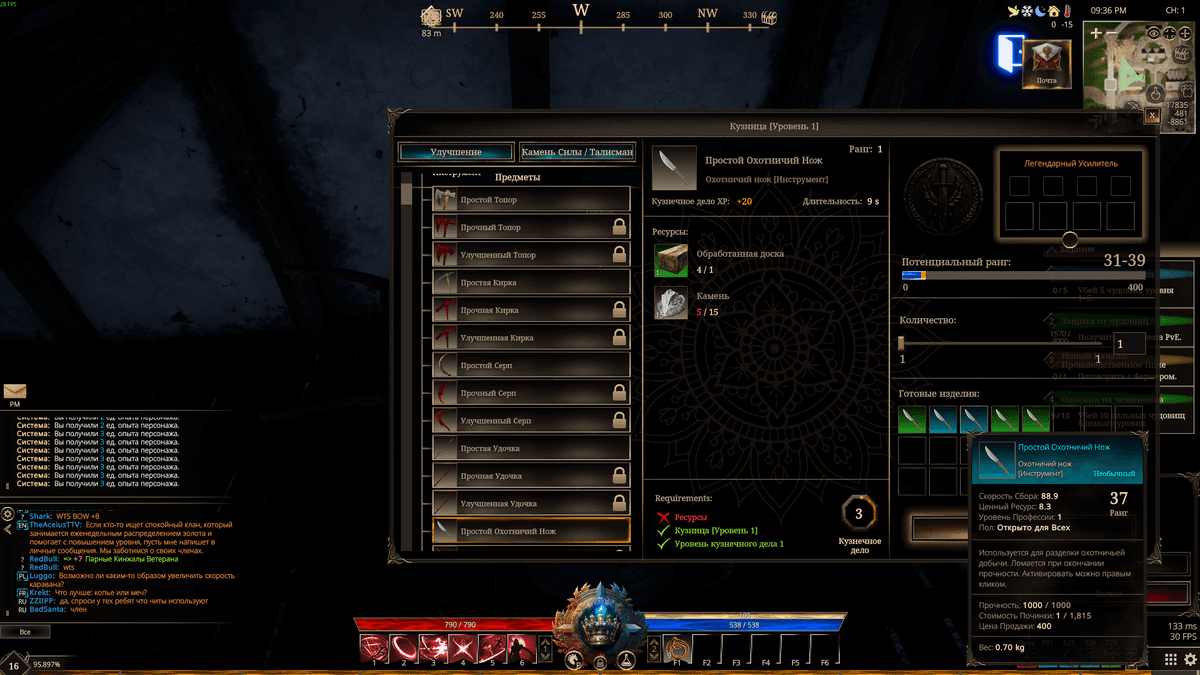
A frequent mistake made by novice weaponsmiths is attempting to forge swords with nothing but iron ingots in their bags. Quinfall enforces realistic assembly requirements:
- Sword Hilt — an indispensable structural component. Fabricated by carpenters at sawmills from processed lumber, it is mandatory for one-handed swords, greatswords, warhammers, and daggers. Without lumber hilts, no blade can be forged;
- Bow Grips and Staff Shafts — similarly require processed hardwood components combined with animal sinew cords;
- Siege Explosive Arrows (Blue / Explosive Arrows) — specialized munitions engineered for archers. These projectiles deliver a 300% damage multiplier against defensive palisades, wooden gates, and fortification walls during guild wars. For a comprehensive breakdown of siege weapons, rams, and conquest tactics, consult our complete guide to The Quinfall Castle Sieges, War Machines, and Territory Control;
- Mastercraft Proc Chance — high profession ranks (level 60+) unlock an innate chance to roll superior bonus stats on forged gear while significantly reducing crafting durability loss.
Jewel Crafting, Veltryn Synthesis, and Power Stone Merging
The Jewel Crafting Workbench supplies rings, earrings, necklaces, and bangles. Recent balance adjustments lowered the crafting milestone for Tier 110 accessories from profession level 75 down to level 70, significantly smoothing the mid-game progression curve.
The entire jewel crafting progression rests on three interconnected pillars:
- Veltryn Synthesis — refined at the Essence Refiner by fusing monster-dropped Luck Essences, creature extracts, and dimensional rift stones into three distinct purity grades (Dull, Bright, Pure Veltryn) that establish the base tier of jewelry;
- Faceted Gemstones — rough Prismite cut on a gem-cutting bench is set into Veltryn mounts, infusing accessories with primary combat attributes like critical hit rating, armor penetration, and elemental resistances;
- Power Stone Merging — the crafting interface includes a stone synthesis system: fusing three Tier 1 power stones produces Tier 2 or Tier 3 socket gems for weapon and armor sockets.
Alchemy and Cooking: Battle Tonics and Homestead Feed
Alchemists and culinary chefs drive steady, perpetual market demand for raw botanical and animal products:
- Battle Potions — instant health recovery vials, mana draughts, and elemental resistance concoctions brewed from Kineakla and Deatra botanical extracts;
- Sustained Rations — cooked gourmet dishes provide percentage-based maximum health and attack power boosts lasting 30 to 60 minutes, representing a mandatory preparation requirement for end-game dungeons;
- Small Livestock Feed — a critical kitchen staple. Without regular feed supplies, domesticated sheep, goats, and cattle quickly starve, halting wool and milk production.
Property Disciplines: Homestead Farming, Animal Husbandry, and Beekeeping
The three disciplines classified under the Property category — Farming, Animal Husbandry, and Beekeeping — fundamentally differ from conventional gathering runs in the wild. These are stationary, automated production systems tethered to your private real estate. While your character sleeps or clears demanding dungeons, crop fields mature, dairy cattle produce milk, and apiary hives synthesize therapeutic honey into pure passive revenue. Private landholdings are intimately connected to the continental feudal structure: for an in-depth breakdown of regional castle taxes, siege engines, and territorial warfare, check out our guide to The Quinfall Castle Sieges, War Machines, and Territory Control.
Quick take: Real estate operations are deployed either on rented municipal town plots or under the protective dome of a private altar toggled with U. Wild animals are captured with a lasso minigame and require regular rations of livestock feed, neglected crops wither and die in arid biomes without timely water, and neglecting altar fuel upkeep initiates rapid structural decay (Base Decay).
Rented Town Plots versus Private Altars
Before breaking ground on your first farm, you must establish the legal jurisdiction of your land:
- Town Plots — designated farmland along town outskirts (e.g., Pinolane). Absolute peace in a safe Blue Zone: hostile player interference is impossible, though plot dimensions are restricted and leases incur recurring gold rent payments;
- Private Altar — activated anywhere in unclaimed wilderness by pressing U, projecting a spherical private construction dome. You are free to design crop plots, livestock pens, and workshop fortifications;
- Blue Zones vs. Red Zones — raising your altar within a peaceful Blue Zone ensures permanent safety for your estate. Settling in a Red Zone unlocks strategic territory access, but exposes all structures and enclosures to hostile raids and siege bombardment;
- Base Decay Prevention — the altar core acts as an energy shield. You must regularly feed construction timber, stone, and fuel into its maintenance inventory. If the timer expires, structures rapidly crumble and captive livestock escape into the wild.
Your private altar doubles as a personal teleportation waypoint. Over time, the core passively accumulates up to three fast travel charges. From anywhere across the continent, you can instantly teleport directly into your courtyard by consuming one stored charge, bypassing road hazards and travel fatigue.
Farming: Arid Microclimates, Seasons, and Harvest Windows
Agriculture (Farming) relies heavily on hydrological management and local environmental conditions:
- Seed Sowing — open your inventory and click any seed pouch. A green grid projection on the terrain indicates valid planting zones;
- Biome Microclimates — in the arid desert basins of Deatra, topsoil parches in hours, necessitating constant, heavy irrigation. In temperate Kineakla valleys, ground moisture lingers significantly longer;
- Seasonal Cycles — summer heatwaves favor rapid growth of grain and corn, whereas winter freezes require shifting to frost-resistant cabbages and root tubers;
- Harvest Window Timers — once crops reach maturity, a countdown timer starts. If you fail to harvest pumpkins or hemp before the expiration deadline, the crops rot away, yielding only earthworms and compost instead of fresh produce.
Animal Husbandry: The Lasso Taming Minigame and Horse Breeding
Instead of purchasing livestock from trading posts, capture wild specimens across open meadows:
- Lasso Procurement — purchase a lasso from any municipal Mount Caretaker (Mount Caretaker);
- Taming Minigame — maintain distance and throw the lasso over a wild cow, sheep, chicken, or boar. An oscillating timing meter appears: press Space precisely as the indicator crosses the green threshold (you have three attempts per encounter);
- Pens and Production — captured animals are placed in estate pens. Cattle yield milk, chickens produce eggs and down feathers, sheep provide valuable wool, and boars generate fat and fertilizer across 8- to 10-hour production cycles;
- Starvation Hazards — captive animals possess a satiety gauge. Neglecting to supply them with Small Livestock Feed results in animal starvation and death. A deceased animal can only be salvaged for remnant scrap meat;
- Horse Breeding — pairing two wild green mounts can yield a blue steed, two blue mounts can produce purple rarity, and elite pairings unlock legendary horses across 12-hour foal gestation cycles.
Beekeeping: Honey Production and Apiary Synergy
Beekeeping (Beekeeping) is the lowest-maintenance stream of passive profit. Wild bee swarms are captured in dense woodlands and transported to homestead apiary hives.
The secret to maximizing honey output is agricultural synergy: position hives adjacent to flowering beds of lilies, basil, and chamomile. Bees accelerate crop pollination rates, while your hives generate pure culinary honey, candle beeswax, and precious royal jelly for master alchemical elixirs every few hours.
Market Economy, Exchange Orders, and Fatal Rookie Mistakes
Professions in The Quinfall represent the most reliable engine for generating wealth, easily outperforming most combat activities in consistent profit. However, fortunes belong not to those who endlessly swing a pickaxe, but to crafters who read market demand, liquidate high-value materials at peak prices, and navigate around costly interface traps. The market shows no mercy to carelessness. Nine out of ten novices stumble over elementary mechanics, hemorrhaging gold reserves that could have funded their first estate.
Quick take: True wholesale market demand is discovered through the Sell Order interface, which reveals active bulk buy requests. Four specific resource categories — Prismite, Luck Essences, Creature Extracts, and Rift Stones — must never be sold to NPC vendors, the daily 16-item barter exchange on T converts surplus materials into valuable tokens and VCoins, and mastering the seven cardinal economy rules will safeguard hundreds of thousands of gold.
Auction House Intelligence: Reading Wholesale Demand via Sell Orders
The default storefront of the Central Market often misleads players: listed prices reflect seller asking prices, revealing nothing about what buyers are actually willing to pay. To inspect authentic solvent demand:
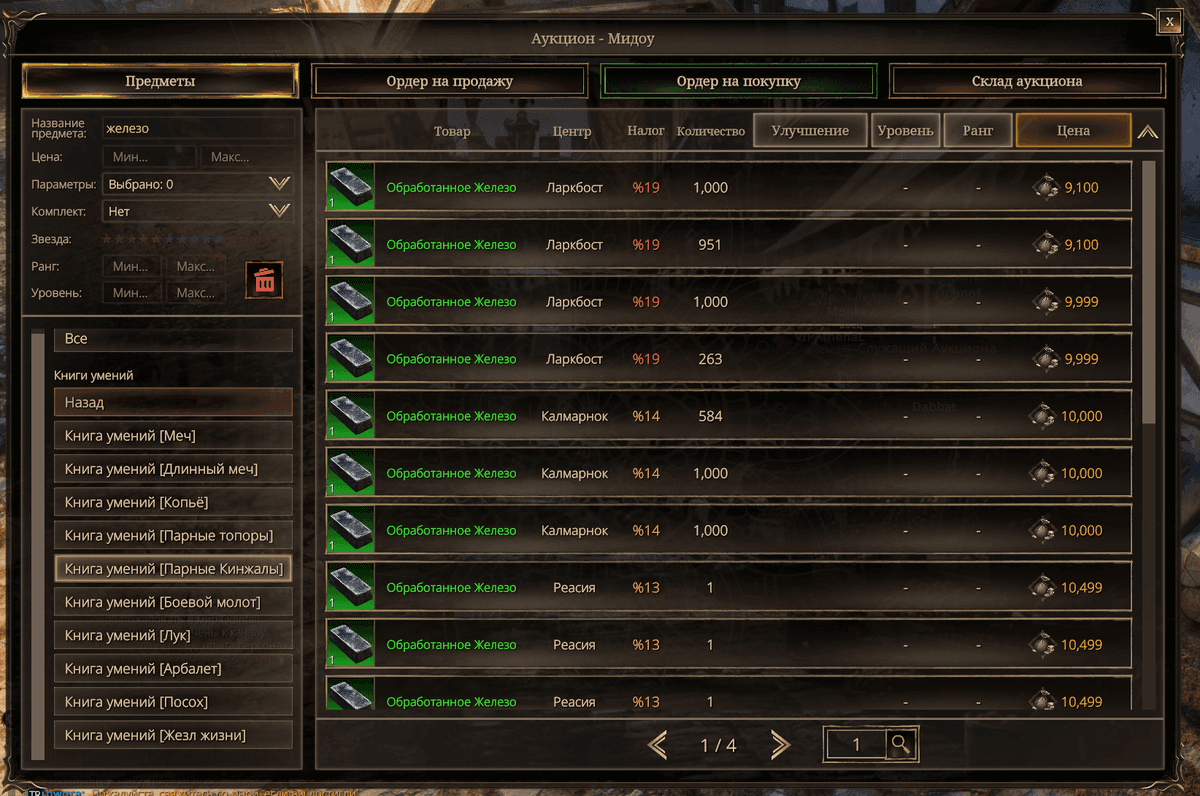
- Type the item name (e.g., processed iron or hemp thread) into the market search bar and submit;
- Click any entry in the resulting item list;
- At the bottom of the window, click the Sell Order button.
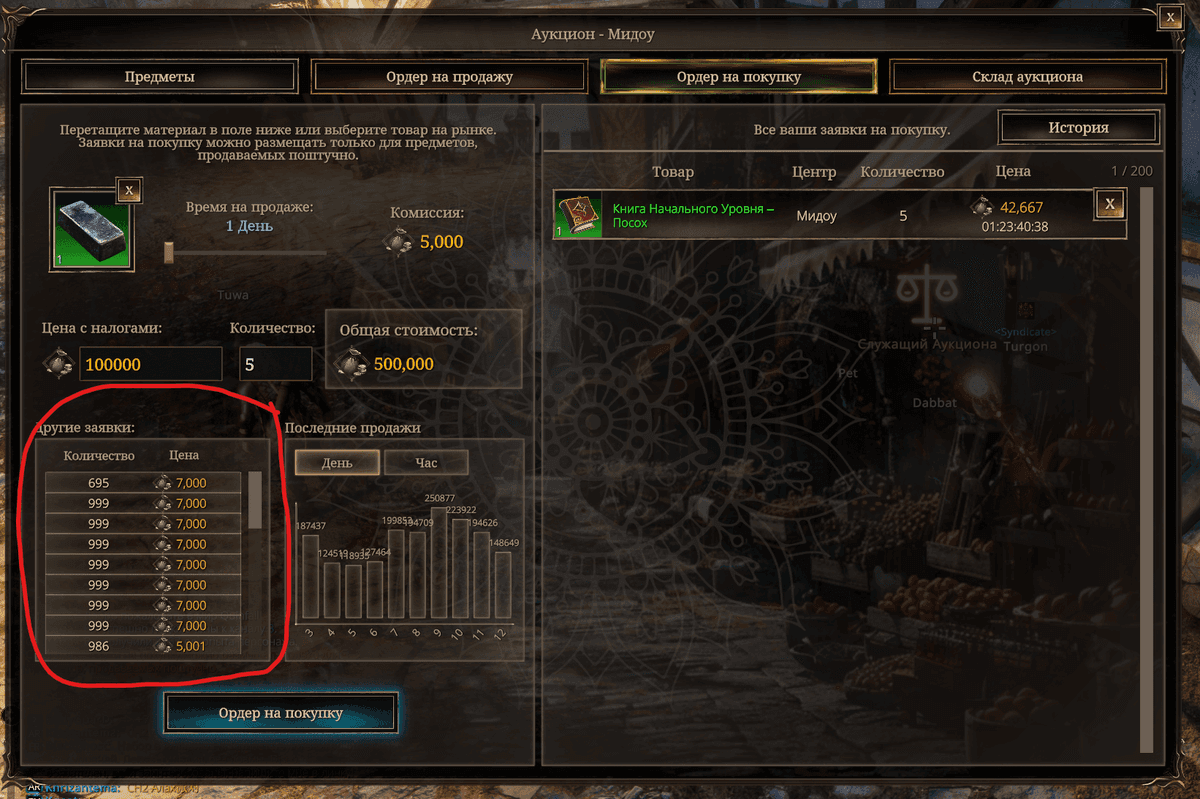
This opens the live order book: an active roster of buy orders indicating offered unit prices and required volumes. If you need immediate liquidity to pay property rent or buy seeds, you can instantly fill an existing buy order without waiting days for your listing to sell.
The Blacklist: High-Value Materials You Must Never Vendor
Many rare drops resemble generic grey vendor junk to untrained eyes. Do not surrender your hardest-earned assets for pocket change. Commit these four categories to memory and never sell them to NPC merchants:
- Prismite — an ultra-rare mineral proc from ore veins. NPC merchants pay a pittance for it, while jewelcrafters on the open market purchase unrefined crystals starting at 70,000 gold each;
- Luck Essences (Weak, Normal, Strong) — dropped by monsters during field combat. These serve as the foundational ingredient for synthesizing all three tiers of Veltryn;
- Riftstones and Rift Scrolls — rewarded from instanced dungeon clears. These provide the alternate catalyst needed for refining high-grade Pure Veltryn;
- Creature Extracts — specialized organic catalysts required for structural bonding in high-tier jewelry assembly and master alchemy.
Daily Token Barter via Key T: Converting Raw Stock into VCoins
Every game day across major regional cities, specialized profession masters (alchemists, smiths, farmers) offer a daily barter exchange accessed by pressing T:
- Exchange Requirements — the master requests exactly 16 units of a specific raw material (rotating daily between sheep wool, raw timber, boar meat, or herbs) and awards 8 profession tokens in return;
- Token Monetization — accumulated tokens can be spent on rare equipment enhancement materials or converted directly into the in-game premium currency: VCoins. This provides a free, steady method to convert surplus gathering stockpiles into premium store utility.
Seven Fatal Mistakes of Novice Crafters
These core rules will safeguard your gold balance and sanity throughout your journey:
- Purchasing Starter Workbenches — never waste 60,000 to 80,000 gold purchasing starter crafting stations or pickaxes from merchants. Clear the introductory storyline in Meadow to claim your full toolset and workbench suite for free;
- Logging Out During Refinement — letting a smelting or sawing timer conclude while offline permanently forfeits all profession experience for that entire production run;
- Leaving Output in Station Buffers — processed items do not drop into your backpack automatically. Leaving items in the output slot blocks the station from accepting new queues;
- Chopping Young Trees — saplings rapidly drain axe durability while yielding negligible lumber. Prioritize mature, thick trunks to maximize log yield per hit;
- Vendoring Prismite and Essences — dumping rare mineral procs and mob drops into NPC shops strips you of tens of thousands of market gold;
- Neglecting Domestic Animal Feed — captive cattle, sheep, and horses require regular rations of Small Livestock Feed; without it, animals starve and die, wiping out your taming investment;
- Purchasing Water on the Market — fresh water and salt water can be harvested indefinitely from any shoreline for free simply by stepping into the water.