EVE Frontier: A New Rider's Guide to the First Hours
EVE Frontier shares a universe with EVE Online, and it comes from the same Icelandic studio, CCP Games — but that's where the family resemblance ends. There's no shared server, no shared characters, and critically, no safe space. Frontier is a survival MMO at its core: you wake up as a cloned consciousness in the wreckage of a broken civilization, and everything from your first module to your own permanent base has to be built by you, from nothing. The game is still in active development and currently distributed through Founder Access, so expect the interface and mechanics to shift between updates faster than in most established MMOs.
The universe spans tens of thousands of star systems (roughly 24,000 by official count), and nearly all of them are dangerous. There's no scripted storyline holding your hand here: guidance only appears the moment you first touch a new mechanic, and after that you're on your own. The second pillar of the game is blockchain: part of your progression and currency (LUX) is tied to a crypto wallet, and the in-game economy is built around genuine ownership of resources. None of that matters for your first hour, but it's worth knowing up front so the wallet prompt doesn't catch you off guard.
Waking Up in the Creche: Your First Ship
You spawn inside the Creche — a temporary birthing chamber that stops existing the moment you leave it. There's no going back once you're out, so don't rush: get comfortable with the basics first, then head into the void. You're sitting in a vessel called Creation, a compact and agile ship with a handful of pre-installed modules. This is the ship you'll use to learn flight, gather your first resources, and print your first gear.
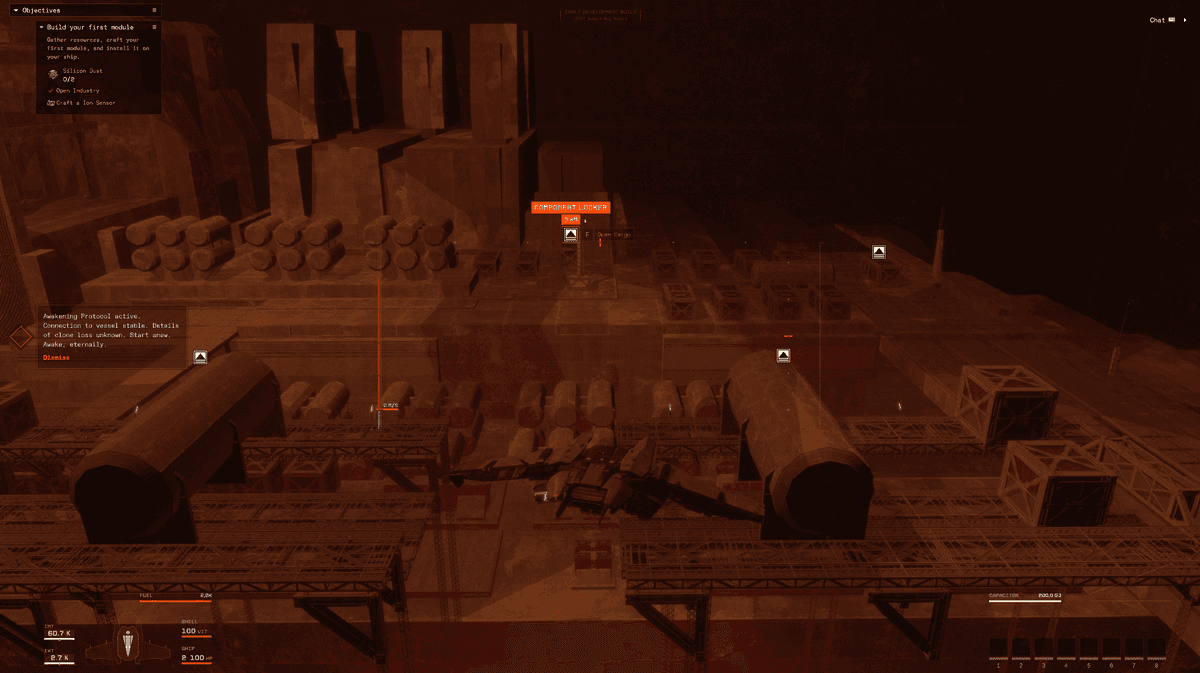
An Objectives panel appears automatically in the top-left corner of the screen, walking you through what to do next — but it only triggers the exact moment you interact with a new system for the first time, never before. If the tutorial isn't showing, or you want to start over, click the star icon in the top-left corner and choose Restart the tutorial, or Skip if you'd rather figure things out on your own.
Reading the HUD: What All Those Numbers Mean
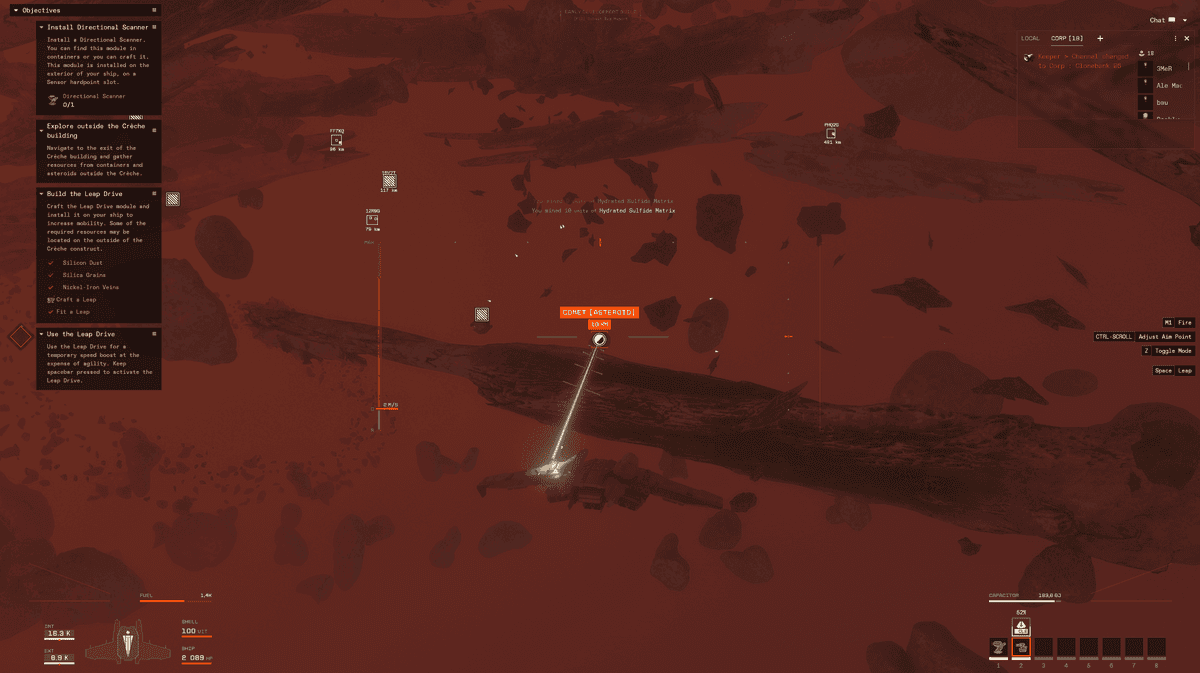
Before you fly anywhere, take a minute to understand what the interface is telling you — otherwise you'll be guessing why your ship is behaving strangely. A vertical thrust bar sits center-screen, running from MAX at the top down to 0 M/S at the bottom. Orange means you're accelerating forward; white means you're reversing or braking. Bottom-right, above your hardpoint slots, sits the Capacitor gauge — this is your action economy. Mining, firing weapons, and afterburners all draw from it. An empty capacitor leaves you dead in space until it recharges by burning fuel.
Bottom-left shows your ship's vitals: Fuel (your remaining tank), Shell VIT (the health of your cloned body), Ship HP (hull integrity), EXT (ambient temperature outside), and INT (your ship's internal heat). Watch EXT closely near stars — overheating your hull is just as lethal as an enemy volley. Just below the hardpoint slots are your active module slots — Scanners, Cutting Laser, weapons — each one toggled on or off with a click or a hotkey, and you can drag them around to rearrange the order.
Hovering over an object in space brings up a context menu with options like Approach, Lock Target, Interact, Show Info, Set Destination, and Align to. For longer trips, a separate warp menu offers choices such as Warp to Within (a set distance from your target) and Add Waypoint. To jettison something, open your Inventory (hotkey I), right-click the item, and select Jettison — this spawns a cargo container nearby that you can dump excess loot into.
Flying Your Ship: No Autopilot Here
This is the part where you need to unlearn old habits. Unlike EVE Online, where you click a point in space and your ship glides there on its own, EVE Frontier puts you in direct, manual control — closer to a flight sim than a point-and-click MMO. Thrust forward and back is E (increase throttle) and Q (decrease throttle, and once you've fully stopped, Q kicks in reverse). Yaw — turning left and right — is A and D. Pitch — tilting up and down — is W and S. If you want to remap any of this, open Esc → Keyboard → Navigation.
The single biggest adjustment for anyone coming from other space games: your ship has momentum. It doesn't stop the moment you let go of a key — it keeps drifting, and you need to actively counter that with reverse thrust or a turn. Until this becomes second nature, keep your speed low; it's far easier to judge your heading and avoid clipping debris or an asteroid at a crawl than at full throttle. C toggles camera alignment and V toggles ship-camera view, both handy when you've lost track of exactly which way your nose is pointing.
Fuel Is Life
Nearly everything in EVE Frontier runs on fuel — no fuel, no modules, no thrust, no capacitor recharge. Your first task inside the Creche is to find a Fuel Cell, a resource container scattered somewhere in the room. Fly up to it and press F to open it; press F again once you're close enough, and its inventory window appears. From there you can hit Loot All, or drag fuel manually into the left-hand panel, which represents your ship's own inventory. If your hold is too small for everything inside, the game will tell you flatly: "No room for more in destination container." Take what fits and expand your cargo capacity later.
The fuel you'll be scavenging on the starting run is called Unstable Fuel. To actually load it into your tank, open the ship management window with Alt+F, which lands you on the Fuel tab. The same window also holds Power Management (Alt+P, for toggling modules on and off) and Install Modules (Alt+H, for fitting new hardware). On the Fuel tab, hit Refuel and the fuel moves from your inventory into your tank.
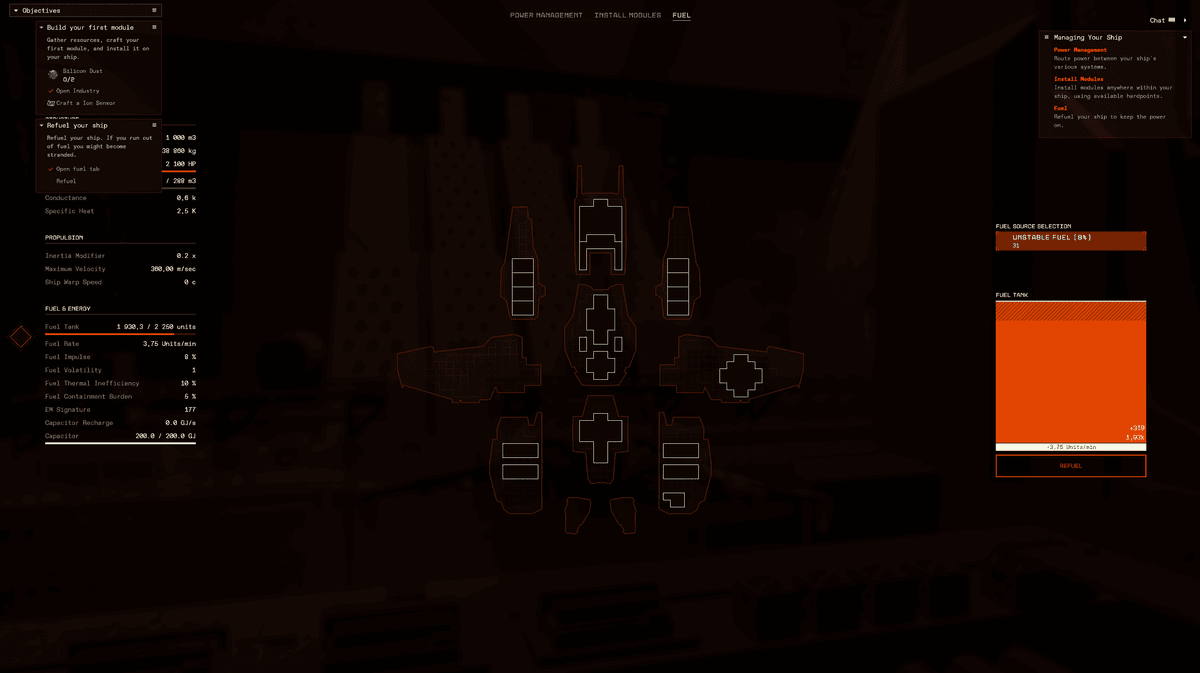
One rule worth committing to memory early: your ship burns fuel constantly whenever a module is powered on, whether you're moving or sitting still. If something isn't actively needed, switch it off from Power Management — it noticeably stretches your range. Burn rate for each module is visible on the Install Modules tab, so you can see exactly what's draining your tank.
Your First Workshop: Emergency Printer and Material Processor
Your Creation comes pre-fitted with two internal tools: the Emergency Printer and the Material Processor. The first prints modules and gear from existing blueprints; the second refines raw ore into usable manufacturing materials. Both open under the same hotkey, Alt+I — the window is called Ship Industry, and it holds a tab for each.
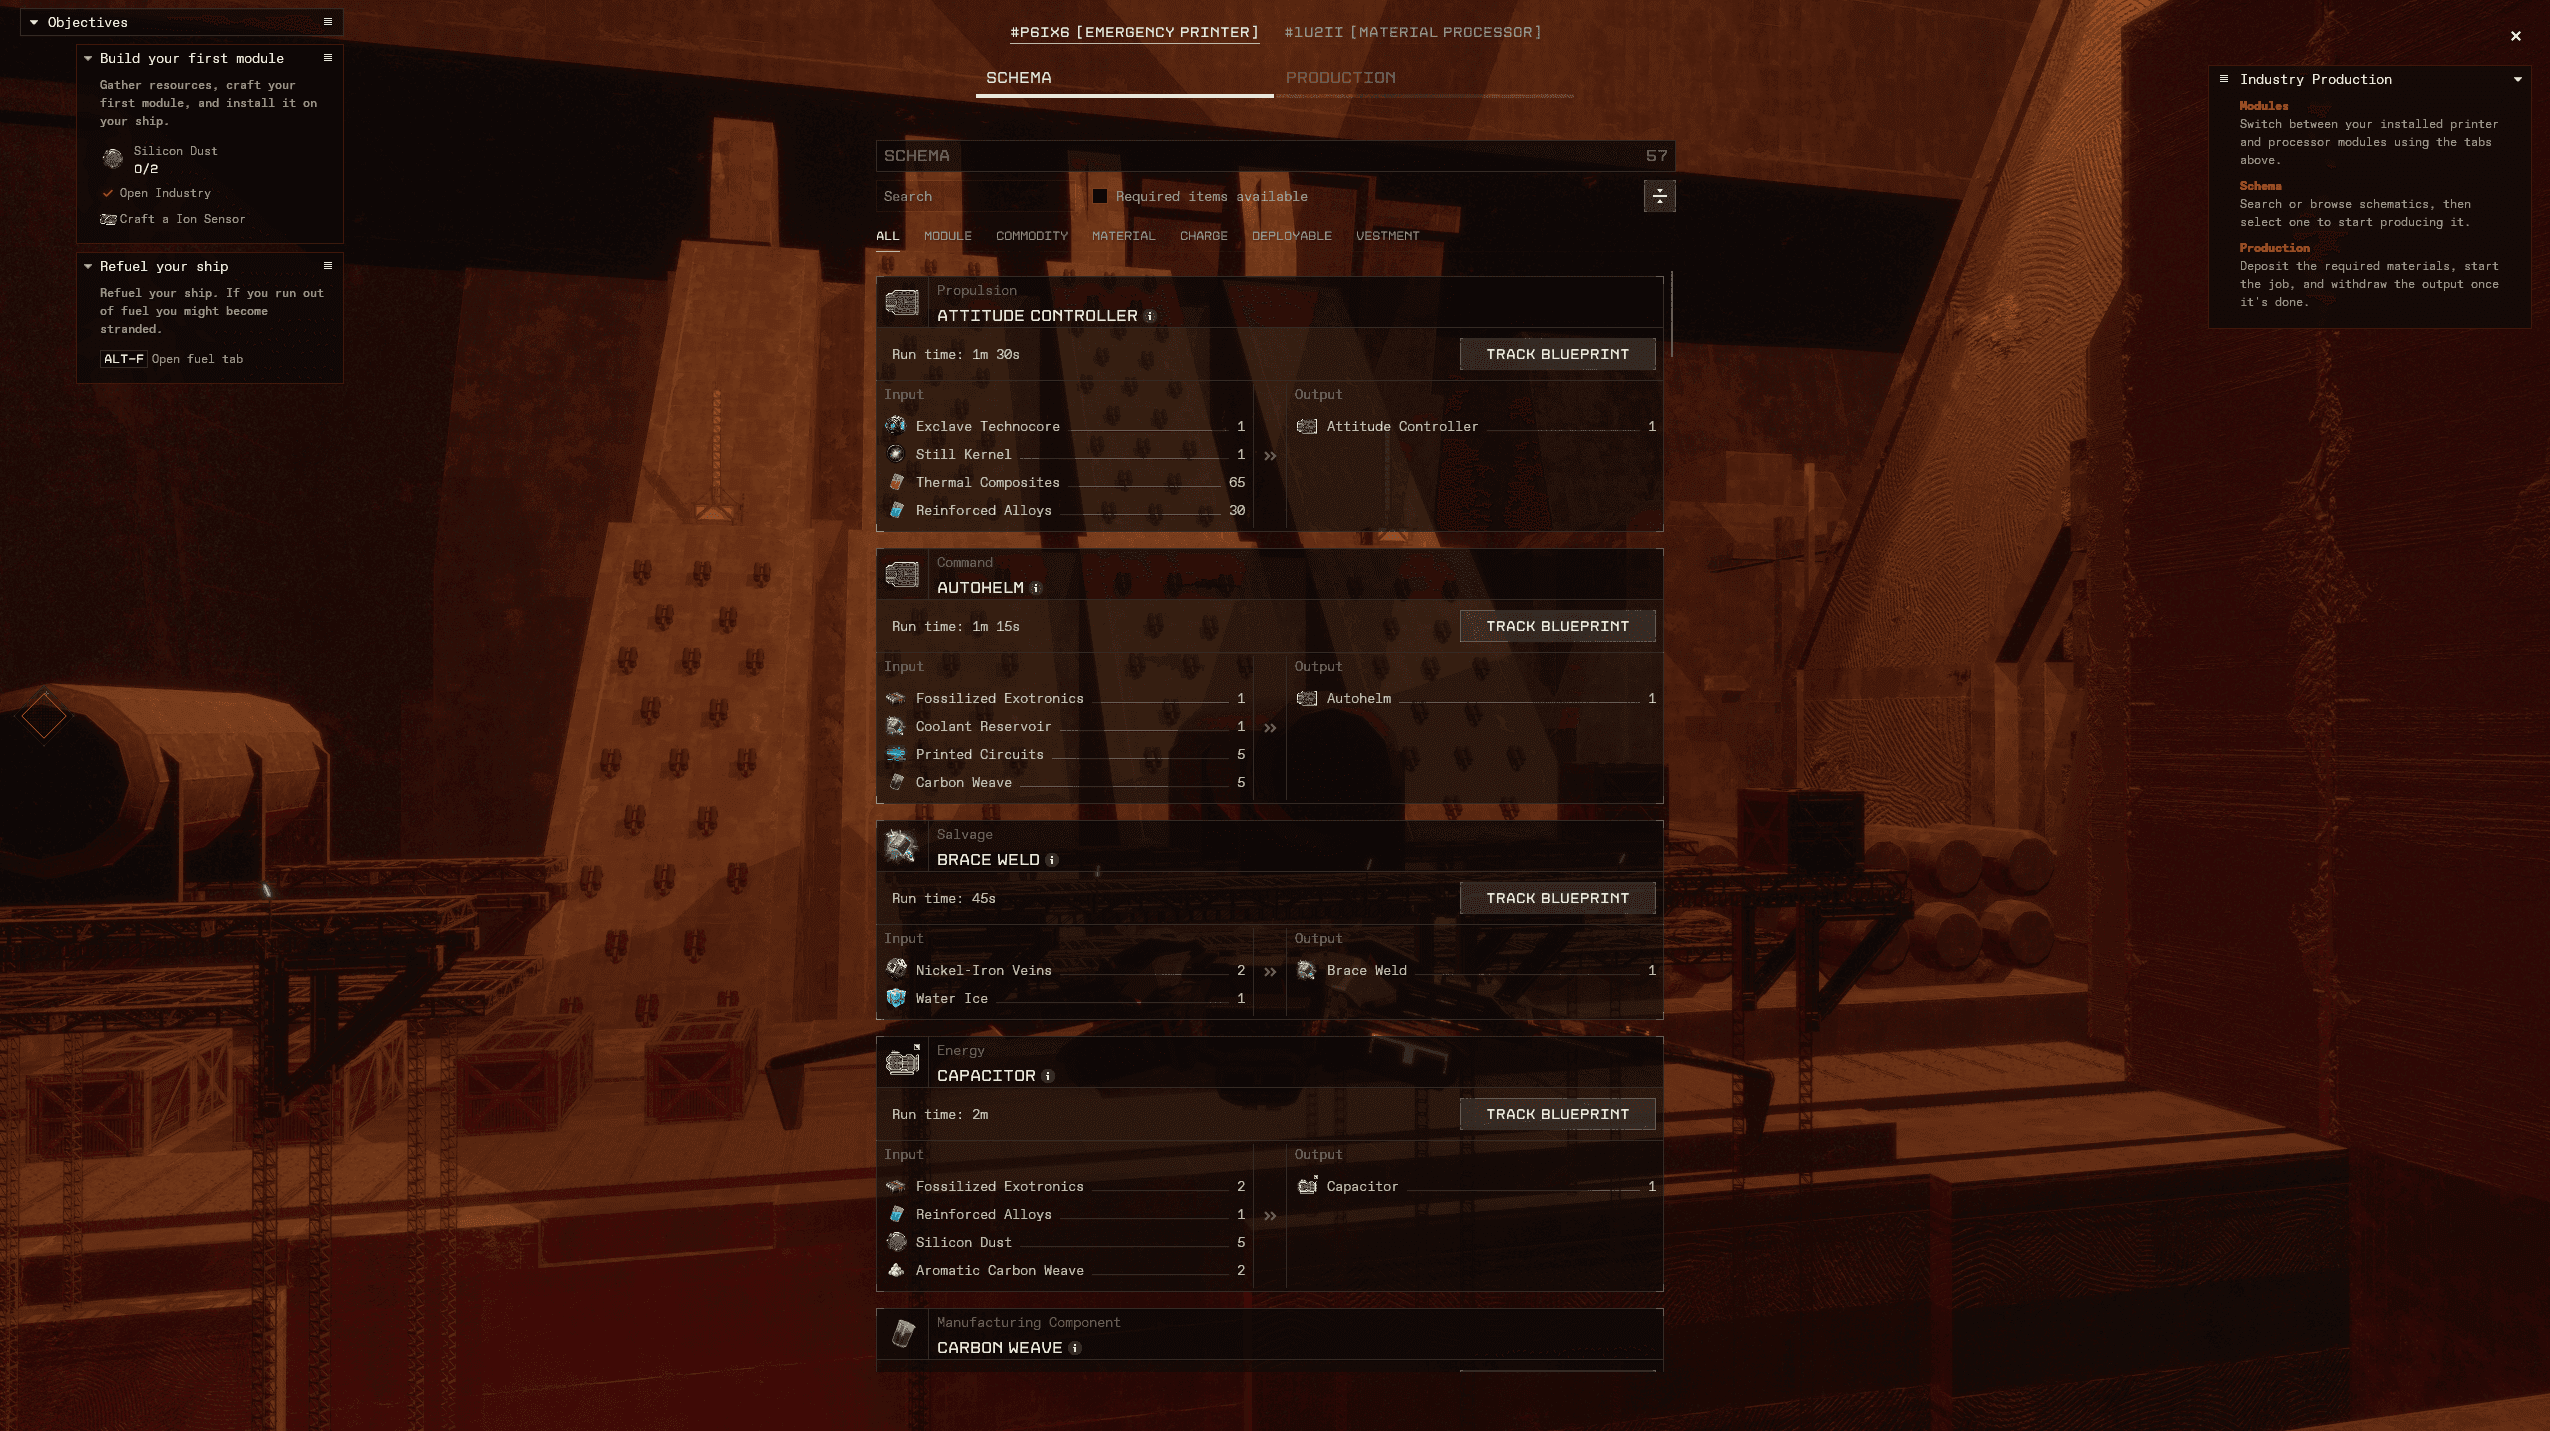
Inside the Emergency Printer are two further sub-tabs: Schema (the list of available blueprints — around fifty of them at the start) and Production (where the actual building happens). To print something: open Schema, find the item you want by scrolling or searching, and hit Select — this drops you onto the Production tab. From there, set your material source (usually Creation, meaning your ship's own hold), click the required resources into their slots, and hit the orange Start button. A timer shows Time per run alongside a completion percentage. Once it's done, click the finished item's icon on the right and choose Creation to pull it into your cargo hold.
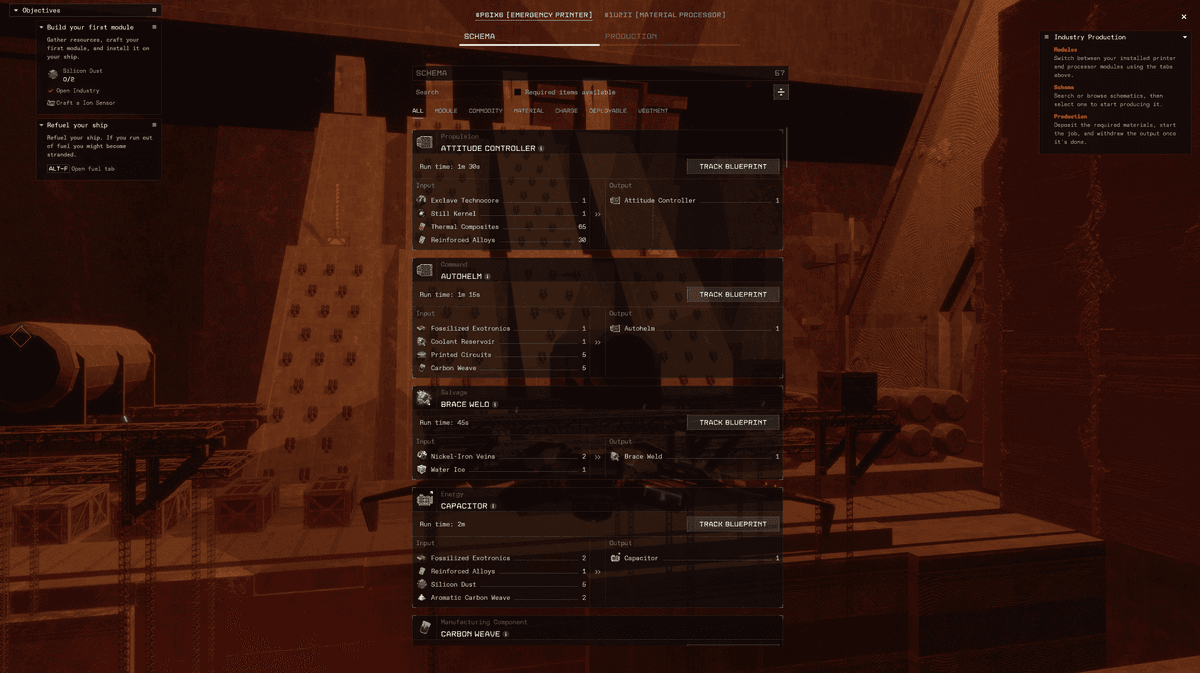
One detail worth knowing early: when depositing or withdrawing materials, you get three click options. Left-click moves the maximum available amount, right-click moves exactly what's needed for a single production run, and Shift+left-click opens a dialog where you can type an exact number. This saves real time once your materials are scattered across several containers and you need a precise count.
Your First Build: The Ion Sensor
Without an active sensor, you're genuinely flying blind — you can see an object's distance and position, but not what it actually is: ore, wreckage, or a threat. Your first production target is the Ion Sensor. A single unit calls for 2 Silicon Dust, which turns up inside Component Lockers scattered around the Creche, the same kind of container that held your Fuel Cell. Open them with F, exactly the same way.
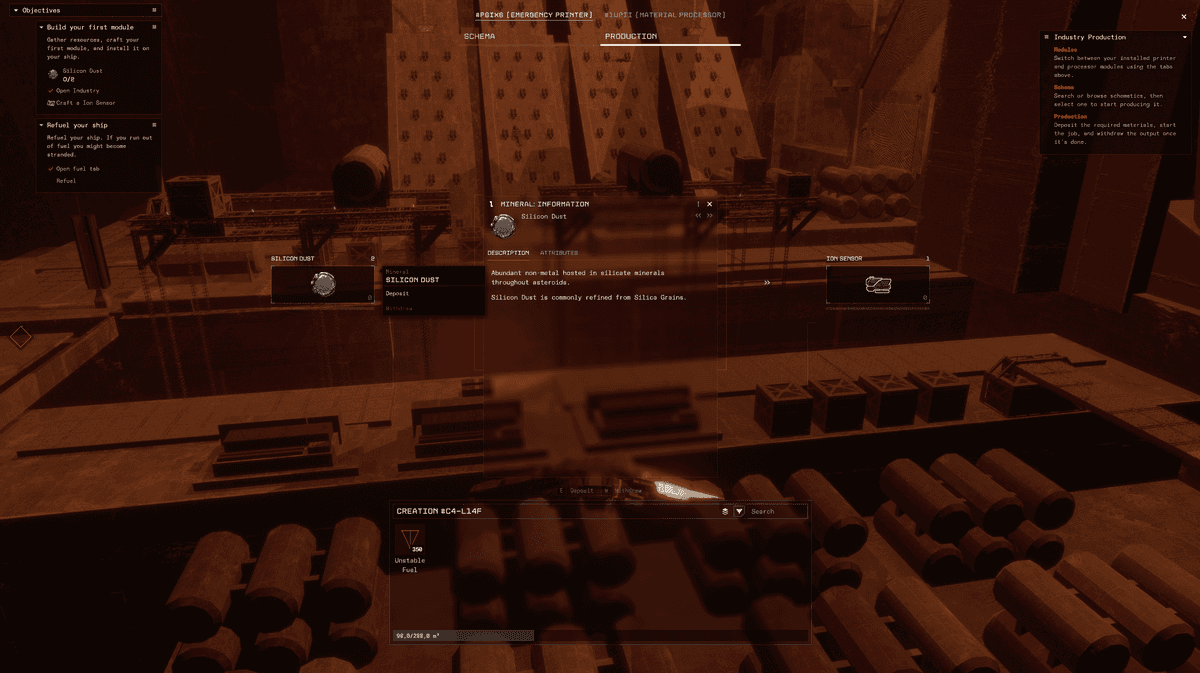
Once you have the Silicon Dust, open Alt+I → Emergency Printer → Schema, find the Ion Sensor, hit Select, drop the materials into Production, and press Start. One run takes roughly 15 seconds. When it finishes, pull the finished sensor into your ship's hold.
Printing the module is only half the job — sitting in cargo, it does absolutely nothing. Open Alt+H (the Install Modules tab), pick Interior Modules on the right side (sensors live in this category), and drag the Ion Sensor onto an open slot in the ship diagram at the center of the screen. Then switch to the Power Management tab, find your newly fitted sensor under Command & Communication, and flip it to Online — a sensor sitting offline scans nothing, no matter how well it's fitted.
Reading Signatures: Making Sense of What's Out There
Once the Ion Sensor is online, you'll start noticing white squares labeled "Unidentified" — these are signatures your sensors haven't resolved yet. Until a signature resolves, all you get is distance and position, never identity. It could be ore, wreckage, another Rider, or a hostile Feral. The closer you fly to a signature, the faster it resolves.
Signatures come in two flavors. EM (electromagnetic) signatures are what the Ion Sensor resolves passively, without any extra input from you. You can speed this up by building and fitting an ION Tube. The second type, GR (gravitational) signatures, needs a separate module — a Gravity Scanner — built and fitted exactly the way you built the Ion Sensor: Component Locker for materials, then Alt+I → Emergency Printer → Schema. A Gravity Chamber boosts that one in turn.
The Ion Sensor also unlocks a hardpoint slot for the Directional Scanner, an active module you have to trigger manually. It picks up ships, structures, and anomalies that your passive sensors simply can't reach. Keep in mind that active sensors burn fuel while running, and sensors left offline make you invisible to passive detection — there's a constant trade-off here between information and staying hidden.
One More Build Before You Launch: The Small Cutting Laser
Before leaving the Creche, gather one more set of materials — this time for the Small Cutting Laser. Like the Fuel Cell and the Component Lockers you raided for the Ion Sensor, the ingredients you need — 1 Fossilized Exotronics and 2 Cinder wrack — are also found in containers right there inside the Creche. Print it the same way as everything else: Alt+I → Emergency Printer → Schema → Small Cutting Laser → Select → Production → Start. Nice bonus here: building the laser also hands you a free Synthetic Mining Lens, without which the laser can't actually mine anything.
Unlike your sensors, the laser is an exterior module, so it's fitted differently: Alt+H → Install Modules → the Exterior Modules tab on the right → drag the laser onto an open hardpoint slot near the bottom of the list. Once fitted, it shows up in weapon slot one, bottom-right of your HUD. The lens needs to be loaded before it's useful, and you've got three ways to do it: click the yellow load icon above the laser icon and pick Synthetic Mining Lens, open your inventory (I) and drag the lens onto the laser icon, or open inventory, right-click the lens, and choose Load Charges. By the time you leave the Creche, you should have both an active Ion Sensor and a loaded laser — your eyes and your only weapon once you're out in the open.
Leaving the Creche: Heat and the Threat of Ferals
Head for the white light in your starting room — that's your exit. Remember: there's no coming back to the Creche once you're gone. Outside is the real Frontier, an active and lethal environment, not just a backdrop for travel.
The first thing worth respecting is thermal mechanics. Stars radiate heat that will slowly cook your hull, so use asteroids, wreckage, and structures as cover from direct radiation — where you position yourself is genuinely a matter of survival. The second threat is Ferals, hostile creatures that lurk in shadows and debris fields. They aggro on sight, and beyond the raw damage, they inflict a debuff called Feralization, which corrupts the bond between your consciousness (Rider) and your cloned body (Shell) — so an unprepared run-in with Ferals can cost you more than just your ship.
Mining: Your First Real Harvest
Now that the laser and lens are with you, you can actually mine. Spot a target — ore or Salvage wreckage — and close the distance. Press X to lock the target; it's not strictly required for mining, but it's a habit worth building early, since a locked target matters a lot once you're in combat and need to track incoming damage. Activate the laser with 1 (or whatever key it's mapped to in the bottom-right slot), line up the crosshair on your target, and hold left mouse button or spacebar — materials start flowing into your hold. Watch your cargo fill level; if it tops out, either jettison what you don't need through Inventory → Jettison, or head back to base to process what you've got. The full loop looks like this: warp to a belt, approach an asteroid, then lock and harvest — activate your mining module, aim, and hold the fire button until the ore comes loose.
The Leap Drive: Closing the Distance
Frontier is enormous, and points of interest sit separated by distances you simply won't cover at starting thrust in anything under an hour. The fix is the Leap Drive, sometimes labeled Leap Module in the interface.
Building one calls for Thermal Composites, Nickel-Iron Veins, Silicon Dust, and Silica Grains — some gathered raw, some produced through refining. Nickel-Iron Veins, Silicon Dust, and Silica Grains all come from refining Cinder wrack: gather 5 units, open Alt+I → Material Processor, find Cinder wrack in the schema list, select it, load the raw material, and hit Start — the refined output lands straight in your inventory. Once the full material list is together, open Alt+I → Emergency Printer, find the Leap Module schema, deposit the materials, run production, and fit it the same way you fitted the Ion Sensor: Alt+H → Install Modules → Interior Modules → drag it into a slot.
Activating the Leap Drive works differently from ordinary thrust: first switch it Online in Power Management, then hit its hotkey in the bottom-right of the HUD (holding spacebar works well by default). Your ship flies in a dead straight line at high speed, with no steering, so make sure your path is clear before engaging. Hitting the same key again disengages it. The trade-off is real: that speed comes at the cost of maneuverability, so this is a tool for covering long distances, not for combat or threading between obstacles.
The Unified StarMap: Choosing Where to Go
Once your ship is mobile and carrying basic sensors, it's time to look at the bigger picture. Press M to open the Unified StarMap, which scales smoothly from a full galaxy view down to local orbital rings just by scrolling. Toggle the [U] SHOW TEMPERATURE switch before jumping into an unfamiliar system or asteroid belt — it'll save your hull from an unpleasant surprise.
Clicking a zone on the map pulls up detailed intel: resource nodes, Feral hotspots, safe corridors. Points you can warp to appear as star clusters and highlight when selected; Lagrange Points and Trojan Belts make some of the best spots for freeform base construction, since they're not tied to any single planet.
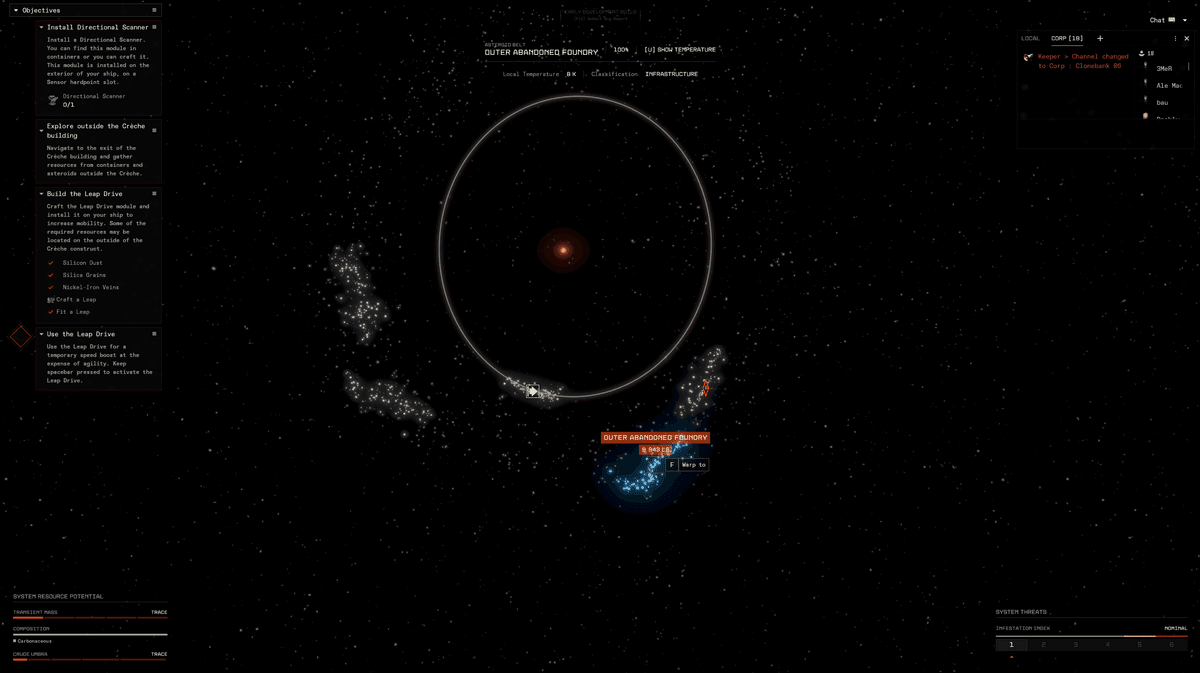
Resource distribution isn't random. Inner belts, closer to the star, are consistently rich in Char and Slag — raw material for industry and early infrastructure — in spots with names like Inner Extraction Yard, Inner Stone Cluster, and Inner Derelict Quarry. Outer belts, out in the cold edges of a system, are the place to look for Comet deposits, feeding more advanced production chains — try zones like Trojan Garden or Outer Vestiges. Keep one thing in mind: resource-rich belts draw a crowd. The exact ore you're after is often exactly what another Rider is willing to fight for, so a profitable mining run starts with good scouting and ends with knowing when to leave, not with greed.
One important warning: once you leave the starting zone through the StarMap, there's no going back — the Creche is gone for good. Make sure you're genuinely ready before you plot that first jump.
Building a Base: From Ghost Building to Your First Refuge
The void doesn't hand you shelter — you build it yourself. Press B to open the Build Menu, also reachable from any terminal. Before you spend a single unit of ore, use Ghost Building, a planning mode that shows a structure as a translucent outline. Until you deposit materials into it, it's just a mockup: move it, rotate it, swap it around as many times as you want, at zero cost.
The first permanent structure worth building is a Refuge — somewhere to dock your ship, refit modules, and let your Shell recover before heading back out. It costs 50 units of Platinum-Palladium Matrix and takes one minute to build, and you can place it almost anywhere. The matrix itself comes from refining Slag Ore mined from Soot Asteroids — use your Ion Sensor and Gravity Scanner to find them, mine with a Small Cutting Laser loaded with a Mining Lens, and refine the haul through Alt+I → Material Processor.
Place the Refuge outline with B, interact with it to open the Construction Depot, deposit the 50 units of matrix, and wait out the one-minute build timer. Once it's finished, use the contextual Bring Online option — only after that can you actually dock inside and get real shelter from the pressure of the void outside.
The next stage of base development is a Network Node, the power source every other structure on your base depends on. It calls for a specific material set: 10 Printed Circuits (2 Silicon Dust + 1 Nickel-Iron Veins per unit), 10 Carbon Weave (25 Hydrocarbon Residue per unit), and 10 Thermal Composites (10 Hydrocarbon Residue + 7 Silica Grains per unit). Place the node through the Build Menu, confirm construction with F (roughly 30 seconds), then load it with a compatible fuel — EU-90, EU-40, SOF 40, SOF 80, D1, or D2 — and hit Start. Only an active Network Node lets you deploy everything else nearby: a Refinery for processing ore at industrial scale, and a Printer for manufacturing beyond what your ship's Emergency Printer can handle.
Death in the Frontier: What You Lose and How You Come Back
Death here isn't a minor setback — it's a real loss. Unlike most other worlds, EVE Frontier has no protected zone you can warp to before logging off: if your ship sits exposed in open space, the Frontier keeps moving without you, and an unattended, idling ship is one of the most common causes of pointless losses. Dock at a Refuge before you log off whenever you can; if you're only stepping away briefly, trigger Emergency Shutdown through Power Management to cut fuel consumption and avoid getting stranded deep in the void.
When your Creation is destroyed, it's gone for good — its modules and configuration have to be rebuilt from scratch, and the more elaborate your fit was, the longer that rebuild takes. Any cargo or resources aboard at the time can end up in someone else's hands if they reach the wreck first. There's also a particularly painful loss: Memories. Every action you take — mining, exploring, fighting, repairing — generates Memories that power up your active Shell. Death wipes out anything you haven't locked in yet; only what you've already committed through the Ascend process survives. Death, in other words, is a risk to your progression, not just your gear.
After destruction, you enter what's called the Death Loop, a system for choosing your respawn point through the map interface. It shows where you died, every available spawn point, and the clones ready to receive your consciousness. You can respawn at any of the game's original starting systems, or at any Refuge you own — the old "set home base" feature has been fully replaced by this on-the-spot choice. Smart disengaging cuts your losses more than aggression ever will: knowing when to warp away or maneuver out of a fight matters, and flying with allies improves both your odds of surviving and your chances of recovering anything from a wreck site afterward.
The Terminal, the Wider Community, and What Comes Next
Your central control panel is the Terminal, reachable from anywhere in the game. It bundles together every core system: Inventory (your ship's hold plus the contents of nearby containers and wrecks), Character (where you lock in Memories, equip crowns onto your Shell, and review combat logs), Wallet (where your LUX — the in-game currency tied to your blockchain wallet — lives), Personal Assemblies (a list of every structure you've built), Creation (your ship's power management), Industry (your ship's manufacturing hub), Corporation (details on your corporation and its recruitment), Fleet (fleet formation), Contacts, Mails, Logs & Messages, Map, and Build.
One section worth calling out specifically is the KEEP Monitor, your command center for the current Cycle (the game's season-like reset structure). The Missions tab lists objectives for every playstyle — exploration, combat, construction, gathering, trading — each one earning you Grace Points. The Leaderboard tab shows how EVE Points get distributed at the end of the Cycle: your reward is based on your rank bracket rather than your exact point total, so players within the same range receive identical rewards. Once a Cycle ends, you have to convert Grace Points into EVE Points through the KEEP Monitor before the window closes — anything left unconverted is lost for good, so keep an eye on the countdown. The Archive tab holds a running record of broadcasts from the KEEP, the game's in-world lore figure, in case you missed an announcement.
For a new player, joining a corporation — Frontier's version of a guild or clan — is one of the most useful moves once you've got the basics down. Shared mining runs, a base that already has a working Network Node, and tips from more experienced players will save you dozens of hours of trial and error. You can find one through the game's official Discord or the recruitment search inside the Corporation section of the Terminal.
Your First-Hour Checklist
Strung together into a single sequence, your opening run looks like this. Wake up in the Creche and take a moment to look around before rushing for the exit. Find a Fuel Cell and a Component Locker, then refuel through Alt+F → Refuel. Gather 2 Silicon Dust, build and fit the Ion Sensor via Alt+I and Alt+H, and switch it on under Power Management. Gather the materials for a Small Cutting Laser, along with its free Synthetic Mining Lens, fit the laser as an exterior module, and load the lens. Head for the white light and leave the Creche, staying clear of direct starlight and ready for a possible Feral encounter. Gather the materials for a Leap Drive, build it, and fit it. Open the StarMap with M, check the heat map and nearby resource points, pick a first short hop — and only then commit to that jump, knowing there's no way back to the Creche once you do.
From here, the real Frontier begins: mining the belts, building out a Refuge and Network Node, first contact with other Riders, joining a corporation, and the slow shift from a lone cloned consciousness into a real presence in the void. The game won't explain anything beyond what you've already run into yourself — but you now have a map for the first steps, and everything past this point is genuinely yours to discover.