
The Warrior in SpiritVale: Who He Is and Who He's For
Warrior is the most straightforward class in SpiritVale and, arguably, the most forgiving one for a newcomer. The game sums him up briefly: a powerful fighter wielding heavy axes and dealing high damage to several targets at once. Behind that description is exactly what you'd expect — you charge in, gather a crowd around yourself, and mow it down with wide swings. There are no resource meters to manage, no stance toggles, no fragile cast chains. Just positioning, combo timing, and damage numbers that keep getting bigger.
The starting stats set the tone immediately: STR 12, AGI 9, VIT 9, with a single point each in INT, DEX and LUK. This is the only base class that opens with a nine in both agility and vitality at the same time — meaning the Warrior hits quickly and takes a punch from his very first minute. Add the highest health growth archetype in the game and you get a character who is forgiven for mistakes that would kill a Mage outright.
The strengths are obvious: strong area damage, excellent survivability for a damage dealer, a simple rotation, and complete self-sufficiency in solo farming. A Warrior doesn't wait for a healer, doesn't fear pulling aggro, and calmly gathers ten monsters at a time — which happens to be exactly how you level in SpiritVale, because there are no quests here and all experience comes from kills.
The weaknesses are worth knowing in advance too. The Warrior works exclusively at melee range: anything that hits from a distance and runs away will irritate you. He has no healing (beyond what sets and items provide), no shields, and no mobility past a single jump. And most importantly, he eats mana — a full area-damage chain drains half your pool, and you have nothing to restore it with except potions, cards, and regeneration from your gear. We'll come back to that separately, because it's the one genuine problem the class has in its first twenty levels.
Who he suits: people who want to learn the game's mechanics without dying every five minutes, people who enjoy gathering a crowd and killing it with one swing, and people who plan to play mostly solo. Who he doesn't suit: fans of ranged combat, players who like the delicate dodge-based style, and anyone who finds it annoying to run to each target by hand. Waiting at the end of the Warrior's road is the Berserker — the same philosophy taken to its logical extreme, with even more aggression and even less regard for defence.
How the Warrior Deals Damage: One Number Decides Everything
Before you spend a single stat point, understand one simple thing: every Warrior combat skill scales from ATK. Open the description of any ability — Bash, Twin Cleave, Vortex Slash, Whirlwind, Stomp — and you'll find the same phrasing every time: Type: Melee, Damage: some percentage of ATK per level. Not one Warrior skill looks at MATK. Not one scales from health or defence. That radically simplifies your planning, because anything that raises your attack raises the damage of all your skills simultaneously.
From that comes the first practical conclusion. In the character window, ATK is displayed as two numbers joined by a plus — for example 134 + 136 on a level 19 Warrior. The first is what your character produces from his own stats; the second is the contribution of equipment and refinement. Sit with that proportion for a moment: at level twenty, your gear is providing roughly as much attack as every point of strength you've ever invested, combined. Which means a Warrior who pumps STR while walking around in an unrefined starter axe will always lose to a Warrior who refined his weapon to +4 and assembled a set.
The second conclusion concerns critical hits. Look closely at the skill tree: the Axe Mastery passive adds +1 crit per level, the Axe Quicken buff adds +4 per level, and the Honed Blade passive raises critical damage by 3% per level. The developer clearly built a critical mechanic into this class, and that opens a second development direction alongside raw strength. In the character window CRIT is also shown as two numbers (10 + 141, for instance); judging by the fact that monsters display a similar pair, the first is crit chance and the second is the critical damage multiplier as a percentage. The interface doesn't spell out the exact formula, so before committing seriously to crit, test the effect in practice.
Which brings us to the third and most important point: you have a built-in damage meter. Hover over a monster, press F, and the lower portion of the inspect window shows a Damage Meter with total damage, DPS, and a percentage breakdown by skill. That's your instrument for verifying any theory from any guide, this one included. Reset your stats at the Waybinder, change the distribution, farm the same pack of monsters before and after, compare the numbers. Given that the reset is free and unlimited, declining to run that test simply isn't rational.
Stats: Where a Warrior Should Actually Invest
You receive stat points with every base level and distribute them by hand in the character window. Let's go through all six attributes using the descriptions from the client — visible when you hover the icon — and set priorities for the Warrior as we go.
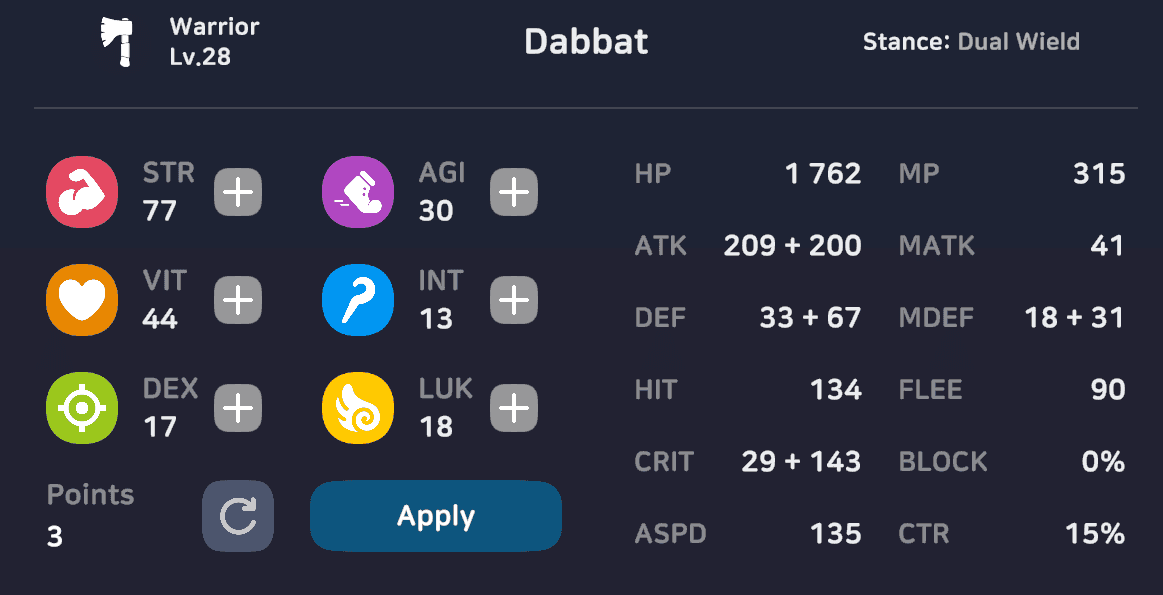
STR (Strength) is the core of the build, no alternatives. The description is direct: it increases melee weapon attack and slightly increases ranged. Since all Warrior damage flows through ATK, every point of strength works on every skill at once. As a bonus you get resistance to Bleed and Stagger — effects applied precisely by the things fighting you at arm's length. Strength is where the bulk of your points go the entire way from level one to fifty.
VIT (Vitality) is the second mandatory attribute. It gives health and defence, plus resistance to Stun and Decay. For a class that stands in the middle of a crowd by definition, that isn't a "just in case" investment, it's a working tool: the longer you live, the more swings you land. The stun resistance is especially valuable here — three seconds lost to a stun while surrounded frequently means death. A practical benchmark for solo farming: keep vitality somewhere around half to two-thirds of what you've put into strength, then adjust by feel. Dying more than once per session? Add VIT. Taking no damage but killing monsters at a crawl? Move points into STR.
Past those two you enter the zone of genuine choice, and here we'll be honest: there is no universal answer, because the game doesn't reveal the exact coefficients converting stats into combat values. Each option does have a clear logic, though.
AGI (Agility) raises evasion and attack speed, and also raises the attack speed ceiling itself — by one point of maximum ASPD for every 30 invested. Plus a little perfect dodge and defence, plus resistance to Slow and Freeze. For a Warrior this is a very natural third stat: between skill casts you're auto-attacking anyway, and the faster those land, the higher your total damage. The starting nine in agility is a hint that the class was designed with it in mind.
LUK (Luck) primarily grows crit chance, with small contributions to critical damage, perfect dodge, attack, accuracy and evasion. It's the stat for the critical direction, which three tree skills already support. It's a workable option, but it needs testing: luck gives a little of everything, and without exact formulas nobody can claim it outperforms pure strength. Verify it on the Damage Meter.
DEX (Dexterity) handles accuracy (HIT) and skill cast speed, adding a little melee attack and attack speed on the side. A Warrior doesn't need to raise it deliberately, but he does need to watch it: if you start missing monsters in a new zone regularly, accuracy is the fix. Compare your HIT against the monster's FLEE value in the inspect window — the game shows both numbers openly, which makes this the easiest problem in the game to diagnose.
INT (Intelligence) is the one stat a Warrior never needs. It grows magic attack, mana and magic defence, and you have no magic skills. The temptation to invest for the mana pool is strong, and it's a trap: the mana problem is far cheaper to solve with regeneration cards and gear than with stat points. The only argument for INT is resistance to Silence and Burning, and you don't build a character around a resistance.
The resulting formula is simple: STR as the foundation, VIT as insurance, AGI or LUK third depending on taste, DEX as needed, INT never. And remember the golden rule of SpiritVale — the stat reset at the Waybinder beneath the Nevaris fountain is free and unlimited. Every recommendation in this section is something you can personally verify in ten minutes.
The Warrior's Skill Tree: All Ten Abilities
The tree opens with K, and you put a skill on your action bar by right-clicking a slot or holding left-click on it. The Warrior has ten abilities in total: six active and four passive. We'll go through each with the exact numbers from the client, because they'll matter in the next section when we start setting priorities.
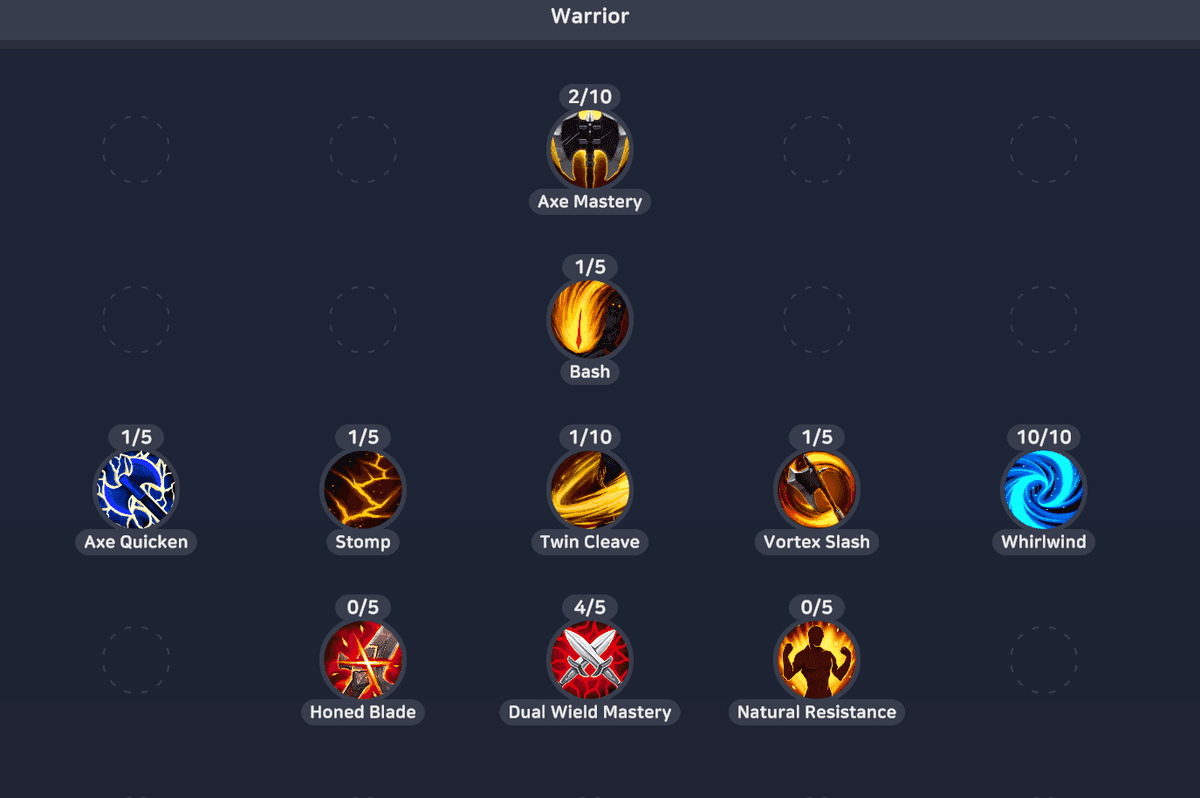
But first, the thing that governs the entire order of investment: skills in the tree are linked by dependencies. Hover over any ability and the ones you need to unlock first will highlight. The chain runs like this — Bash and Axe Mastery are roots and require nothing; Bash unlocks Twin Cleave; Twin Cleave unlocks Stomp and Vortex Slash; Stomp unlocks Axe Quicken; and Whirlwind requires both Twin Cleave and Vortex Slash. In other words, you can only reach the far abilities through the near ones, and sprinting straight to your favourite skill isn't an option. Judging from live characters, a single invested point in the prerequisite is enough to open the next step — so the chain is cheap, but you still have to account for it when planning. The threshold for higher skill ranks is worth double-checking in your own client.
Active Skills
Bash (max 5) is your first attack in the game and the cheapest thing in the tree. It requires an axe, sword or scythe, deals 100% + 60% ATK per level to a single target, and costs a laughable 3 + 1 mana per level — eight units even at maximum. It carries the tag [Combo Ready] 4 seconds, meaning it opens the combo window. There's a chance to stun the target for 3 seconds, but a modest one: 5% per level, so 25% at rank five. Note the Fixed Duration marker — levelling the skill does not extend the stun, only the probability of landing it.
Stomp (max 5) slams the ground for 100% ATK per level across an area of 4, and it has three properties that make it stronger than it looks. First, the Jump tag combined with a cast range of 10 turns it into a gap closer. Second, it's your second combo opener, with the same four-second window. Third, its stun chance is 15% per level — three times Bash's — which reaches 75% at maximum. And notice that Stomp's description has no [Requires] line at all, so it works with any weapon. Cooldown 4 seconds, cost 10 + 5 mana per level.
Twin Cleave (max 10) delivers two wide swings in front of you: 50% ATK per level, two hits, area 5. It requires an axe, sword or scythe and is tagged [Combo Finisher] with a +50% damage bonus. Its greatest virtue is the price — 5 + 2 mana per level, meaning just 25 mana even at rank ten. That makes it the most economical source of area damage in the tree by a wide margin.
Vortex Slash (max 5) is a spinning strike for 120% ATK per level across an area of 8 — the largest of any attack you have — carrying a Pull effect that drags everything it clips toward you. It's also a [Combo Finisher] with the +50% bonus. Cooldown 4 seconds, cost 10 + 5 mana per level. That pull isn't cosmetic, it's a working farming mechanic: gather a scattered pack into one heap, then cover the heap with your next swing.
Whirlwind (max 10) spins for 75% ATK per level, two hits, lasting 3 seconds, area 6, cooldown 6 seconds. Another [Combo Finisher] at +50%. This is your primary clearing tool, and its key detail is hidden in what the description doesn't say. The Self Status Effects block lists only "cannot attack" and "cannot use skills" — movement isn't mentioned, and in practice your character moves freely while spinning. So for three seconds you become a walking mincer: you can wade into a pack, drag it along with you, sweep up the stragglers, and the whole time damage keeps landing across an area of 6. The price for that pleasure is mana: 10 + 5 per level, 60 units at maximum, making it the most expensive skill in the tree. And remember that for those three seconds you've given up your other buttons — you can't cancel the spin at will.
Axe Quicken (max 5) is a self-buff with outstanding return on every point invested. For a flat 20 mana you gain +6% attack speed and +4 crit per level, lasting 60 seconds per level. A single point already gives you a minute of acceleration; the fifth turns it into a five-minute buff worth +30% attack speed and +20 crit. There's no [Requires] line in the description, so despite the name the buff isn't tied to axes at all.
Passive Skills
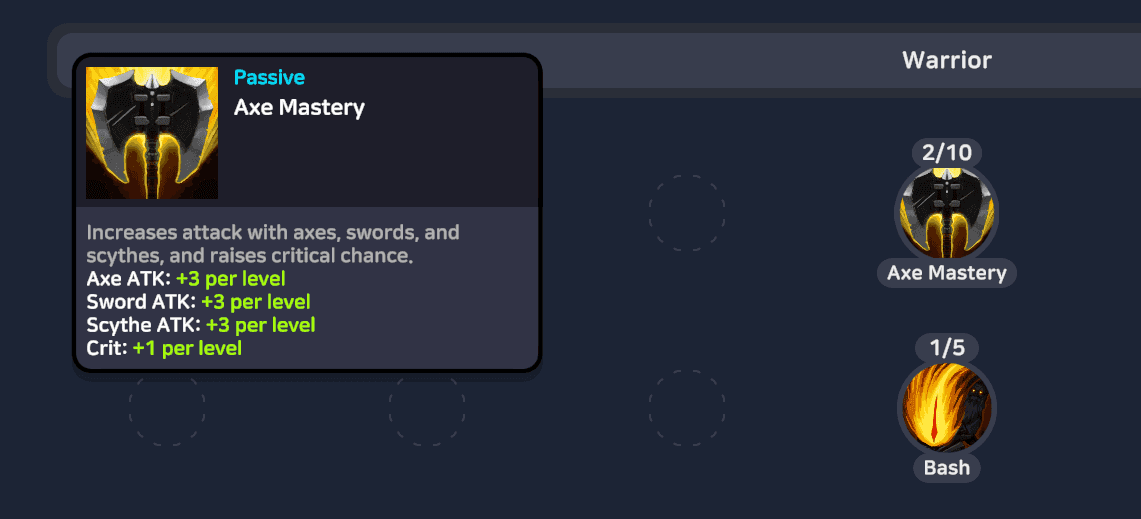
Axe Mastery (max 10) strengthens more than axes despite the name: +3 attack per level for axes, swords and scythes alike, plus +1 crit per level. At maximum that's +30 attack and +10 crit with no conditions, no mana cost and no button to press. For scale, that level 19 Warrior we mentioned had a total attack of 134 + 136 — so thirty points of pure addition is genuinely noticeable.
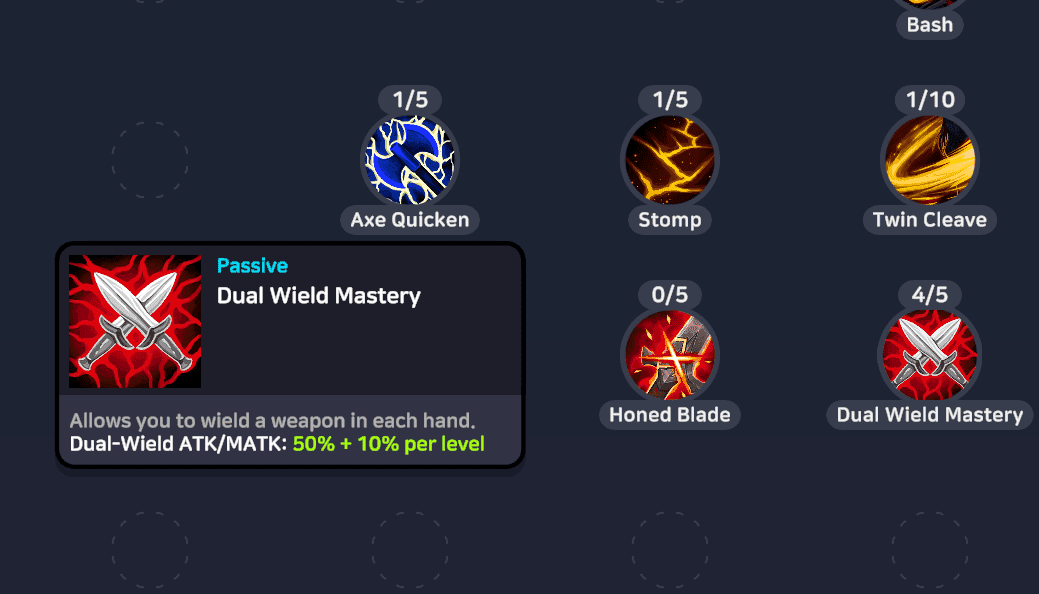
Dual Wield Mastery (max 5) is a mechanic-unlocking passive that opens up fighting with a weapon in each hand. The description reads: Dual-Wield ATK/MATK 50% + 10% per level, so from 60% at rank one to 100% at rank five. The interface doesn't explain how exactly that fraction is applied, so verify the effect empirically: equip the second weapon, check ATK in the character window, unequip it, compare. This is one of those cases where ten seconds in your inventory beats any amount of theorising.
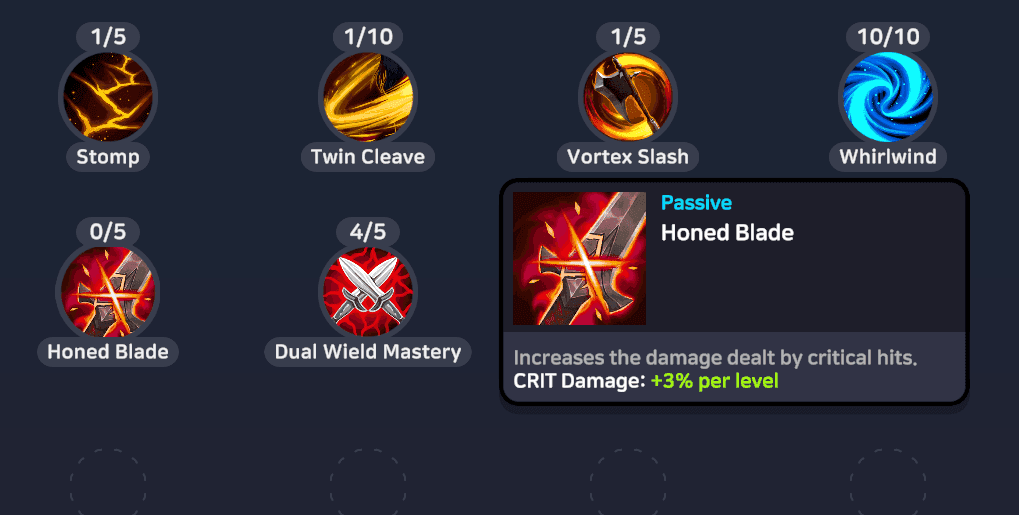
Honed Blade (max 5) gives +3% critical damage per level, up to +15%. It's a pure amplification passive, and it only makes sense once critical hits are actually happening to you regularly.
IMAGE: Honed Blade tooltip
Natural Resistance (max 5) reduces damage taken from every element except Neutral by 3% per level, to a maximum of 15%. It's the Warrior's only defensive passive, and its value is entirely situational: useless on the neutral starting meadows, and increasingly worth its points in elemental zones and against elemental bosses.
The Combo System: How a Warrior Gets +50% Damage for Free
Read the skill descriptions attentively and you'll notice the Warrior's tree is split into two groups by the square-bracket tags. Bash and Stomp are marked [Combo Ready] 4 seconds — these are the openers. Twin Cleave, Vortex Slash and Whirlwind are marked [Combo Finisher] +50% damage — these are the closers. The mechanic is simple: use an opener, a four-second window opens, and a finisher used inside that window hits one and a half times as hard.
Take a moment on the scale of that. One and a half damage against one is the difference between comfortable farming and misery. A Warrior who spams Whirlwind on its own is voluntarily giving up a third of his damage. And the openers are deliberately cheap — Bash runs 4 to 8 mana — so the combo costs almost nothing in resources while the payoff is enormous. That's why the very first thing to drill is the chain itself, before you start thinking about stats or refinement.
Here's what it looks like in practice. For farming packs: fly into the group with Stomp, which closes the distance, hits an area, and has a solid chance to stun, then use Vortex Slash in the window that just opened, pulling the scattered monsters back to you and covering them with an area of 8. Finish with Twin Cleave, or drop into Whirlwind — and this is where its best quality shows up, because you keep moving during the spin, so you can roll straight through the pack, scoop up the stragglers, and grind everything down at once.
For single targets and bosses the chain is different: Bash as the cheap opener, then Twin Cleave or Vortex Slash as the finisher. Whirlwind works against a single target too — it doesn't stop you moving — but remember those three seconds where you can neither attack nor cast. If the boss has a phase coming up that you need to interrupt with a specific ability, don't start spinning right before it.
A couple of practical notes. The combo window lasts four seconds, which is comfortably generous — no need to rush, but no dawdling either. Keep your opener on the first or second bar slot with the finishers next to it, so the chain fires without looking. And don't forget Axe Quicken before you drop onto a farming spot: one press for 20 mana buys anywhere from one to five minutes of faster attacks, which means a faster return to your next combo.
Skill Priority: Why You'll Have to Choose
Start with the arithmetic that reshapes all your planning. Add up the maximums of every Warrior ability: Axe Mastery 10, Twin Cleave 10, Whirlwind 10, Bash 5, Stomp 5, Vortex Slash 5, Axe Quicken 5, Dual Wield Mastery 5, Honed Blade 5, Natural Resistance 5. That's 65 points for the complete tree. Skill points arrive one per job level, and the base class hits its ceiling at fifty. The fifteen-point gap isn't a miscalculation, it's the design: maxing everything before job advancement is impossible.
The good news is that this isn't a life sentence. After you become a Berserker your job level resets with a new ceiling of 70, and those seventy points can be spent on the advanced tree or the base one. So the passives you left underlevelled get finished later. But your first fifty job levels — which is dozens of hours — will be lived with a trimmed-down set, and what you choose determines how fast that whole stretch goes. Double-check the exact point totals in your client, since Early Access numbers shift from patch to patch.
Now the logic of choosing. Judge a skill not by its absolute power but by its return per point — adjusted for the tree's dependencies. Even the most efficient ability has to be unlocked through its prerequisites, and that changes the order in which you invest.
Axe Mastery is the most honest passive in the game. Three attack per point works always: in auto-attacks, in every skill, inside combos. No mana, no button, no conditions, no prerequisites — you can start pouring into it from your very first job level.
Twin Cleave is the key to the whole tree. It isn't just the best damage-to-mana ratio you have (5 mana plus 2 per level, twenty-five at maximum — half of Whirlwind's cost), it's also the mandatory step toward Stomp, Vortex Slash and through them everything else. Even if it were mediocre you'd have to level it. Fortunately, it's excellent.
Vortex Slash pays for itself from the first points, less through damage than through the pull and that area of 8. Gathering a pack saves more time than a few percent of damage ever will, and it opens Whirlwind besides.
Whirlwind is the Warrior's main farming skill. It maxes at ten, hits twice for 75% ATK per level across an area of 6, and — most importantly — doesn't interfere with movement, so you roll through the pack collecting stragglers while the damage lands on its own. That's why a grinding build deserves to max it rather than leaving it leftover points. The one constraint is the mana cost, so it's comfortable to level once you've solved your regeneration problem.
Axe Quicken offers the best return per point of any buff. One point is +6% attack speed, +4 crit and a full minute of uptime; five points make it a five-minute buff you simply refresh between spots. The catch is that it unlocks through Stomp, and Stomp through Twin Cleave. Three points spent getting there is hardly a loss, though — you need Twin Cleave under every scenario, and Stomp gives you a gap closer and a stun.
The remaining passives are candidates for "later." Dual Wield Mastery gets taken when a second worthwhile weapon actually shows up in your inventory; before that the point sits there doing nothing. Honed Blade only makes sense with crit assembled — otherwise you're amplifying hits that barely happen. Natural Resistance is insurance for elemental zones and bosses, and it's dead weight on the neutral meadows of the early levels.
Putting it all together with dependencies in mind, the investment order runs like this: a point into Bash as the root combo opener, then Twin Cleave, which both deals damage and unlocks half the tree; in parallel, points into Axe Mastery, which depends on nothing. Then Vortex Slash for the pull, a point each into Stomp and Axe Quicken to pick up the gap closer and the buff — and after that, Whirlwind and Twin Cleave to maximum as your primary damage sources. The bottom-row passives get finished last, or after job advancement entirely.
Two Ready-Made Builds for Job Level 50
Theory is theory, but it's easier to start from a concrete layout. Below are two options costing exactly fifty points — what you'll have by the time you advance. Both are arithmetically checked, both work, and the difference is one of emphasis. Treat them as a starting position rather than doctrine: the skill reset is free, and you'll always have time to bend the build toward your own style.
Build A — "Pack Farming" for Fast Levelling and Grinding
- Axe Mastery — 10
- Twin Cleave — 10
- Whirlwind — 10
- Vortex Slash — 5
- Axe Quicken — 5
- Stomp — 5
- Bash — 1
- Dual Wield Mastery — 4
The logic is simple: maximum clearing speed on a farming spot. Three area damage sources cover every situation — Vortex Slash gathers the pack, Twin Cleave mows it down cheaply, Whirlwind finishes expensively and painfully. Stomp supplies the gap closer and the stun on the way in, Axe Quicken hangs in the background as a permanent buff. Bash is deliberately left at rank one: its role here is a cheap combo opener and a mandatory step toward Twin Cleave, and levelling its single-target damage makes no sense when you're hitting areas anyway. The four points in Dual Wield Mastery are a bid for dual wielding if you have the weapons for it; if you don't own a second decent axe or sword, move them into Bash or Honed Blade instead. The tree's dependencies are satisfied in this layout: Bash opens Twin Cleave, Twin Cleave opens Stomp and Vortex Slash, Stomp opens Axe Quicken, and Twin Cleave plus Vortex Slash together open Whirlwind.
Build B — "Single Target" for Bosses and Careful Play
- Axe Mastery — 10
- Twin Cleave — 10
- Bash — 5
- Vortex Slash — 5
- Axe Quicken — 5
- Stomp — 5
- Honed Blade — 5
- Natural Resistance — 5
Here we give up Whirlwind — the very skill that strips your ability to react for three seconds — and invest in reliability instead. Bash at maximum delivers 400% ATK to a single target for eight mana with a quarter chance to stun. Stomp at maximum pushes its stun chance to an imposing 75%, turning from an attack into a control tool. Honed Blade amplifies the crits that Axe Mastery and Axe Quicken are already supplying you, and Natural Resistance shaves 15% off damage from every element — against elemental bosses that's considerably more meaningful than it sounds on paper.
What to Do With the Other Seventy Points
After the switch to Berserker your job level resets with a new ceiling of 70, and those points can go into either tree. Fifteen of them are enough to finish everything you left unfinished in the base tree, and the rest flow into the new abilities. Which yields a piece of forward-looking advice: don't rush to top up the base tree the moment you advance. Put one point into each new ability first, see what they change about your rotation, and only then distribute the remainder.
Weapons and Stances: Axe, Sword, Scythe and Dual Wielding
Hidden here is a fact that saves newcomers dozens of hours of pointless farming. Every Warrior attack skill — Bash, Twin Cleave, Vortex Slash, Whirlwind — lists Axe, Sword, Scythe on its [Requires] line. Not "axe," but any of the three. On top of that, the Axe Mastery passive gives an identical +3 attack per level to axes, swords and scythes despite its name. In other words, the class has no attachment to axes at all: take whatever dropped best in terms of stats, bonus lines and card slots.
That matters especially at the start. The Warrior begins with an axe, but the Craftsman in Sunny Meadows doesn't sell axes — his list is a knife, a sword, a mace and a shield, all for bundles of Flax. The sword on that list is a completely functional weapon for you: every skill works with it, and your mastery strengthens it. Your first axes will come from drops instead — from the Bees in Sunny Meadows 2, for instance, where an axe falls at a 4% chance and the Broad Sword drops in the same place.
Now for stances. Weapon descriptions carry a Stances line, and swords and axes usually list One-Handed, Two-Handed and Dual Wield, with your current stance shown in the character window next to your name. The one-handed stance leaves your left hand free for a shield, two-handed commits to the weapon's weight, and dual wield requires both the Dual Wield Mastery passive and a second weapon in your off hand.
Is dual wielding worth pursuing? The passive's description reads Dual-Wield ATK/MATK 50% + 10% per level, so from 60% at the first point to 100% at the fifth. How exactly that fraction is applied isn't explained by the interface — so rather than theorising, take a direct measurement: equip the second weapon, note your ATK in the character window, unequip, compare. Bear two more things in mind. First, two weapons mean double the weight, and going over your carry limit slows you down. Second, attack speed depends on the weapon, and heavy combinations swing slower, so watch your ASPD every time you change gear.
The practical takeaway for a beginner: don't spend points on Dual Wield Mastery until two genuinely good one-handers appear. A single refined axe with four card slots is almost always better than two random pickups off the ground. But when a pair of decent blades does turn up in your loot, the passive pays for itself and becomes one of the Warrior's most visible upgrades.
Mana and Survivability: The Warrior's Real Problem and How to Close It
Let's do the honest arithmetic. A full area chain at high skill ranks — Stomp at 35 mana, Vortex Slash at 35, Whirlwind at 60 — costs 130 mana. That level 19 Warrior had a total pool of roughly 260. Which means two chains and you're standing in the middle of an angry crowd with an empty bar, swinging auto-attacks. That isn't a flaw in your build, it's how the class is constructed: the Warrior pays mana for the right to kill in packs.
The first and most important solution isn't a stat — it's cards and gear with mana regeneration. And here SpiritVale hands the Warrior an unexpected gift: ordinary bees on the starting meadows drop cards granting MP Regen +25%, and they exist in two different slot types — Bee Card for your weapon and Bumblebee Card for an accessory. And you wear two accessories. These cards cost you a few dozen dead bees to farm (roughly a 0.5% chance) and they close the exact problem that drives other players to dump points into intelligence they'll never otherwise use.
The second solution is a smarter rotation. The cheap skills exist for a reason: Bash at 4–8 mana and Twin Cleave at 7–25 let you keep up pressure while your pool refills for the expensive abilities. Open with Bash rather than Stomp when you don't need the stun; finish with Twin Cleave rather than Whirlwind when the pack is already nearly dead. Whirlwind is not the "kill everything" button — it's the tool for genuinely large gatherings.
The third is unglamorous potions. They're crafted at the Craftsman in the very first zone for Flax, they drop from monsters at a decent rate (3–4% in nearly every early drop table), and keeping a full stack in your inventory is normal practice, not an admission of weak play.
Survivability is more straightforward, but there are nuances. Beyond VIT, the Warrior has three sources of durability that newcomers forget. The complete Novice set from the first zone grants Lv.1 Heal, Lv.1 Haste and Lv.1 Cure — self-healing, a speed buff and status cleansing for a class that has none of those anywhere in his tree. Don't take it off until you find an equivalent replacement. Health Leech appears on weapon bonus lines and in accessory descriptions; for a character who strikes often and across an area, that's effectively endless regeneration. And Natural Resistance in the tree cuts up to 15% of damage from every element if you're farming somewhere elemental.
A separate word on encumbrance. The Warrior carries heavy things: an axe weighs plenty, a second weapon doubles the load, and mountains of loot pile up while you farm. Exceed the weight limit and your character starts slowing down, turning farming into a slog. The standard fix is to break down the junk at a field Craftsman with Dismantle All, or sell it to merchants. And the Forest Set from the forest zones grants Weight Limit +500 as its full set bonus — for a Warrior, one of the most useful early set effects in the entire game.
Gear, Cards and Artifacts for a Warrior
We established earlier that equipment supplies roughly as much attack as every stat point you've invested. Which means choosing it deserves more of your attention than arguments about stat distribution. Let's take it layer by layer.
Your weapon is refinement priority number one. Every upgrade level raises base attack, and base attack is what all your skill percentages multiply against. An axe with 20 attack hits for 28 at +4, and that's before bonus lines. Remember the Early Access trap: the first refinement levels succeed at 100% for pocket change, but the +4 to +5 attempt already sits at 60% success, 5,000 gold and a shard per try, with a level lost on failure. A sensible target for a beginner is taking your main weapon to +4, then investing further only if the item is a long-term keeper.
What counts as a long-term keeper? SpiritVale has no coloured rarity grades: every copy of an item is generated with its own random bonus lines, its own potential and its own number of card slots. Two identical axes can differ enormously in value. In bonus lines, a Warrior wants Str, Atk and Atk percentage, Crit and Crit Damage, and Health Leech above all. Lines like Magic Damage or Matk are garbage for you — dismantle that one without hesitation. And compare duplicates by holding LShift before you throw anything away.
Armour. The early route is obvious: the full Novice set with its Heal, Haste and Cure carries you to the forest zones, where the Forest Set takes over and adds that weight limit bonus. Past that, aim for defence, health and the same strength-flavoured lines. Don't forget there are no class restrictions on armour in this game — a Warrior can wear anything, and the only question is what the stats say.
Cards. A clear priority trio takes shape for the Warrior. First, the mana regeneration we discussed: Bee Card in the weapon, Bumblebee Card in an accessory. Second, direct attack and crit additions in your weapon slots. Third, anything granting life steal or resistances. Check a card's slot type before you commit an evening to farming a specific monster for it — the same effect can exist in both a weapon and an accessory version, and you're wearing two accessories.
Artifacts occupy four slots: Rune, Jewel, Scroll and Relic. The early Pioneer set drops right in the starting zone and its full bonus gives +1 to all stats, health and mana regeneration, and +3 to both attack and magic attack. At low levels that's substantial — on a level 8 character the complete Pioneer set raised health from 722 to 877 and mana from 118 to 169. When choosing later sets, look for lines mentioning ATK, STR, HP and physical damage, and leave sets like Arcanum with their magic damage bonuses to the casters, even if that's what dropped for you first.
And on gems: they slot only into artifacts, one per artifact, and nearly all their power comes out through refinement at the Gem Smith — lines reading "+2% per refinement level" give you almost nothing on a +0 stone. For a Warrior it's worth hunting gems for attack speed, critical damage, life steal, and amplification of the specific skills in your rotation. Watch for the [Unique] marker in some stone descriptions: only one copy takes effect, so you can't duplicate the bonus across all four artifacts.
The Levelling Route: From the Meadows to Job Advancement
SpiritVale has no quests, so you chart your own route by the level ranges printed on the world map. Below is the Warrior's path with notes on what to actually do at each stretch. One habit applies to the whole journey: when you arrive somewhere new, find the teleport crystal on the minimap and activate it first thing. Waypoints don't work until you touch them, and running across half the map on foot will have worn you out by level twenty.
Levels 1–5, Sunny Meadows 1. Collect the Waystone from the Waybinder, head north, and hit dandelions. Pollen drop Flax at a 100% rate, and Flax is the local Craftsman's currency. Your first goal is the complete Novice set (Chest, Legs, Shoes) for the set bonus with Heal, Haste and Cure, plus a stack of potions. If your starting axe feels weak, a sword crafts there for 30 Flax — and as a reminder, all your skills work with it. Pioneer artifact pieces drop from Pollen alongside everything else, so collect them without worrying about duplicates.
Levels 6–10, Sunny Meadows 2. The Bees here are your first genuinely valuable spot. This is where you'll find an axe at a 4% chance, the Broad Sword, and above all the Bee Card with its mana regeneration, which solves your biggest problem for dozens of hours to come. By level ten you should have the full Pioneer set assembled and the Bash into Twin Cleave chain drilled to reflex.
Levels 11–20, the forest zones. Forest Field 1, then your choice of Forest Field 2, Treant Trail or Nevaris Sewers. The Forest Set appears here with its Weight Limit +500 — for you that's less a combat upgrade than a logistical one, but it changes the comfort of farming radically. The forests are also where elements start mattering for the first time: the local wisps come in water, earth and fire varieties, so build the habit of pressing F before you settle in and checking the vulnerability multipliers.
Levels 21–30. Bunny Woods or Festering Woods 1, then Festering Woods 2, Lake Field or Windy Desert. By now you have every key skill and farming becomes an assembly line: Stomp on entry, Vortex Slash to gather, Whirlwind to finish. This is also where you should start deliberately hunting giants — oversized versions of ordinary monsters with roughly seven times the health and tripled drop chances. For a Warrior with area damage and a deep health pool, they're ideal prey.
Levels 31–50. Mystic Lake, Fairy Glen, the desert fringes, then Swamp, Goblin Field and Forgotten Depths. This is where your equipment gets its real examination: if you've spent the whole time farming without refining a weapon or collecting cards, monsters will start feeling frankly bloated. That's a natural moment to slow down, break down the junk you've accumulated, invest in refinement, and go get the cards you're missing.
And the general rule that matters more than any specific zone name: don't overstay. Job Level is the bottleneck of your entire progression and it grows slower than your base level. If the Job bar is barely creeping, the local monsters have stopped being worth your time and it's time to move on. The one legitimate exception is deliberately farming a specific card or material.
A word on groups is worth adding. Playing in a party raises both experience and drop rates, with the bonus scaling up to twelve people. A Warrior is a welcome guest in that kind of group: he gathers monsters into a heap with Vortex Slash, where the mages and archers bury them. Even committed solo players should look into Party Search from time to time — over a long stretch it's noticeably faster.
Eight Mistakes New Warriors Make
Ignoring combos. The most expensive mistake on the list: spamming one skill instead of running the opener-to-finisher chain means voluntarily giving up +50% damage on every hit. No amount of refinement and no stat distribution compensates for that.
Spreading stats thin. A jack-of-all-trades character loses consistently in SpiritVale. Strength and vitality are the core; everything else comes only after the core is assembled.
Pumping INT for mana. Understandable logic, wrong decision: intelligence adds not a single point of damage for you, and the mana problem is far cheaper to solve with a regeneration card and potions.
Starting the spin for nothing. Whirlwind is great because you can move and gather monsters during it, but for three seconds you can neither attack nor cast. Firing it at one straggler, or right before a boss phase you need to interrupt with a specific ability, throws away the most expensive skill in your tree.
Refining starter gear to the ceiling. Refinement costs gold and materials, and you'll replace the first zone's kit within a couple of evenings. Up to +4, by all means — beyond that, only on items you plan to live with.
Selling or dismantling duplicates without looking. Since bonus lines and potential are random, one of two identically named items can be markedly better than the other. Ten seconds comparing with LShift saves hours of farming.
Farming monsters that resist your element. The F inspect window reports resistances as honestly as it reports weaknesses. Hitting a water monster with water damage means losing a quarter of your output for nothing, when somewhere one zone over lives something your attacks land on with a bonus.
Being afraid to experiment. The stat and skill reset at the Waybinder is free and unlimited. The only irreversible decision a Warrior makes across all fifty job levels is his choice of advanced class. Everything else can be replayed at any moment — so test your hypotheses on the Damage Meter instead of arguing about them in chat.
What Comes Next: The Move to Berserker
On reaching job level 50 you head into the Windy Desert and speak to the local Class Master, who's marked on the zone's minimap. The zone's levels sit considerably below your base level by then, so nobody's asking you to farm it — you just need to get there. Open the waypoints along your route in advance so the trip doesn't cost you half an hour.
After the change the Warrior becomes a Berserker — described by the game as a raging juggernaut who cleaves enemies with heavy weapons and thrives in combat without rules. Your job level resets with a new ceiling of 70, the base tree and every point in it are preserved, and your stats, base level and equipment are untouched. Four new abilities open up: Wild Charge, Execute, Cyclone and Berserk. Judging by the names and the class description, that's a gap closer, an execute, another spinning attack and a rage mode — but check the exact numbers in your client, because balance patches land several times a week. Note also that the four abilities shown on the class preview aren't necessarily the whole advanced tree; community reports mention additional Berserker skills built around attack speed and health siphoning, so treat the preview as a headline rather than a complete list and read the tree yourself once it opens.
The main tactical news of the advancement was mentioned earlier, but it's worth repeating: those seventy new points spend on both the advanced tree and the base one. Which means everything you left unfinished across your first fifty job levels — Whirlwind, the passives, Dual Wield Mastery — gets completed here. A sensible order: one point into each new ability first, to understand how they reshape your rotation, then plug the holes in the base tree, and only then deepen whatever you genuinely enjoyed.
There's also an alternative you need to know about in advance: any base class at job level 50 can become a Weaver instead of its standard specialisation, with that master waiting in the distant Starfall Tundra. It's a hybrid built on support and flexible damage, generally not recommended for newcomers, and the choice is irreversible. A Warrior who becomes a Weaver will never be a Berserker, so make that decision before you talk to a master, not after.
To sum up the whole road: the Warrior in SpiritVale is a class that rewards attentiveness rather than complexity. A drilled two-button chain, a dozen points in the right passives, a weapon refined to +4, and a couple of mana regeneration cards — and you're clearing packs where other players are killing monsters one at a time. Start with Bash and Twin Cleave in your first levels, reach Vortex Slash by ten, assemble Novice and Pioneer on the meadows, and after that the world around Nevaris will show you where to go. See you out on the spots.
Frequently Asked Questions About the Warrior
Is the Warrior a good pick for a first character? Yes, one of the best. He has the highest health growth in the game, a simple two-button rotation, and complete self-sufficiency when playing solo. He forgives mistakes, and learning the game's mechanics on him is far more comfortable than on a fragile caster.
Do I have to use an axe? No. Every attack skill accepts an axe, sword or scythe, and the Axe Mastery passive strengthens all three equally. Take whatever is better in stats and slots.
How much should I put into vitality? There's no exact formula, but a working benchmark for solo farming is roughly half to two-thirds of what you've invested in strength, adjusted by what actually happens. Dying more than once a session? Add VIT.
Is dual wielding worth it? Only when you have two genuinely good one-handed weapons. A single refined axe with card slots is almost always better than two random ones. And measure the ATK change in your character window before and after — the passive's description doesn't reveal the exact mechanic.
Why do I keep missing? Not enough accuracy. Compare your HIT in the character window against the monster's FLEE in the F inspect window — the game shows both openly. The fix is points in DEX or gear with accuracy bonuses.
Where does all my mana go? Into area skills: Stomp plus Vortex Slash plus Whirlwind at maximum ranks costs around 130 mana. The solution is MP Regen cards from the bees on the starting meadows, potions, and a more economical rotation through Bash and Twin Cleave.
Can I just take the skill I like straight away? No — abilities are linked by dependencies, and reaching the far ones means unlocking the near ones. Bash leads to Twin Cleave, that to Stomp and Vortex Slash, Stomp to Axe Quicken, and Whirlwind requires both Twin Cleave and Vortex Slash. Only Axe Mastery depends on nothing and is available from your first job level.
Is it true that Whirlwind roots you in place? No. The description forbids only attacking and using skills; your character can still move during the spin. Players use exactly that, rolling through a pack and collecting stragglers while the damage is landing.
Can I max the whole tree? Not before job advancement: the complete tree needs 65 points and you'll have around fifty by job level 50. After the switch to Berserker another seventy points arrive, spendable on both trees, and that's when the base tree can be finished off entirely.
Can I change my mind and not become a Berserker? Before you speak to the master, yes — any base class can go to Weaver instead. After the conversation the choice is irreversible and switching means a new character. Stats and skills, however, reset free as many times as you like.
Every number in this guide comes from the SpiritVale client as of late July 2026, Early Access version 0.30.x. The game patches several times a week, so specific values are worth re-checking in the skill descriptions themselves — the underlying build logic changes far more slowly.