What SpiritVale Is and Why Everyone Suddenly Knows Its Name
SpiritVale is a class-based action MMORPG wrapped in soft, cheerful low-poly visuals, and it hit Steam Early Access on July 15, 2026. The art style is the friendliest thing about it. Underneath sits a deliberately old-fashioned game: no quest chains, no exclamation marks floating over NPC heads, no auto-pathing, no tutorial holding your hand through the first hour. You walk out of the city gate, you hit a monster, you pick up what it dropped, you make your gear a little better — and somewhere around hour fifteen you realise you've been doing exactly that the whole time and enjoying it. The developer names Ragnarok Online as the main inspiration outright, and it shows in everything from the dual level bars to the cards that fall out of monsters.
Part of the buzz is the game itself, and part of it is the story behind it. SpiritVale was built essentially by one person — Australian developer Phil Yum, working under the Baikun Interactive banner in Melbourne, with a volunteer team of artists and moderators around him. The Kickstarter that ran in June 2026 asked for AU$75,000 and closed at AU$357,436 from 3,066 backers, roughly five times the goal. Early Access then peaked above 20,000 concurrent players on Steam. For a solo project those numbers are extraordinary, and they were also the problem: the first week was mostly a fight against a backend that had never been asked to carry that kind of crowd.
The commercial model is refreshingly simple. SpiritVale is buy-to-play — you pay once, around $15, and that's it. No subscription, no energy timers, and an in-game shop limited to cosmetics and convenience items. All servers are linked, so your characters and your items follow you between them; picking the "wrong" server to play with friends isn't a mistake you can make. And there are no wipes planned now that Early Access has started — the one wipe happened back in June 2026 when the playtest ended, and it was announced well in advance. Whatever you build from here is yours through to full release.
Now the honest part, because a guide that skips it isn't doing its job. As of late July 2026 the game is going through textbook Early Access growing pains. The flood of players and bots pushed the developer to shut off the free demo, and then to temporarily disable player trading, vending stalls and the Auction House while the item infrastructure gets rebuilt. Guild storage went down for the same reason on July 25. The team has said all three are due back within days rather than weeks, so if you're reading this later there's a good chance the economy is humming along again — check the Steam patch notes for the current state before you plan around it. Steam reviews sit at Mixed, around 63% positive, and that split is almost entirely about stability rather than design. Everything that isn't trading works, patches land several times a week, and concurrent player counts were still hovering near 10,000 two weeks after launch.
What's actually in the box right now: more than 30 maps, over 230 monster types, 20-plus world bosses, seven base classes branching into eight advanced ones, parties of up to 12, guilds, and a PvP arena. The developer expects Early Access to run six to twelve months. In other words, there is already far more game here than a beginner can chew through — and this guide exists to make sure you don't spend your first ten hours discovering things the game never bothered to tell you.
Your First Twenty Minutes: Nevaris, the Waystone, and Where to Walk
Character creation ends and you're standing in Nevaris, the game's hub city, with no marker on screen and nobody telling you what to do. That's intentional. So here's the shortcut: walk to the fountain in the middle of town and talk to the NPC called Waybinder. He hands you a Waystone, a return stone that teleports you back to your saved point whenever you double-click it in your inventory. It isn't consumed on use, so it works forever. Take it seriously — your legs are the primary transport in SpiritVale, and the Waystone is the single item that will save you the most walking over the next few hundred hours.
The same Waybinder does something even more important, and most new players don't find it for days: he resets your stats and skills for free, with no limit. Not a paid service, not once per week, not a cash-shop item — free, forever. That single design decision removes the great terror of Ragnarok-style games, which is ruining your build with a bad point allocation at level 12. You cannot ruin anything here. Dump twenty points into the wrong stat, hate the result, walk back to the fountain, redo it. Experiment aggressively; the game is built to let you.
While you're in town, note the rest of the service NPCs, because you'll be coming back to all of them. The Blacksmith refines your gear, and the Material Vendor standing next to him sells the stones that refining eats. Weaver pulls cards back out of equipment. Gem Smith handles gems, Artificer handles essences, and Mira runs the storage vault, which is shared across every character on your account. Each of these systems gets its own section further down. For now, the useful thing to know is that everything administrative lives in Nevaris, and everything else happens in the field.
Once you've got the Waystone, head north. That's Sunny Meadows 1, the starter zone for levels 1–5, with Sunny Meadows 2 (levels 6–10) waiting behind it. The first monster you'll meet is a Pollen — an overgrown dandelion with a level of 1 and 120 HP that exists to die and teach you the loop. Movement is WASD, skills sit on the number keys 1 through 9, and you have a dodge roll with a short window of invulnerability baked into it. That roll is not decoration. Learning to press it into an incoming boss attack is the difference between a character who fights bosses and a character who watches them.
A handful of keys the game won't mention and you genuinely need. K opens the skill window — that's where your job level points get spent, and if you don't open it, you're leaving free power on the table every few minutes. To get a skill onto your action bar, right-click an empty bar slot (or press and hold left-click on it) and pick the ability from the dialog that pops up; there's no drag-and-drop from the skill tree, which trips up almost everyone. V picks up loot lying on the ground. And F opens the monster inspect window, which shows a target's stats, element, elemental multipliers, and its complete drop table with exact percentages. That window is the most powerful tool in the game and it gets a full section of its own later.
Two last habits before you head out, both about the world map. First, there's a search bar at the top of it: type in the name of any item and the game highlights the zone where it drops with a blue square. That one feature replaces about half of what you'd normally go to a database site for. Second, maps that contain a teleport waypoint are drawn with a thicker border on the world map — but the waypoint is not active until you physically find the glowing crystal in that zone and touch it. Make it a ritual: arrive somewhere new, check the minimap, spend sixty seconds walking to the crystal, activate it. You can't teleport to a waypoint you never opened, and the hour of backtracking you avoid later is not hypothetical.
You also can't really wander into a zone that kills you by accident, as long as you read. Every zone portal is labelled with its level range — Sunny Meadows 2 shows Lv. 6–10 right on the sign — and the entrance previews which monsters live inside. Between the portal labels, the map search, and the F inspect window, SpiritVale quietly hands you the information that other MMOs make you leave the client to find. The players who struggle in their first evening are almost always the ones who didn't realise those tools were there.
The Class System: How It Actually Works
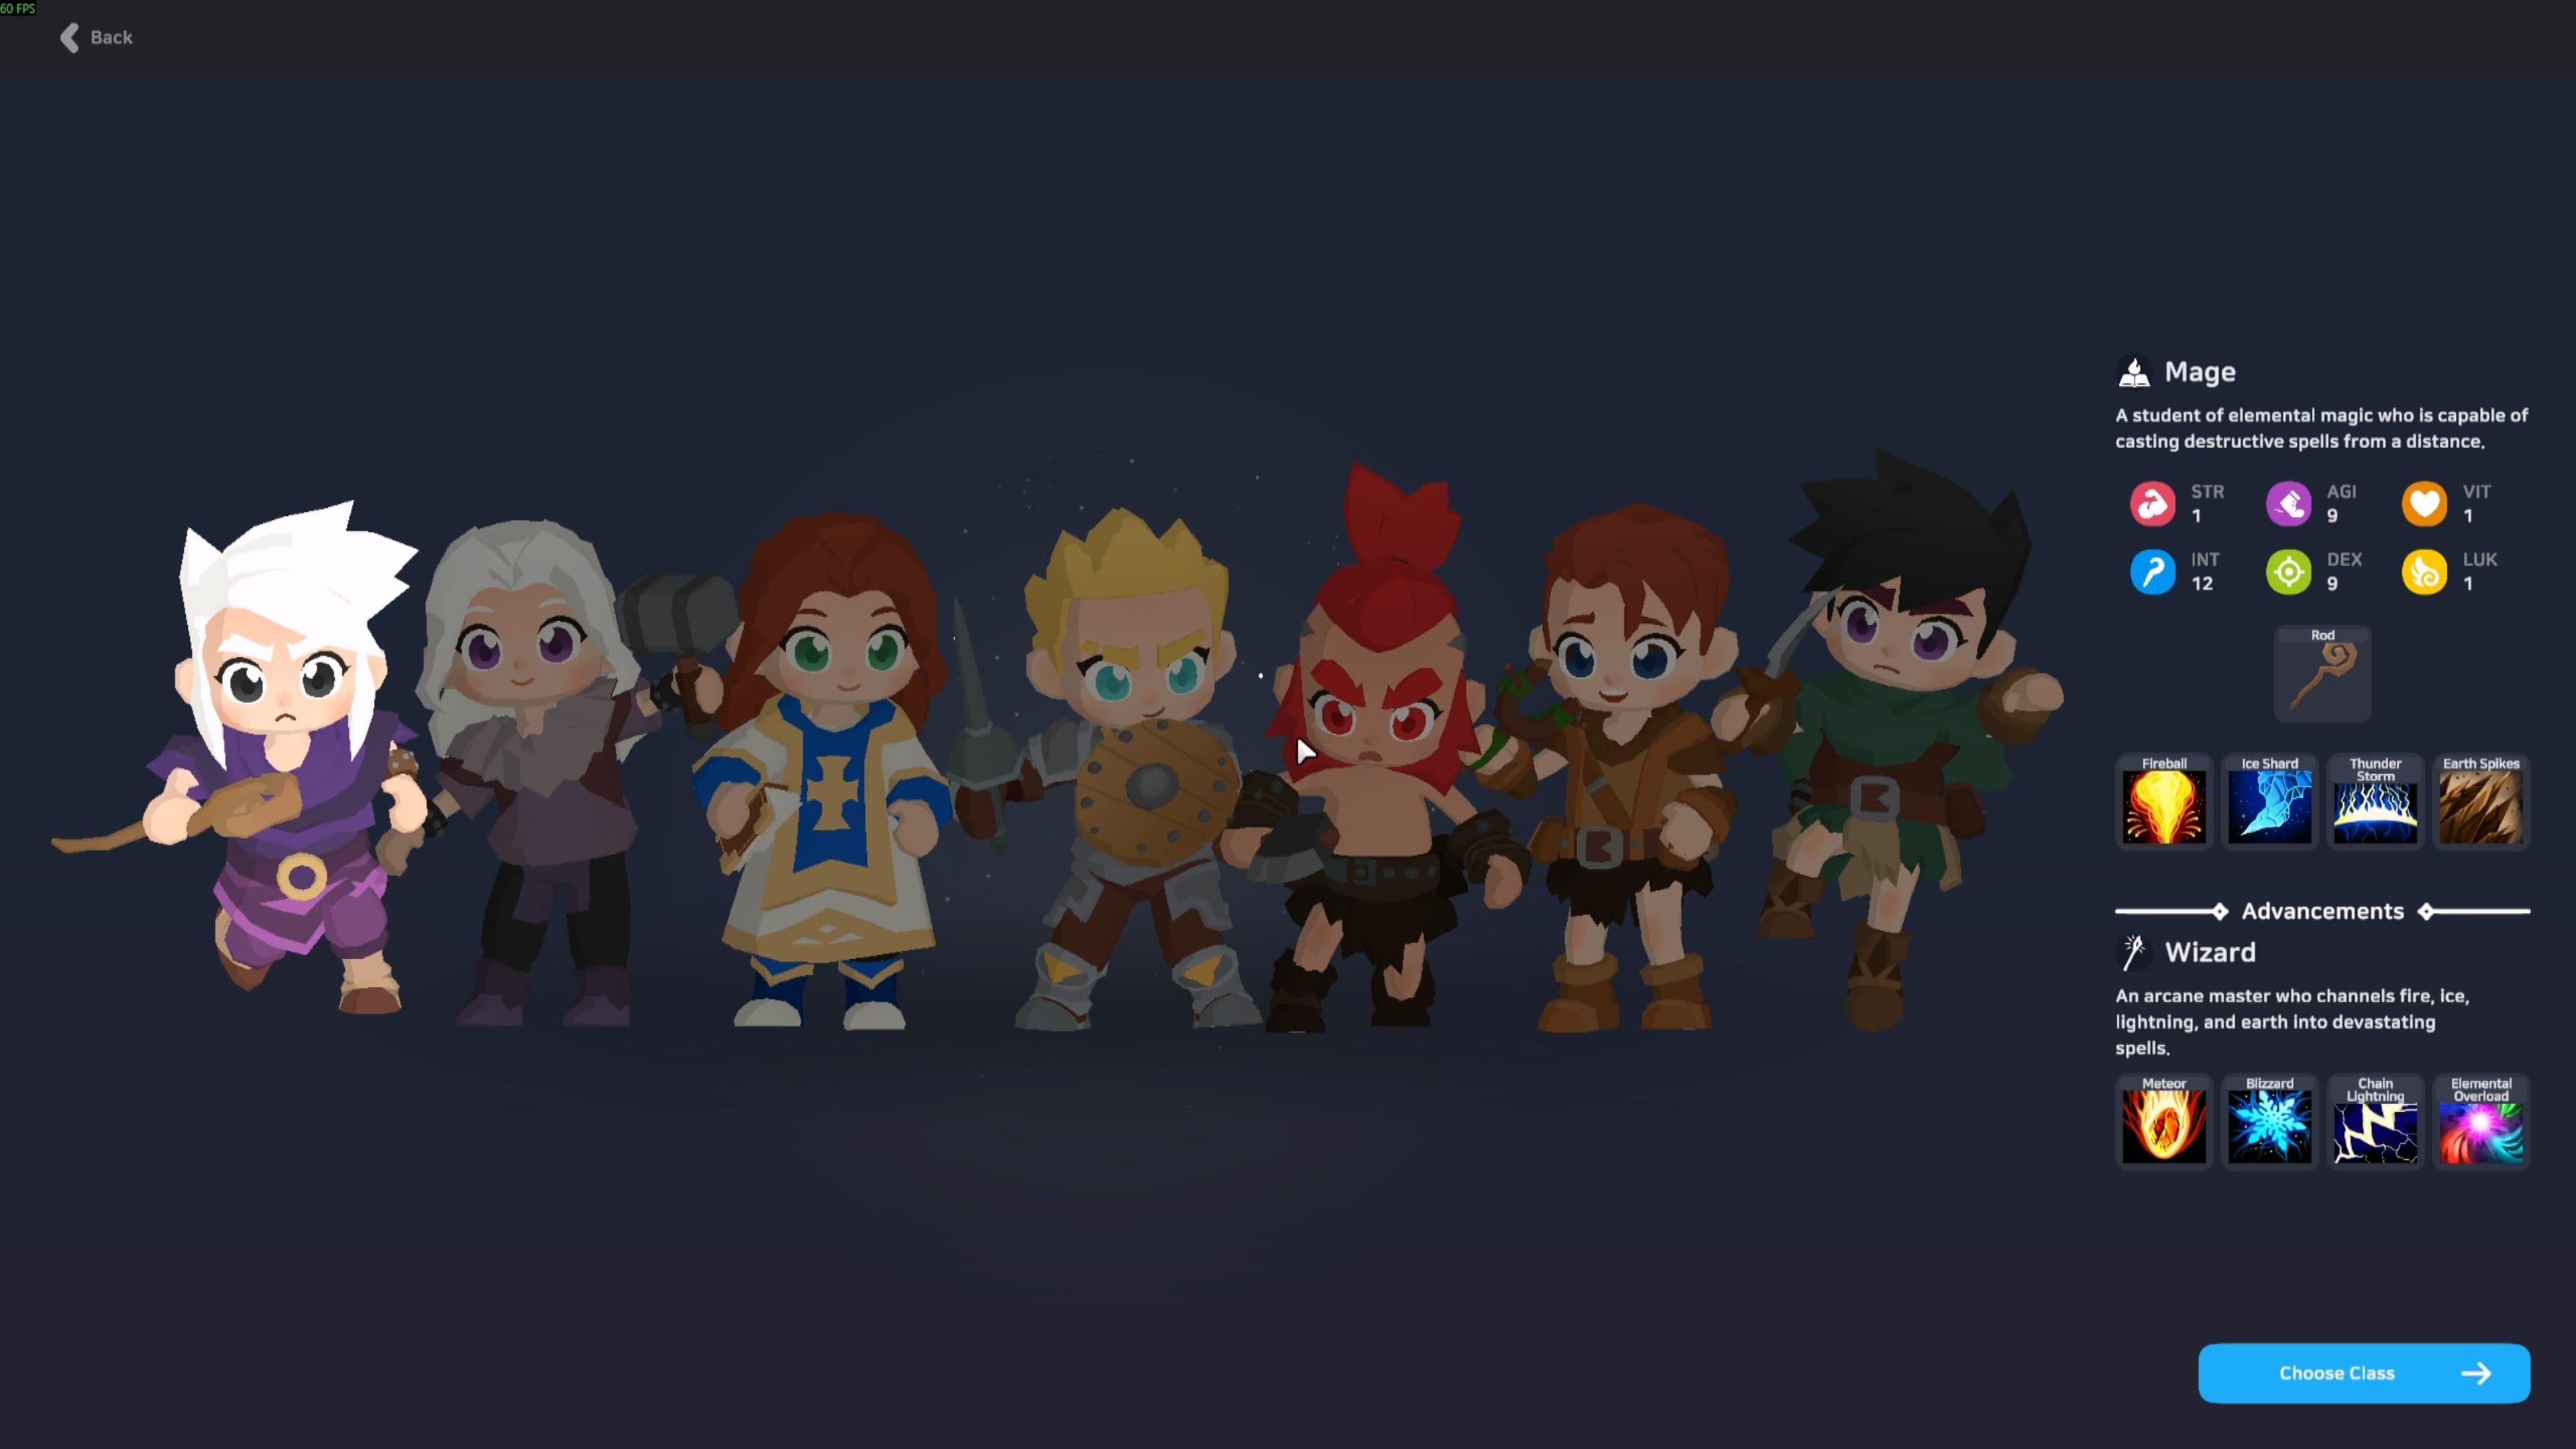
You pick a class on the character creation screen, and it's the first decision in SpiritVale that sticks. There are seven base classes: Warrior, Knight, Mage, Summoner, Rogue, Acolyte and Scout. Each of them advances into a specialised class at job level 50 — Warrior becomes Berserker, Knight becomes Paladin, Mage becomes Wizard, Summoner becomes Necromancer, Rogue becomes Shinobi, Acolyte becomes Priest, and Scout becomes Gunslinger. There's also an eighth advanced path, the Weaver, a hybrid that any of the seven base classes can take instead of their standard specialisation. One naming quirk to file away before it confuses you later: there is also an NPC in Nevaris called Weaver, who extracts cards from equipment and has nothing to do with the class. Same word, two completely different things.
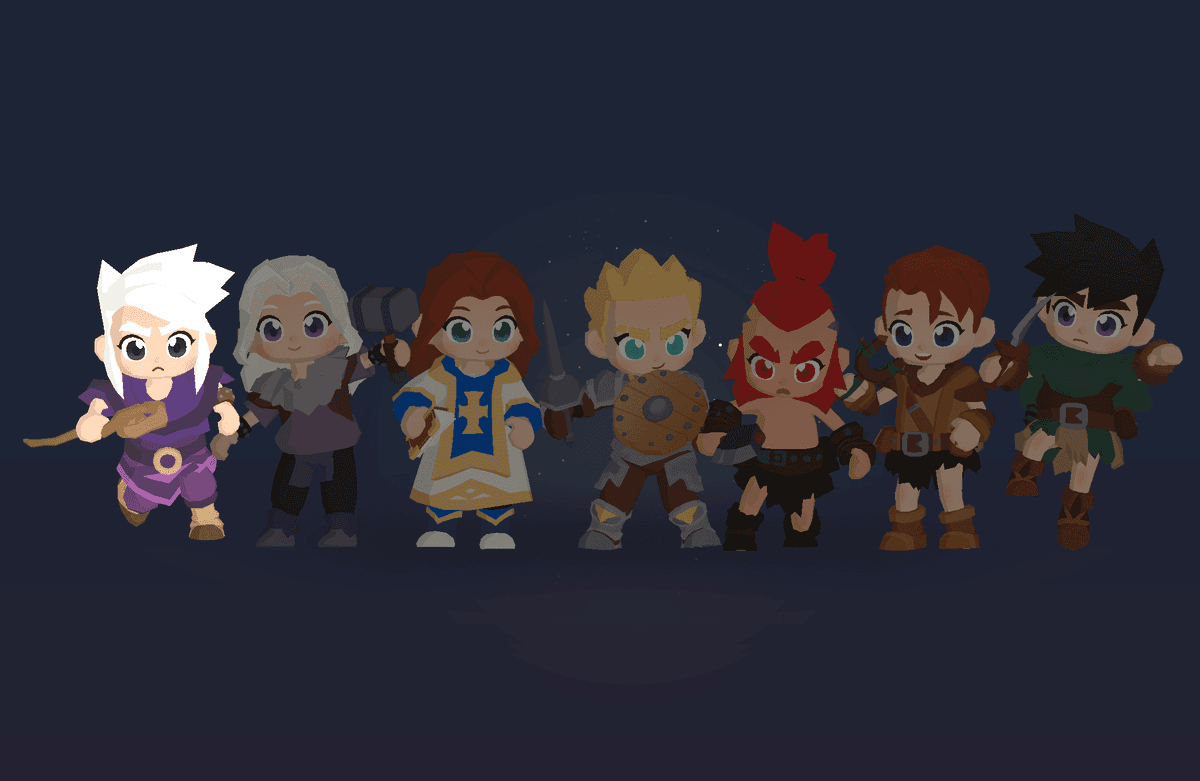
Here's the part that separates SpiritVale from most classic MMOs: your class does not restrict your equipment. Any class can wear any armour and wield any weapon. What differs is skills, not item locks. The catch is that skills almost always require a specific weapon family — a Knight's combo strikes only fire with a spear, sword or mace equipped, and a Scout's volley only works with a bow. So in practice your Mage still walks around with a rod. But the door to strange builds is genuinely open, and a few people are already walking through it.
There's also a hidden layer called the archetype, which governs how much health you gain per level. This is why a Mage at level 30 feels made of paper next to a Warrior at level 30, even with comparable gear. Ranked from sturdiest down, the archetype order runs Warrior, then Knight, then Rogue somewhat below the middle, then Acolyte, Summoner and Scout, with Mage and Weaver at the bottom. You don't choose an archetype separately — it comes attached to your class, quietly shaping how forgiving your first fifty levels feel.
So which class should you start with? There's no universally correct answer, but there is a sensible way to think about it. If you want room to make mistakes while you learn the systems, take Knight or Warrior — a big health pool and melee range are the most forgiving combination in the game. If you like the idea of deleting groups of monsters from a distance and don't mind dying occasionally, Mage puts out startling area damage from the very first levels. Summoner is the lazy-in-the-best-way solo pick, since your pet tanks and fights while you contribute at your own pace. Acolyte is the team player's choice: parties always want a healer, but soloing is slower. And Rogue and Scout demand active play — dodging, kiting, repositioning — and reward people who find that fun rather than exhausting.
One thing to weigh properly before you click Create: stats and skills reset for free at the fountain any time you like, but the class itself is locked to that character. Want to try another one? You make a new character. Since Mira's storage is shared across your whole account, handing gear down to an alt is trivial, so it's not a catastrophe — but it does mean you should pick the class whose fantasy appeals to you, not the one sitting at the top of somebody's tier list. Tier lists in a game two weeks into Early Access are guesses anyway, and the developer is still actively rebalancing.
The Melee Trio: Warrior, Knight and Rogue
Warrior is exactly what it looks like — raw force, an axe, and very little subtlety. You start with 12 points in STR and 9 each in AGI and VIT, which makes you both hard to kill and heavy-handed from the first minute. The signature ability is Vortex Slash, a spinning strike that deals 120% of your ATK per skill level across an area of 8 and drags everything it clips toward you. Look closely at its tooltip and you'll see the tag [Combo Finisher] +50% damage — that's the combat system's hidden layer talking, and it means using Vortex Slash inside the window opened by a setup skill like Bash makes it hit half again as hard. Gather a crowd with Vortex Slash, finish with Whirlwind, repeat. It's the simplest early farming loop in the game and one of the most effective.
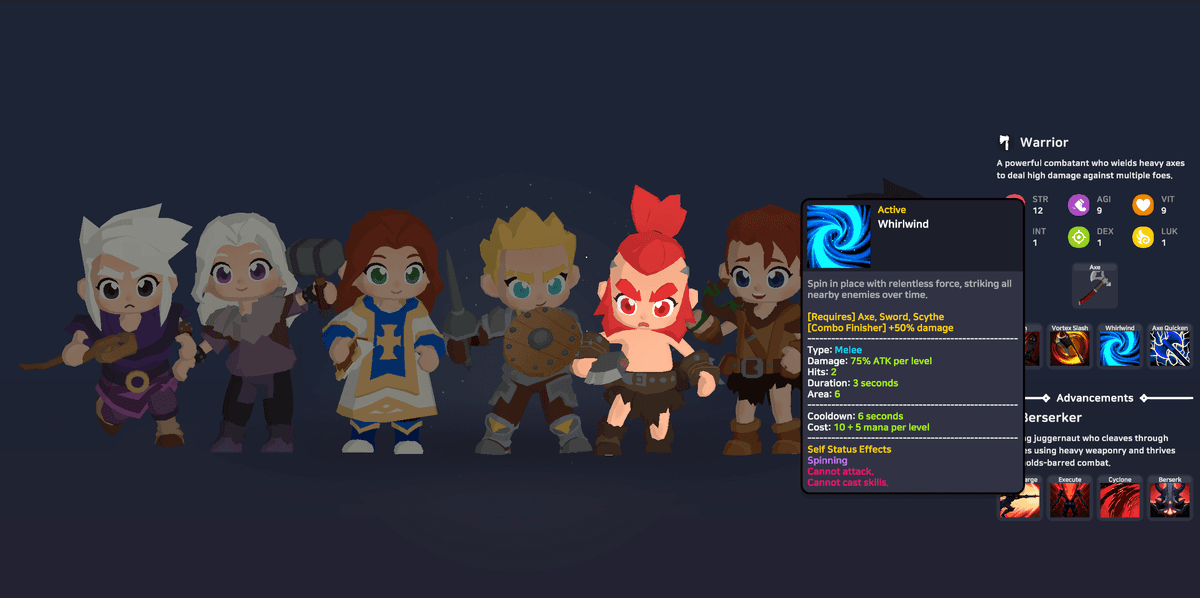
At job level 50 the Warrior becomes a Berserker, picking up Wild Charge, Execute, Cyclone and the self-titled Berserk. The design intent is unmistakable: everything in that kit rewards staying in the enemy's face and never backing off. If your idea of a good time is a class with almost no defensive decisions to make, this is your endpoint.
Knight is the game's dedicated tank, starting with 12 VIT alongside 9 STR and 9 DEX, holding an iron spear and a wooden shield. You kill things slower than a Warrior and you die considerably less, and parties will always find room for you. The skill that makes the class is Piercing Flurry: three piercing hits (100% + 40% ATK per level) on a three-second cooldown that stack a debuff called Vulnerability on the target. Each stack raises the damage that target takes from melee and ranged attacks by 1%, and stacks climb to 25. Sit with that number for a second — a Knight spamming a cheap attack is making a boss a quarter more fragile for the entire party. That's a group buff disguised as a filler skill, and it's the reason experienced players want a Knight in the group even when they don't need a tank.
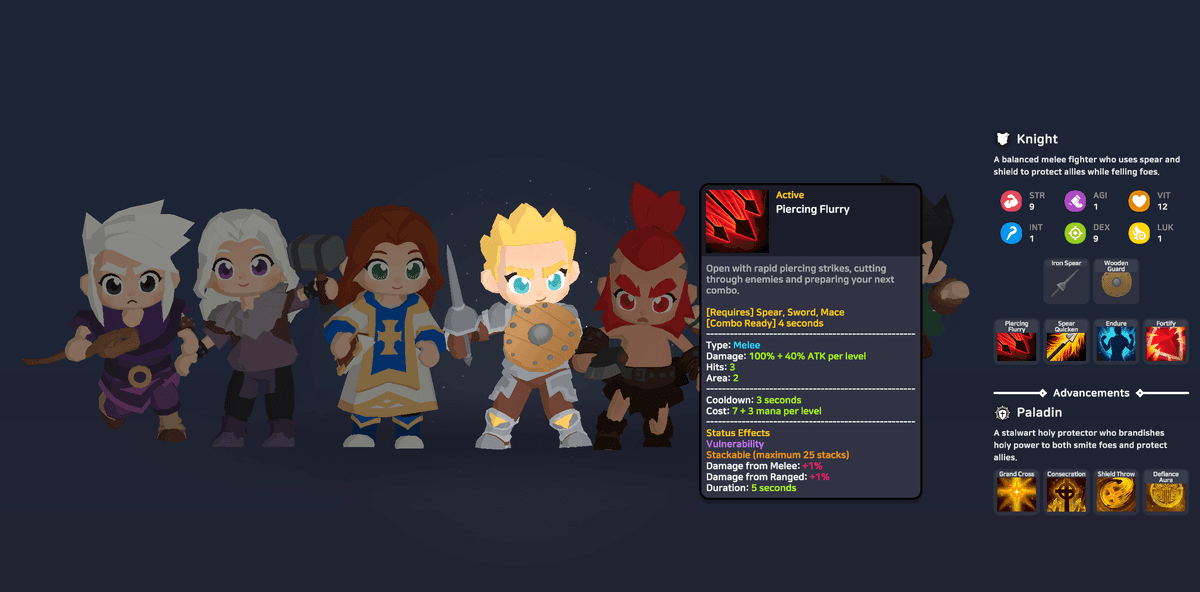
Piercing Flurry also carries [Combo Ready] 4 seconds, meaning it opens a four-second window for an empowered finisher. Around it sit Spear Quicken, which speeds up your spear attacks, plus Endure and Fortify as defensive stances. The advanced class is Paladin, arriving with Grand Cross, Consecration, Shield Throw and Defiance Aura — the same durability with healing and party support bolted on top, which is why Paladin is one of the most self-sufficient solo options in the late game.
Rogue is the fastest thing in SpiritVale: 12 AGI, 9 each in STR and DEX, a dagger, and a grand total of 1 VIT. Read that last number again. You are not surviving through armour; you're surviving because things miss you. The class identity is poison, delivered through Venom Coating, an ability tagged [Exclusive] that costs 20 mana and coats your weapon for 60 seconds per skill level. While it's up, every hit has a chance to apply Poison — and this game's Poison doesn't just tick health away and stack, it also shuts off the target's natural mana regeneration. That second effect is easy to skim past and it's the reason Rogues punch above their weight in PvP and against casting monsters, who simply run dry and stop being dangerous.
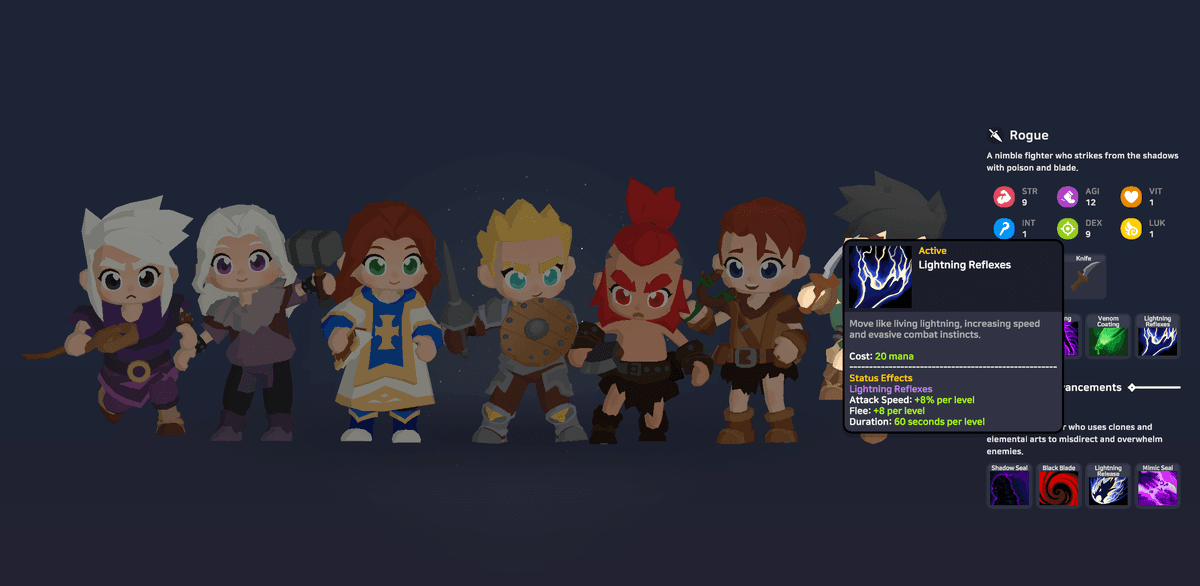
Cloaking gives you invisibility and Lightning Reflexes rounds out the toolkit. At job level 50 the Rogue becomes a Shinobi, trading long poison chains for clones, teleports and misdirection, with abilities like Black Blade and Mimic Seal. It's a genuine change of register — the base class is patient and attritional, the advanced class is fast and deceptive — so if you enjoy Rogue for the poison specifically, know that the endpoint isn't more of that, it's something else.
Casters, Support and Guns: Mage, Summoner, Acolyte and Scout
Mage is the elemental artillery: 12 INT with 9 in AGI and DEX, holding a Rod. Your opening four skills cover four elements — Fireball, Ice Shard, Thunder Storm and Earth Spikes — and if you want to understand this game's design philosophy in one tooltip, read Fireball's. It deals 100% MATK per level in an area of 3 with knockback, takes 0.75 seconds to cast, has a 1-second cooldown and a range of 12. Then the interesting part starts. The explosion applies Burning (3% of max HP per second for 10 seconds, and it stacks), it drops the target's earth resistance by 4% per level, and it leaves behind a Firewall that burns and pushes anything walking into it for another 2 seconds per level. One button gives you a damage-over-time effect, area denial, and a setup for an Earth Spikes follow-up through that shredded earth resistance.
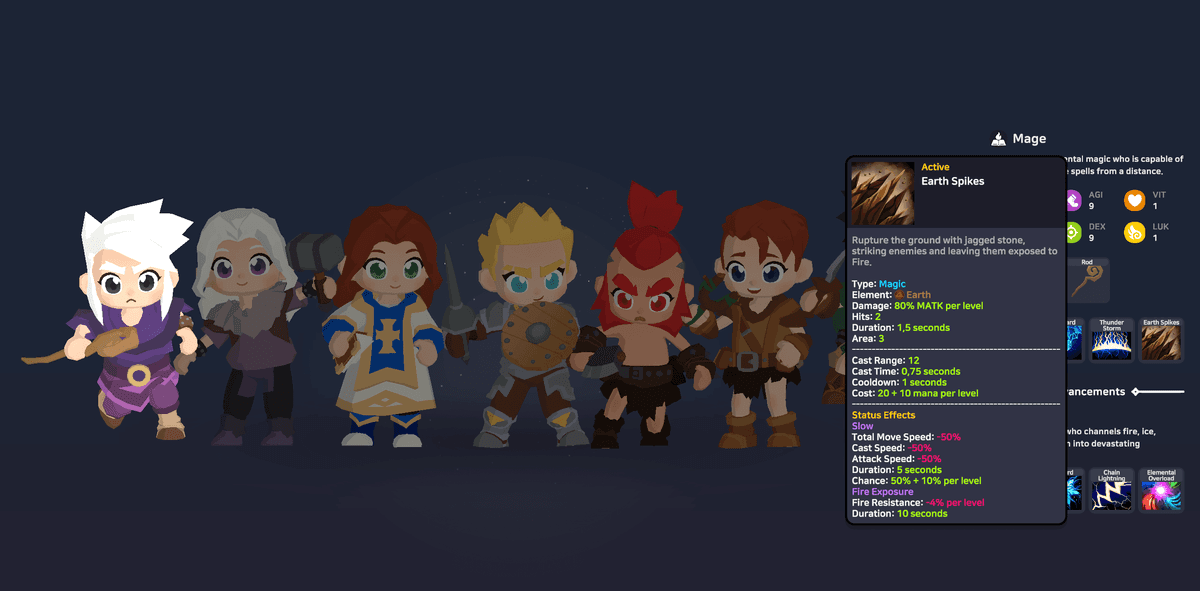
The bill arrives in mana: 30 base plus 15 per level makes Fireball the most expensive starting skill any class has, and at low levels with a small mana pool you will absolutely run yourself dry mid-fight. The advanced class is Wizard, bringing Meteor, Blizzard, Chain Lightning and Elemental Overload. The spells get bigger, and so do the consequences of standing in the wrong place while you cast them.
Summoner is a strange and very likeable hybrid: 12 INT but 9 STR and 9 VIT, which means the pet class is also tougher than a Mage and can hold a mace and fight in melee if it comes to that. The heart of it is Summon Cat, an [Exclusive] skill costing 30 mana on a 30-second cooldown that drops an electric cat onto the battlefield to run around zapping things on its own initiative. The pet is a real second character, not a temporary buff: its stats scale with your base level, and it unlocks new abilities as your job level climbs — Thunderbolt at 5, Flash Step at 10, Lightning Coat at 20, Thunder Storm at 30 and Lightning Release at 40. The cat itself evolves too, from Sparkit at level 1 to Voltpaw at 15 and Raiju at 30.
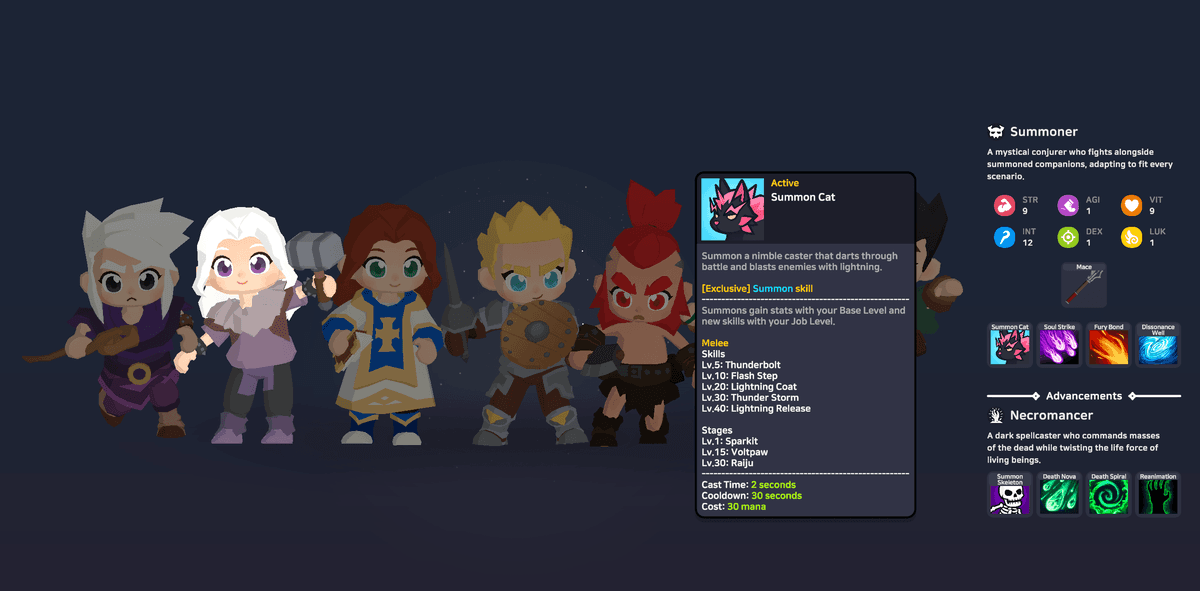
For a new player that adds up to the most comfortable solo levelling in the game. The cat holds aggro, you finish things off with Soul Strike and Fury Bond, and you're rarely in danger. At job level 50 the Summoner becomes a Necromancer with Summon Skeleton, Death Nova, Death Spiral and Reanimation — the pet fantasy scaling up into an undead army built on grinding enemies down with damage over time rather than bursting them.
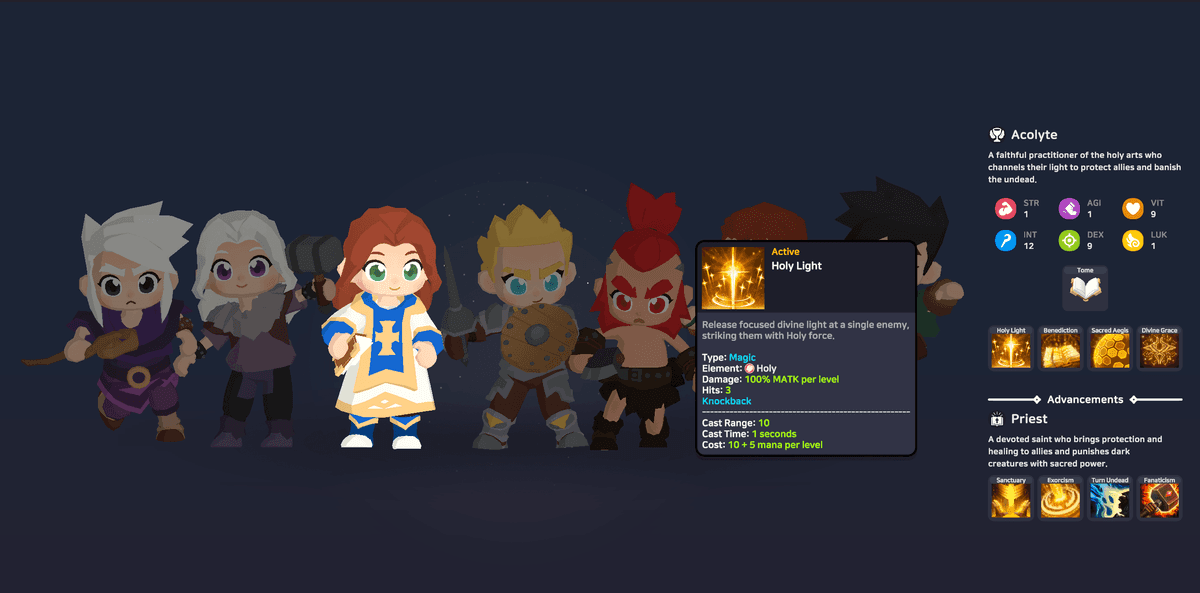
Acolyte is the classic support: 12 INT, 9 VIT, 9 DEX, and a Tome. The stereotype says healers can't fight, and this one doesn't hold. Your basic Holy Light fires three bolts of holy power at 100% MATK each per level with knockback at range 10, for a very cheap 10 mana plus 5 per level — and since the world is generously stocked with undead, holy damage lands harder than you'd expect. Around it you get Benediction, Sacred Aegis and Divine Grace: blessings, shields and heals, which is what actually gets you invited to groups. Solo levelling works but runs slower than the classes above it, and Acolyte genuinely comes alive in a party where the shared experience and drop bonuses more than repay your modest personal damage. The advanced class is Priest, with Sanctuary, Exorcism, Turn Undead and Fanaticism.
Scout lives at range: 12 DEX with 9 each in AGI and INT. There's a small joke in the starting kit — the game hands you a Slingshot, and your skills require a bow. Getting a proper bow is therefore job one, and the local Craftsman — the field crafting NPC covered further down — will sort you out cheaply. The rotation builds around Strafing Volley, a two-arrow burst at a single target for 100% + 50% ATK per level, costing a nearly free 3 mana plus 1 per level. Its two important tags are Triggers Multistrike and [Combo Ready] — the volley both feeds the multistrike mechanic and opens the window for Force Shot or Arrow Shower to land as a finisher.
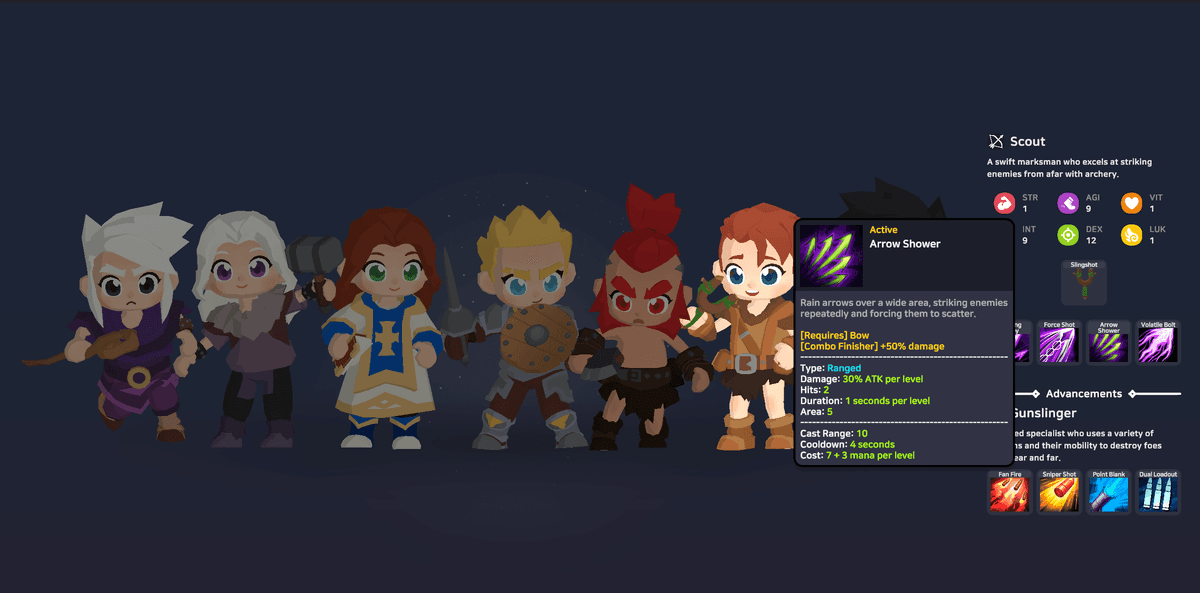
Playing Scout means never standing still: shoot, back off, roll, shoot again. The payoff at job level 50 is one of the most dramatic transformations in the game — Gunslinger trades the bow for pistols, rifles, shotguns and machine guns, with Fan Fire, Sniper Shot, Point Blank and Dual Loadout. It's also the class most likely to make someone watching over your shoulder ask what game you're playing.
Two Level Bars and Six Stats: How Your Character Grows
SpiritVale advances your character along two tracks at once, and understanding the difference belongs in your first hour, not your first week. Base Level (capped at 150) hands you stat points that you distribute by hand across six attributes. Job Level (capped at 50 for a base class, 70 once you've advanced) hands you skill points for your skill tree. Both bars fill from the same monster kills, but at different rates, and you can watch both crawling along at the bottom of the screen. Job Level moves slower, and the gap widens over time — sitting at base 40 with job 25 is completely normal. The practical consequence: Job Level is your real bottleneck, because the job change that defines your character is gated behind job level 50, not behind any base level at all.
The six attributes each do a specific set of things, and the exact effects are worth knowing rather than guessing (hovering over any attribute in the character window spells them out). STR raises melee weapon attack and adds a little to ranged. AGI raises evasion (FLEE) and attack speed, contributes slightly to perfect dodge and defence, and — this one matters — raises the attack speed ceiling itself, by 1 maximum ASPD for every 30 points invested. VIT gives health and defence. INT gives magic attack, mana and magic defence. DEX gives accuracy and ranged damage, plus small amounts of melee attack, MATK, attack speed and MDEF. LUK gives critical chance and a light dusting of critical damage, critical defence, perfect dodge and nearly everything else.
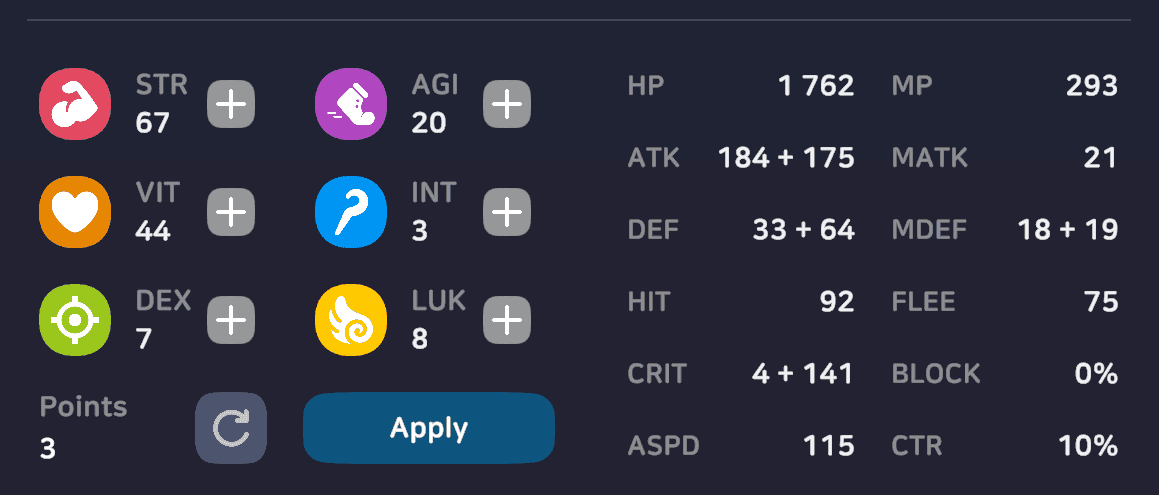
Now the mechanic that surface-level guides skip entirely: every attribute grants resistance to two status effects. STR protects against Bleed and Stagger. AGI protects against Slow and Freeze. VIT protects against Stun and Decay. INT protects against Silence and Burning. DEX protects against Poison and Blind. LUK protects against Curse and Weaken. This turns stats that look like dead weight for your class into a real decision — twenty points of VIT on a Mage isn't only a health cushion, it's insurance against being stunlocked to death. Note too that the character window shows each attribute as base plus bonus (Strength 24+3, for instance); that green addition comes from your equipment and set bonuses.
Your starting spread already tells you what your class wants: 12 STR on a Warrior, 12 INT on a Mage, 12 DEX on a Scout. The beginner's golden rule is to push your class's primary attribute first and resist the urge to spread points thinly across all six. A jack-of-all-trades character loses consistently to a specialised one in this game. That said, put points into "secondary" stats deliberately when you have a reason — a resistance you keep suffering from, or an equipment requirement you're trying to meet.
There's a subtler nudge hiding in item descriptions, too: gear can grant bonuses at stat thresholds. The basic crafted sword, for example, adds 2% skill damage for every 10 points you hold in STR, VIT, DEX or INT. It's a gentle push toward rounding your attributes up to clean multiples of ten, and it means those "wrong" stats aren't entirely wasted after all.
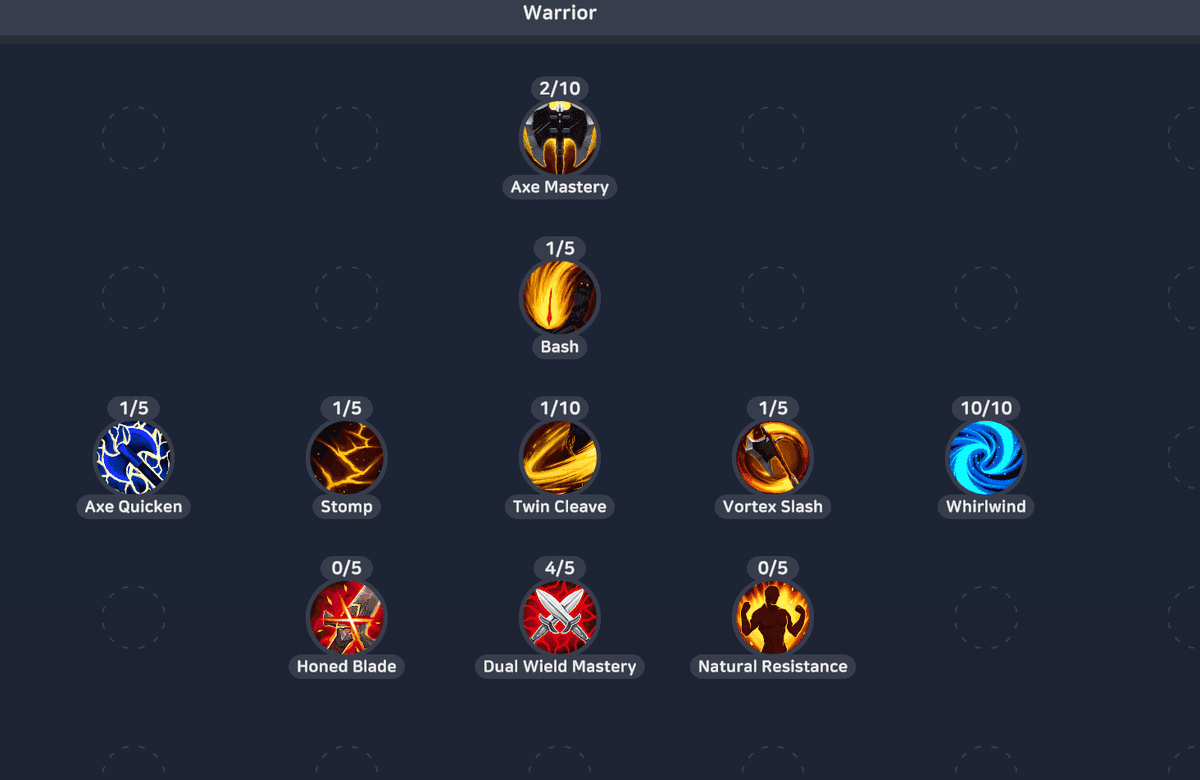
Skill points go into the job tree on the K key, and here's what to internalise immediately: the tree is far richer than the four abilities shown to you on the class selection screen. A Warrior, on top of active attacks like Bash, Twin Cleave and Whirlwind, has a whole stratum of passive masteries — Axe Mastery, Dual Wield Mastery, Honed Blade, Natural Resistance — that make you stronger without ever occupying a hotbar slot. Skills also have different maximum ranks (some cap at 5, some at 10), and new tiers of the tree unlock as you invest, so "active or passive" is a question you'll answer over and over rather than once.
How to Read a Skill Tooltip (and Skip Half the Build Guides)
Skill descriptions in SpiritVale are dense technical documents, and learning to parse them properly will do more for your character than any build video. Start with the tags in square brackets. [Requires] lists the weapon types without which the skill simply will not fire — which is why, before you sink points anywhere, you should check that you're investing inside one weapon family rather than scattering points across axes, bows and rods. [Combo Ready] and [Combo Finisher] mark the combo chain: the first opens a four-second window, the second hits 50% harder inside it. Your build should always contain at least one opener-and-finisher pair. [Exclusive] means only one skill of that type can be active at a time.
Second, read the Self Status Effects block and every line of pink text, because that's the price tag nobody mentions in reviews. A Warrior's Whirlwind looks spectacular and locks you out of attacking and casting for three seconds. Against a pack of weak monsters that's irrelevant; standing under a boss, three seconds of helplessness can end the fight. The same close reading pays off elsewhere: Bash has a 5% stun chance per level while Stomp has 15%, so levelling a skill raises not just its damage but the reliability of its crowd control — and sometimes that reliability, not the damage number, is the reason to spend the point.
Third, watch the mana and cooldown economy. That "3 + 1 mana per level" format means levelling a skill makes it more expensive. A cheap spammable hit at 4–8 mana and an expensive burst at 30-plus are different tools serving different moments, and at low levels an over-invested expensive skill can genuinely fail to fit into your rotation at all. Do the rough arithmetic on what a minute of fighting costs you, and always keep one cheap attack in the set.
Fourth, not all passives are equal. Some are plain numbers — Honed Blade gives +3% critical damage per level — and some are switches that unlock mechanics. Dual Wield Mastery literally opens up two-weapon fighting. Skills like that change how you play more than any percentage ever will, and they're usually worth the very first point you spend. A related category is long-duration buffs like Axe Quicken: a single point already gives 60 seconds of attack speed for 20 mana, which means minimum investment buys a near-permanent effect. Put it together and the opening formula for any class looks like this — one point into your key actives and any mechanic-unlocking passives to open up your arsenal and the lower tiers of the tree, then max out one or two primary damage sources (usually the ones capped at 10, since that ceiling is the developer telling you which skills he considers your mains), and leave utility buffs and stat passives for last.
And the best news in this section, worth repeating because people keep forgetting it: you cannot get this wrong permanently. The Waybinder at the Nevaris fountain resets stats and skills free and unlimited. Curious whether a Warrior built around AGI and attack speed beats one built on raw STR? That's a ten-second trip to the fountain and an afternoon of testing. Very few games in this genre let you play with their systems this freely, and it would be a shame not to.
Combat: Elements, the Inspect Window, and Combo Chains
Fighting in SpiritVale is real action combat, not an exchange of auto-attacks. You move with WASD, your skills sit on 1 through 9, and plenty of abilities are aimed at a point on the ground rather than at a target. Your main defensive tool is the dodge roll, which grants a brief window of invulnerability — the i-frames — and knowing when to spend it is what separates a living character from a corpse. Monsters use skills and elements too, so button-mashing carries you through the first few meadows and then stops working.
Your analytical instrument is the monster inspect window, opened by hovering over a target and pressing F. Don't treat it as a curiosity; it's a full dossier. Take the starting zone. A Pollen is a walking dandelion at level 1 with 120 HP, 23 ATK and the Neutral element, taking 25% extra damage (x1.25) from Poison and Ghost. A level 6 Bee in Sunny Meadows 2 shows something more instructive: element Wind, x1.25 from Earth, and x0.75 from both Water and Wind. So the window reports resistances as honestly as it reports weaknesses — and notice that an element resists itself, which means hitting a wind monster with wind damage is close to pointless. The same panel carries the complete drop table with exact percentages and a built-in Damage Meter showing total damage, DPS, and each of your skills' contribution as a percentage.
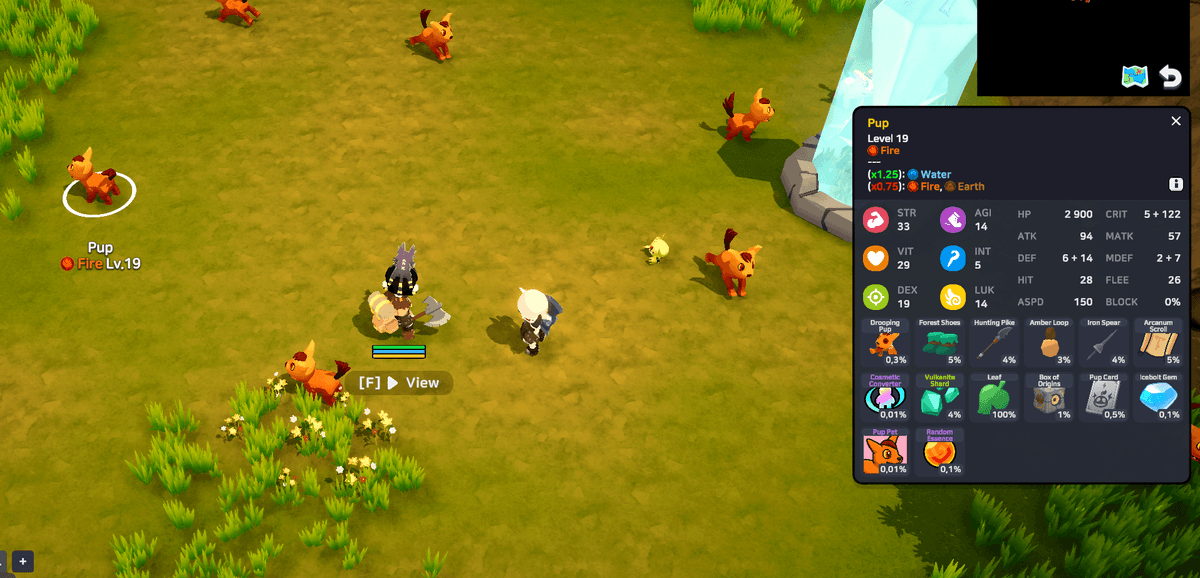
Get into the habit of pressing F before you commit to a farming spot and you'll save hours. Why grind a monster your element bounces off when its neighbour one zone over is weak to exactly what you deal?
There are roughly a dozen elements in play: Neutral, Fire, Water, Wind, Earth, Poison, Holy, Shadow, Undead and others. The four natural elements run in the classic circle, which you can derive yourself just by inspecting things — fire beats earth, earth beats wind, wind beats water, water beats fire, and each element resists itself. Confirmed in the field: the wind-element Bee takes x1.25 from Earth, the water-element Frost Wisp takes x1.25 from Wind (and only x0.75 from Fire and Water), and the earth-element Giant Earth Wisp takes x1.25 from Fire. Since exact multipliers are always visible in the inspect window, there's nothing to memorise. Your own attack element comes from your skills (Fireball is fire, Holy Light is holy) and from enchantments — certain cards change your weapon's element, and the Frost Wisp Card adds +6% water damage. Against ordinary monsters that's a pleasant bonus. Against bosses and heavyweight elites, it's half the fight.
The second layer of the combat system is the combo chain hidden in those square-bracket tags. A skill marked [Combo Ready] 4 seconds — the Knight's Piercing Flurry, the Scout's Strafing Volley — opens a four-second window after it lands. Use a skill tagged [Combo Finisher] inside that window, like the Warrior's Vortex Slash with its +50%, and the finisher hits noticeably harder. A correct rotation in this game isn't one button held down; it's "open the combo, close the combo." The sooner that becomes muscle memory, the faster everything else goes.
Wander the fields for a while and you'll start noticing oversized versions of ordinary monsters. Those are giants — field mini-bosses — and their value is easy to quantify. Compare a level 11 Frost Wisp to the level 15 Giant Earth Wisp from the same area: the giant carries roughly seven times the health (6,400 against 940), and every drop chance is tripled. Equipment goes from 5% to 15%, Box of Origins from 1% to 3%, its card from 0.5% to 1.5%, and the basic material drops at a 300% rate, meaning a guaranteed handful rather than a maybe. The rule writes itself: when you see a giant and you think you can take it, take it. It's the densest source of rare drops in the open world. Inspect works on them as well, so press F and make an honest assessment before you commit.
Finally, respect status effects, because this game leans on them heavily in both directions. Burning drains 3% of health per second and stacks. Poison stacks and shuts off mana regeneration. The Knight's Vulnerability climbs to +25% incoming damage at full stacks. Monsters apply these things to you just as readily, which is why a stack of healing potions — crafted at the Craftsman, and dropped by monsters — isn't optional kit. It's the same category of essential as your weapon.
Loot: What Drops, How Often, and How to Pick It Up
SpiritVale is a game about hunting for loot, and it's unusually honest about it — there are no hidden tables. Press F on any monster and you get its complete drop list with percentages attached. The humble starting Pollen looks like this: the Flax flower at a flat 100%, a Novice Chest at 10%, a Pioneer Rune artifact at 10%, a sword and a knife at 5% each, potions at 4%, a Vulkanite Shard at 2%, a Box of Origins at 1%, a Pollen Card at 0.5%, a Firebolt Gem at 0.1%, a random essence at 0.1%, and — right at the bottom — a Pollen Pet egg and a Cosmetic Converter at 0.01% apiece. One look at that table and the entire economy of the game snaps into focus: ordinary loot pours out of everything, and the things that actually matter are rare celebrations.
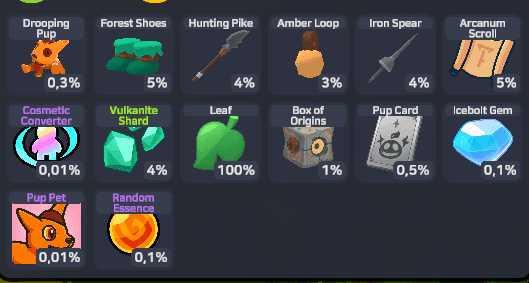
Dropped items have to be picked up manually with V, which grabs whatever is lying near you. Sounds tedious over a few hundred hours? That's what pets are for. An equipped pet collects loot automatically, and its description even lists the auto-pickup interval — one second for starter pets like the Bee Pet. Pet eggs drop from most monsters at that brutal 0.01%, so you're either grinding very hard for one or buying it from another player once trading is back online. Everyone who has one will tell you the same thing: it's among the best quality-of-life investments in the game, and it pays back for as long as you keep playing.
Memorise the baseline rates for the things worth chasing. Cards drop at 1% from regular monsters and 3% from bosses. Gems drop at 0.1% from regular monsters, usually skill gems, and 0.3% from bosses, where you get boss gems with distinctive effects. Essences are rare and arrive already assigned to a specific type. If you've killed something thirty times without seeing its card, nothing is broken — that's just the arithmetic. A card takes around a hundred kills on average, and averages have long tails.
If solo grinding wears on you, the game meets you halfway: playing in a party raises both experience and drop rates, and the bonus keeps scaling all the way up to 12 players. A full group on a good spot is simultaneously the fastest way to level and the fastest way to farm rarities, which is a rarer alignment than it sounds. Use Party Search to find one — recent patches added the ability to search by map name, so you can find people already sitting where you want to be.
And here's the trick that ties everything together: the world map's search bar. Need a specific item? Type the name and the zone where it drops lights up blue. That gives you the core loop that will not change between here and the endgame — search the map, travel to the zone, inspect the monsters with F, settle in and farm. Only the zones and the numbers get bigger.
The Craftsman: Your First Full Kit for a Handful of Weeds
With player trading on hold, your primary source of early equipment is the Craftsman — a field NPC who stands inside the farming zones themselves and swaps that zone's materials for that zone's gear. The logic is elegant: kill the local monsters, collect the local material, convert it into local equipment without ever leaving the map. There are no crafting professions to level, no workbenches to unlock, no recipe books to hunt down.
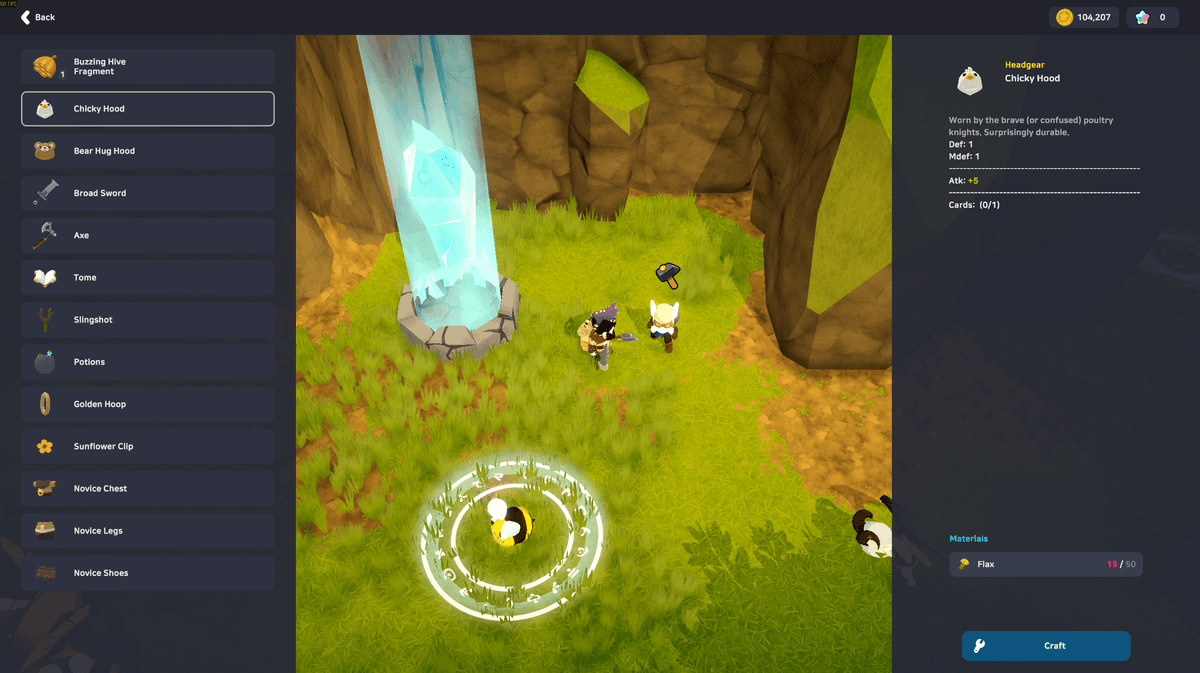
Look at what that means concretely in the first zone. The Sunny Meadows Craftsman offers a genuinely substantial list: weapons (Knife, Sword, Mace), the Wooden Guard shield, potions, the beginner armour set (Novice Chest, Novice Legs, Novice Shoes), the Golden Hoop and Sunflower Clip accessories, and even cosmetic hats like the Chirpy Hat. The currency is Flax, that flower dropping at 100% from every Pollen in the area. A sword costs 30 Flax — thirty dead dandelions, about ten unhurried minutes.
That crafted sword also delivers your first real lesson in this game's philosophy: read item descriptions all the way down. Behind a modest "Atk: 15" sits a list of properties — three wielding stances (one-handed, two-handed and dual-wield), +10% block, +50 HP, a bonus of +2% skill damage for every 10 points of STR, VIT, DEX or INT, and four card slots. A four-slot weapon from the first zone in the game is not disposable junk. It's a platform you can keep using for a surprisingly long time, filling the slots with cards as you find them.
This pattern runs through the entire game. Every zone has its material, its Craftsman and its equipment line continuing the idea of the previous one. In the forest zones just past Sunny Meadows the currency becomes Leaf — dropped at 100% from the local wisps — and the Novice set gives way to the Forest Set, tougher, with healing bonuses and a full set effect of All Stats +1 and Weight Limit +500 that quietly solves the perpetual problem of an overstuffed inventory. Helpfully, the game flags what to keep: materials that read Used by Craftsman in their description have a use at a local workbench, so don't sell those to a vendor.
The Craftsman also runs in reverse, which is easy to miss and extremely useful — and it works at the field Craftsmen, not only the one in Nevaris. There's a Dismantle tab with a Dismantle All button: dump every piece of unwanted equipment in there and one click converts the pile into materials, including the shards you need for refining. This is also the built-in answer to being overloaded. Your character starts slowing down under the weight, so you walk to the nearest Craftsman, break down the junk, and go straight back to farming instead of teleporting to town. The alternative is selling the surplus for gold — city merchants like the Material Vendor buy your loot, and that's your first reliable income stream (five weapons and shields from the starting meadows go for around 1,250 gold). So after every farming session you have an actual choice — cash now, or refining materials later — and nothing you picked up is wasted either way.
Now for the reason the starting zone deserves a proper evening of your time. The Novice set pieces (Chest, Legs, Shoes) aren't merely "10 defence and a bit of HP." Read the description: completing all three grants +1 to all stats and three free skills — Lv.1 Heal, Lv.1 Haste and Lv.1 Cure. Think about what that means. A Warrior in the first zone gains self-healing, a speed buff and status cleansing, none of which exist anywhere in his skill tree and none of which he will ever otherwise have. For a new player that transforms solo play: you stop chugging a potion after every skirmish and just heal up between fights instead. Our advice is blunt — don't take the Novice set off until you find something offering comparable utility, and that will take a while.
Which gives you an obvious plan for your first hour or two. Leave Nevaris for Sunny Meadows, gather 30–60 Flax, craft the weapon your class's skills actually require (a sword or mace for the Knight, the starting rod is fine for the Mage, a bow for the Scout), add the full Novice armour set and a stack of potions. That kit carries you confidently into the level 5–10 zones. The only things the Craftsman can't provide are artifacts and boss items — those come from farming, and from other players once the economy is back on its feet.
Equipment and Refining: Slots, Bonus Lines and the Blacksmith
Your character has a generous set of equipment slots: main weapon, left hand (a shield, or a second weapon if you're dual wielding), head, face, a utility slot, chest, legs, shoes, and two accessories. Everything equips with a double click, and if something refuses to go on, check the level requirement in its description — a fair amount of gear demands base level 50 or 100. One quirk worth filing away now: for the card system, the Head, Face and Utility slots all count as a single Headgear category. That becomes relevant the moment you start matching cards to slots.
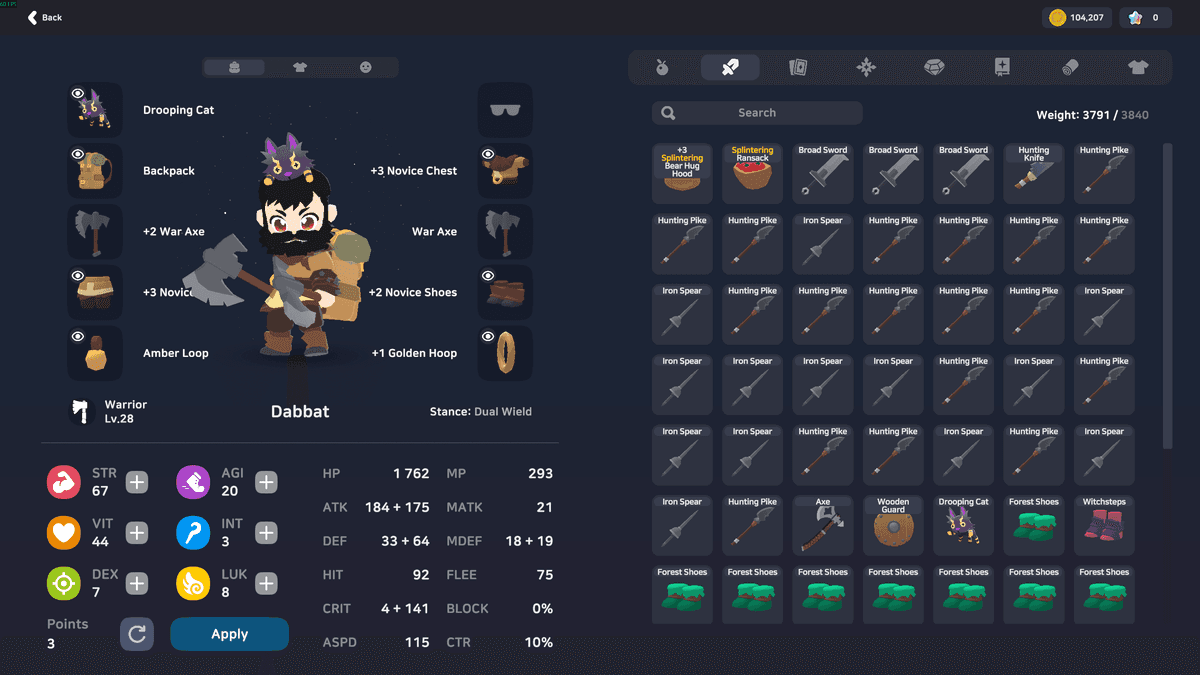
Every item that drops is a small lottery. On top of its fixed base stats, a new piece arrives with three bonus lines — randomly rolled extra stats. This is exactly why you can't judge equipment in SpiritVale by its name and base damage: a sword that happened to roll critical and attack speed will comfortably beat a "higher level" sword whose bonuses do nothing for your build. Check every find before you sell it. Those lines can later be changed and improved through the essence system, which gets its own section below; an item's remaining allowance is shown right in its description on the [Potential] line (a fresh Broad Sword, for example, comes with 20).
That leads to a design choice which breaks the habits of anyone coming from a modern MMO: SpiritVale has no rarity grades. No white, blue and epic borders. "Rarity" here is produced by rolls. Every single copy of an item is generated individually, with its own bonus lines, its own potential and its own number of card slots. A concrete example from one farming session: two Novice Chests, the first with 12 potential and lines of Int +3, Damage from Magic −5%, Perfect Dodge +4%, the second with 9 potential and Int +2, Perfect Dodge +3%, Mdef +10. On paper, the same chestpiece. In practice, two different items worth different amounts. So never dismantle a "duplicate" without looking — compare the lines, the potential and the slots first, holding LShift to see it against what you're wearing. A lucky roll is what turns a routine drop into the item you carry for thirty levels, and once the auction house returns, into something other players will pay for.
Three more things to watch for when reading a weapon. First, Stances: many swords and blades support one-handed, two-handed and dual-wield styles, and your active stance is shown in the character window — it determines which weapon and shield combinations are available to you. Second, Weight: every item has one, and crossing your carry limit slows your character down, which is the game's signal that it's time to visit a Craftsman. Third, trade-offs buried in the base stats: that Broad Sword offers a solid 20 attack, +10% block and +100 HP, but cuts your attack speed by 10%. The "better" item is not automatically better for your build.
A few hotkeys make handling items much less painful. Holding LShift compares an item against your equipped one, C links it into chat, F favourites it, V converts it into a cosmetic (Convert to Cosmetic preserves the look of armour you've grown attached to, and requires the rare Cosmetic Converter material that drops at 0.01%), and X breaks it down into materials. Be careful with that last one.
The second pillar of gear progression is refining at the Blacksmith in Nevaris. Any piece of equipment, artifact or gem can be taken from +0 to +10, with every level adding stats. The materials come from the Material Vendor standing right there: three families — Vulkanite, Gravion and Lunaris — each in two denominations, Shards at 1,000 gold and Chunks at 15,000. Shards also drop regularly from ordinary monsters (2–4% in starting zones), so early refining costs you almost nothing. Keep an eye out for lines reading per refine in item descriptions, because some gear grows specific stats through refinement rather than base value — the Hunting Knife dagger gains +5 accuracy, +5 evasion and +1 attack per level of refinement, which makes it far better in the plus range than its bare description suggests.
And now the rule that will unclench every player arriving from a Korean MMO: nothing breaks in SpiritVale. Not ever. The worst outcome from a failed attempt is losing a single level of refinement, and even that only happens if you refined without the safe leveling option enabled. With safe refining on you lose nothing at all — you simply pay more per attempt.
From that comes a practical strategy backed by the numbers on the forge screen. Your refinement level becomes part of the item's name (+3 Axe, +4 Axe) and visibly moves the base stats: an axe with 20 attack hits for 28 at +4. The first few levels succeed at 100% and cost pocket change, but the curve steepens quickly — the +4 to +5 attempt already sits at 60% success, 5,000 gold and a shard per try, with a level lost on failure if you're not using safe mode. So refine freely and cheaply up to +4 or +5, then start doing the arithmetic and switch on Safe Refine for anything expensive. And don't pour materials into first-zone equipment: refining costs real resources, and you'll replace that starter armour within a few evenings. The exception is a piece you're deliberately keeping — good bonus lines, four card slots, a useful property list. That one is worth the investment.
Sets deserve a mention of their own: items sharing a set name grant an extra bonus when you wear several pieces together, so read descriptions and try to assemble matching kit rather than a patchwork. Storing everything is easiest at Mira in Nevaris, whose vault is shared across your whole account — which means your alts can inherit your main's hand-me-downs without any fuss.
Cards: The Real Treasure Inside Every Monster
If you played Ragnarok Online, this section will feel like coming home. Cards are collectible items that slot into equipment and grant bonuses ranging from a plain +10 ATK to effects that reshape how you play. Every monster in the game carries its own card — Pollen Card drops from Pollen, and so on down the entire bestiary — at 1% from ordinary monsters and 3% from bosses, though some regular mobs sit at 0.5%, so check the exact figure in the inspect window. A concrete example of how much a first-zone card can matter: the Bee Card from the bees of Sunny Meadows 2 is a weapon card granting MP Regen +25%, which more or less erases the mana problems of any early caster. There are over 227 cards in the game, and collecting them is an endless layer of content sitting on top of everything else.
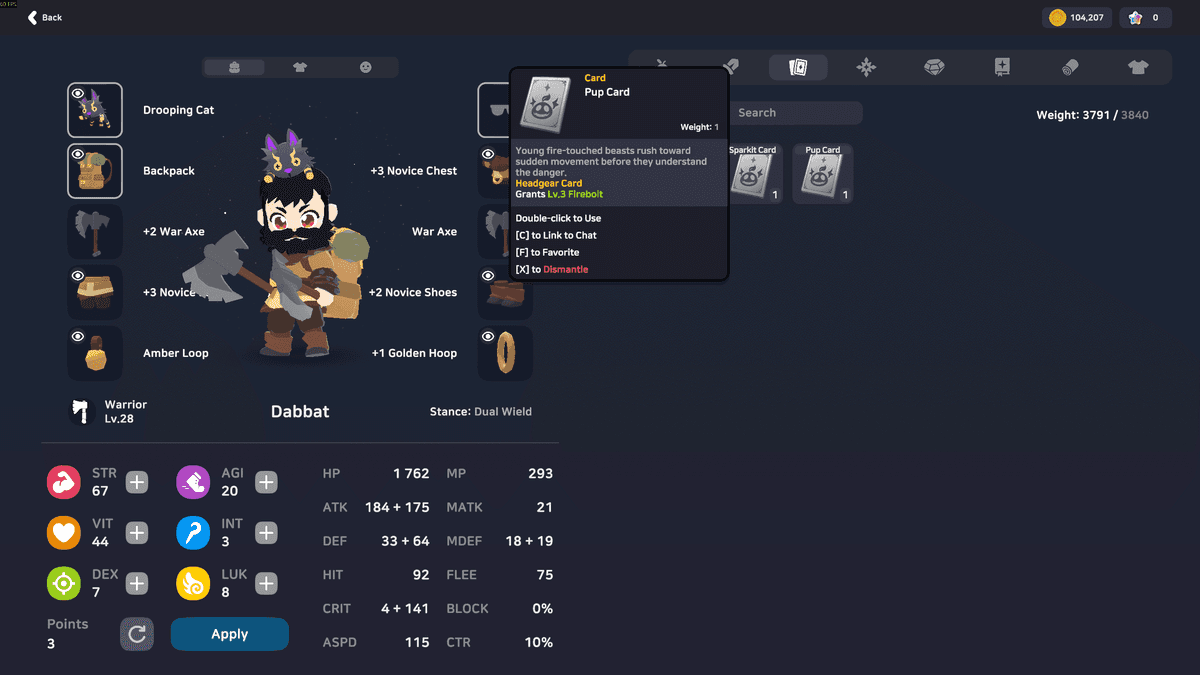
What can cards do? The range is genuinely wide: flat and percentage stats (Atk +5, Cast Spd +10%), boosts to a specific skill (Fireball Damage +10%), granting skills you don't have (Grants Lv.5 Heal — and suddenly your Warrior can heal), autocast effects that fire a spell at random when you attack or get hit, weapon element changes (Enchant weapon with Fire), and resistances or immunities. If a card grants a skill your class doesn't own, you can use it exactly as if it were yours. This is the foundation of every inventive build in the game.
Socketing rules are straightforward. Each card has a slot type — Weapon, Headgear, Chest, Legwear, Shoes, Shield or Accessory — and it can only go into an equipped item of the matching type that has a free card slot. Items carry varying slot counts (remember that four-slot first-zone sword), which makes "slottiness" a major factor in an item's value. To socket, double-click the card in your inventory and the game offers up the eligible equipped items.
Here's what it looks like in the client: a socketed card adds a prefix to the item's name based on what the card does. An ordinary Golden Hoop with a Bumblebee Card in it becomes an "Energy Golden Hoop," and its description gains the line Cards: [Bumblebee Card] (1/1) along with the bonus itself, MP Regen +25%. The prefix follows the effect rather than the monster — a mana regeneration card yields "Energy," a splinter damage card yields "Splintering," and so on. Handy, because once you have a dozen socketed items you can tell what's inside each one from the inventory list alone.
On the subject of matching cards to slots, note that similar monsters often drop cards for different slots. The Bee Card from ordinary bees is a weapon card, while the Bumblebee Card from bumblebees is an accessory card — even though both grant MP Regen +25%. You wear two accessories and one weapon, so the same bonus can land on your character more than once if you pick the right cards for the right slots. Check the slot type line before you commit an evening to farming a specific monster for its card.
Extraction needs more care. You can pull a card back out at the Weaver NPC in Nevaris, and neither the card nor the item is ever destroyed in the process — but since launch the service costs gold, and the price climbs with each card sitting in the item: roughly 25,000 gold for the first, 30,000 for the second, and rising from there. Verify the current numbers in your client, since this is Early Access and prices are still being tuned. The beginner takeaway is simple: don't scatter valuable cards into throwaway gear from the first few zones. Make sure the item is one you'll actually keep first.
Boss cards are their own category, with effects on the scale of "change the element of all your attacks" or powerful autocasts. They'll be priced accordingly once the auction house is running again, so if you get lucky with a drop, resist the urge to sell it to an NPC on the spot — ask the community what it's actually worth first.
Artifacts and Gems: The Second Layer of Equipment
Alongside ordinary gear, your character has four separate artifact slots: Rune, Jewel, Scroll and Relic. Artifacts don't replace armour and weapons — you wear both at once. Each artifact's name combines its set name with its slot type, so a Pioneer Rune is the Rune piece from the Pioneer set. There are more than 33 sets in the game, each with its own specialisation.
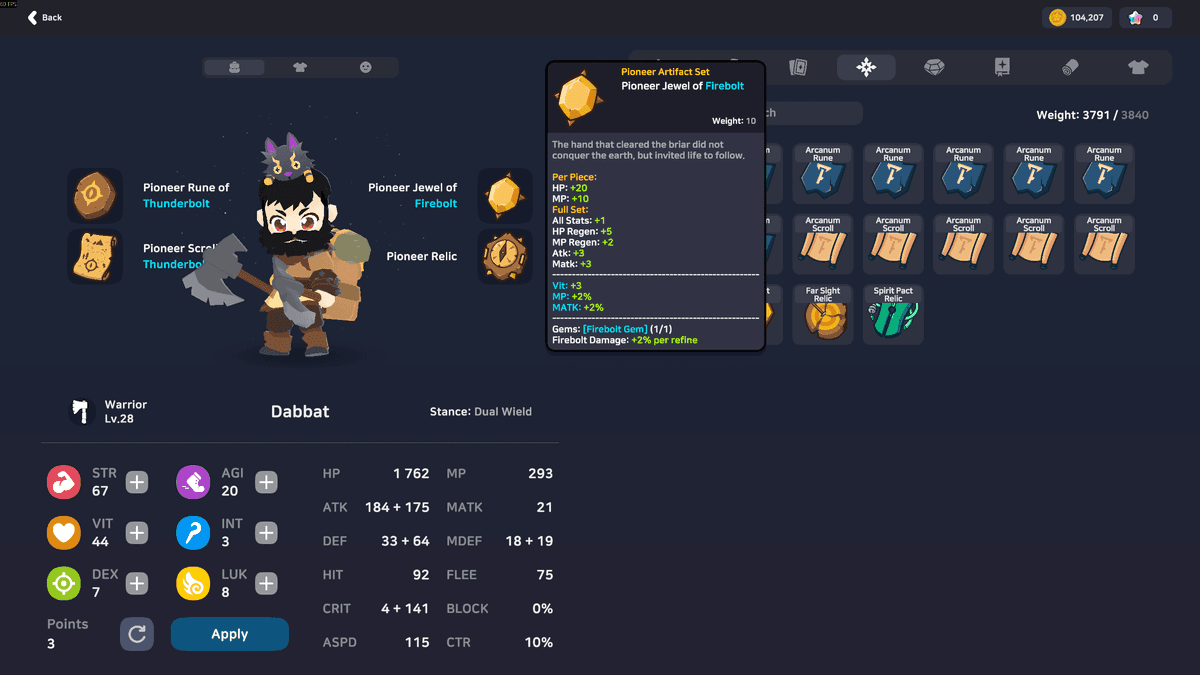
Artifact bonuses come from three places at once: stats granted by each individual piece you're wearing (which apply even if your other slots hold pieces from different sets), additions from that piece's refinement level, and the main prize, the full 4/4 set bonus when all four slots hold pieces of the same set. The Arcanum set from the level 11–15 forest zones demonstrates all three at once: each piece gives +3% magic damage, the complete set adds All Stats +1 and another +3% magic, and every refinement level adds a further +0.125%. Not every set uses all three mechanics, so read the descriptions. And while you're assembling a full set, feel free to wear a mismatched combination — the per-piece stats don't go anywhere.
How much does this actually matter? Here's a live comparison on a level 8 Warrior. With no artifacts: 722 HP and 118 MP. Wearing the complete Pioneer set from the starting zone: 877 HP, 169 MP, +1 to all stats, plus health and mana regeneration and +3 to both attack and magic attack. Each Pioneer piece contributes +20 HP and +10 MP on its own, and the 4/4 bonus supplies everything else — and that's before counting the random bonus lines every artifact piece rolls exactly like normal equipment does (one Pioneer Jewel might arrive with +2 DEX and +2% attack, the next with something entirely different). Over 20% more survivability for free is what "the artifact tab" means in the early game.
Artifacts are farmed in specific zones, and this is where the map search bar earns its keep again. Your first target you already know: the Pioneer set drops right in Sunny Meadows — that Pioneer Rune at 10% from Pollen — so an evening of farming produces pieces by the dozen and a full set is realistically yours before level 10. Since the bonus lines are random, keep the best-rolled copies out of your duplicates. After that the progression continues with sets like Spellweaver in Fairy Glen (levels 31–35) and Blitzcore in Forgotten Depths (41–50).
One family of sets works differently. Holy Vow, Honored Oath, Arcane Origin, Silent Death, Far Sight, Spirit Pact and Iron Wake don't drop from monsters at all — they come exclusively from Box of Origins, a container that drops from monsters all over the world (1% from Pollen, for instance). Each box contains one random artifact piece from those seven sets, and the box description lists them honestly. These sets are the raw material for grimoires, covered further down, which gives you a golden rule to adopt immediately: never sell Box of Origins contents to an NPC, even when the set looks useless for your class.
Now gems. Every artifact has a single gem socket, giving you up to four active gems at once, and identical gems don't stack. Gems are the rarest routine drop in the game: 0.1% from ordinary monsters (skill gems, which boost a specific skill, typically by 2% per level of gem refinement) and 0.3% from bosses (boss gems with broader bonuses like attack speed, life steal or knockback immunity). Note that phrasing — per level of refinement. A gem's power comes out through upgrading it at the Gem Smith in Nevaris, from +0 to +10. The refinement interface shows you the success chance honestly (100% at the early levels), the cost in gold and materials (the same shards from the Material Vendor, Lunaris Shard among them), and a safe-mode checkbox. Nothing breaks here either; without safe mode a failure costs one level. One more detail from the tooltips: some gems carry the tag [Unique] Only one copy takes effect, so you can't multiply that effect across four artifacts. Pulling a gem back out at the same NPC is free and safe. And refining an artifact and refining the gem inside it are independent operations — improving one doesn't touch the other.
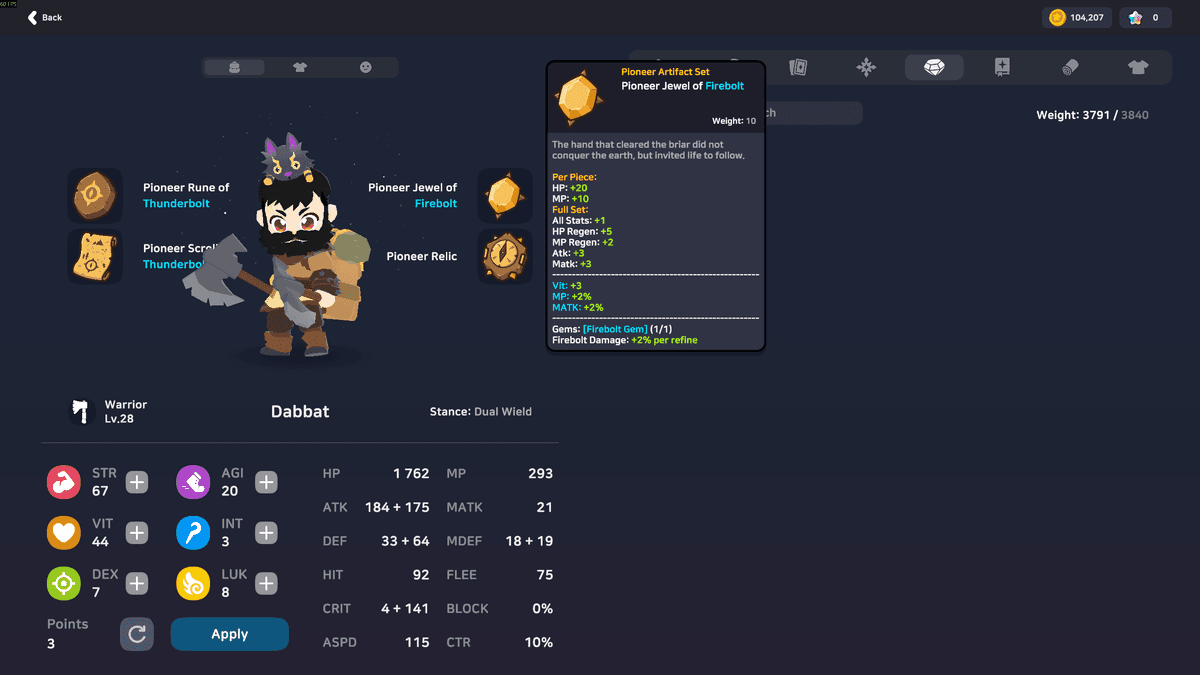
Socketing renames things here too. A plain Pioneer Rune with a Thunderbolt Gem becomes a "Pioneer Rune of Thunderbolt," its description gaining the counter Gems: [Thunderbolt Gem] (1/1) and an effect line reading Thunderbolt Damage +2% per gem refinement level. Convenient — you can scan your artifact slots and see which stone is where without opening each one.
The priority order for a beginner runs like this: pick up artifacts from your very first levels, since they're effectively free; assemble a complete set when you reasonably can; and leave deliberate gem farming for the mid-game. At low levels, whatever random skill gem happens to drop is entirely sufficient — assuming one drops at all.
Essences: Fine-Tuning Your Bonus Lines
Remember those three random bonus lines that come with every item? Essences are how you take control of that lottery. They're applied at the Artificer in Nevaris and work only on ordinary equipment — weapons, armour, accessories. Artifacts, cards and gems are outside their reach, and refining at the Blacksmith is a completely separate system that doesn't interact with them.
Every item carries a hidden budget called potential: the number of essence applications it can survive. Each use consumes one point, and at zero the item can never be modified again. So essences aren't an infinite slot machine — they're a series of deliberate bets, and checking the remaining potential in the item description before each application is a habit worth forming early.
There are five types. In a monster's drop table they occupy a single line reading "Random Essence" (usually around 0.1%), and which specific type lands on the ground is decided when it drops.
Rebirth preserves one line of your choosing and rerolls everything else — the tool for an item with one perfect line surrounded by garbage. Flow rerolls only the value of a single line without changing which stat it is, for when the line is right but the roll is weak. Destruction deletes one line and rolls a new one in its place, a targeted cure for one bad line. Growth adds a line on top of what's already there, up to the normal ceiling of 4 lines on armour and accessories and 5 on weapons. And Chaos is the casino for the truly reckless: it burns all remaining potential on the item and delivers one random outcome with equal odds — nothing happens, all line values are multiplied by something between 0.7 and 1.3, a weapon's base stat is converted, or the item is ruined outright. In exchange, Chaos is the only thing that can push line counts past the usual ceiling, to 5 on armour and 6 on weapons. Every perfect endgame item is born from that gamble. A beginner should not touch it.
The working strategy for your first few weeks is undramatic. Three lines on a fresh drop is normal, and you can live with them perfectly well. If a promising item has one genuinely bad line, treat it with Destruction or nudge its value with Flow — those are the cheapest and safest operations available. Save Growth for gear you're confident will stay with you a long time, and save Chaos for the happy day when losing an item stops being a tragedy.
Grimoires: What Your Spare Artifacts Turn Into
Grimoires are the final layer of the equipment system and the territory of serious buildcrafting. Your character has three dedicated grimoire slots, and unlike everything else you wear, grimoires give almost no raw stats — they modify and amplify skills. Typical effects read like Holy Light Damage +25%, removing the knockback from a specific ability, granting an additional skill, or +50% to status effect duration. Grimoires are what turn "a well-levelled character" into "a character with a build," and three well-chosen tomes can rearrange your entire rotation.
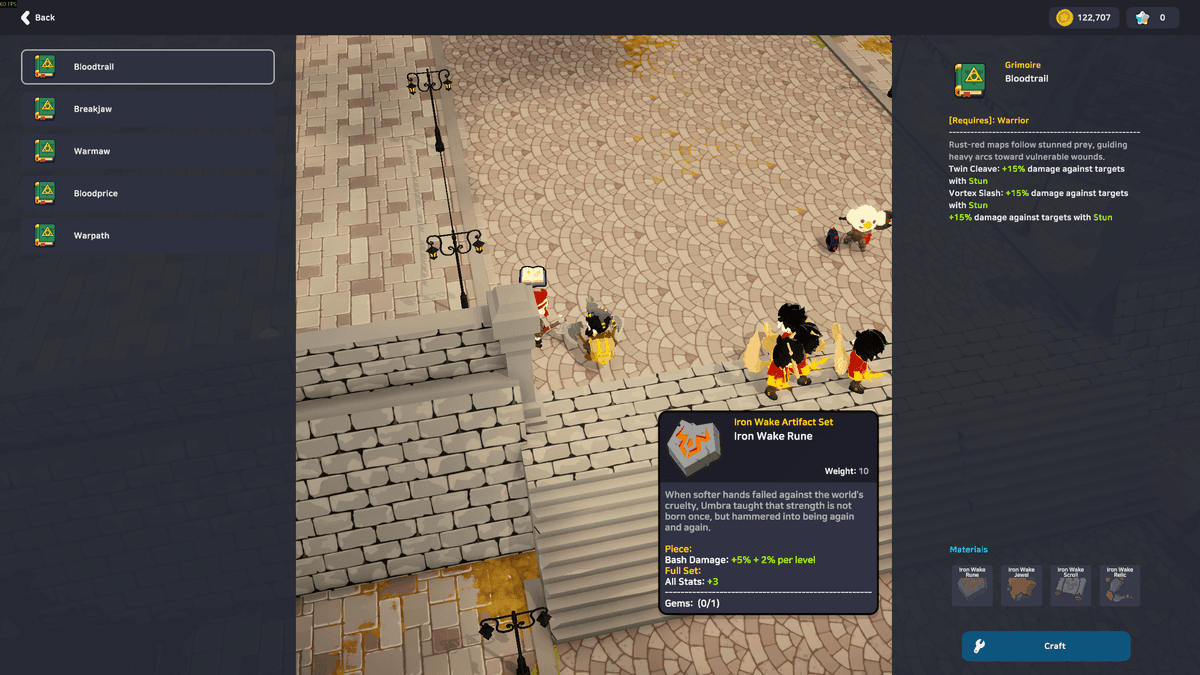
You cannot craft a grimoire and you cannot find one as a drop. There's exactly one route: trade them from the master of your base class in Nevaris. Bring four artifact pieces from a single set out of the Box of Origins pool — Holy Vow, Honored Oath, Arcane Origin, Silent Death, Far Sight, Spirit Pact or Iron Wake — and you receive one grimoire from your class's list. There are 39 grimoires in the game across all classes. The class masters are scattered around the city rather than gathered in one spot, so expect a little walking on your first visit; the Rogue master sits near the north exit and the Scout master toward the south, for instance.
Pay attention to the word "base" in that sentence. Even after job advancement, a Berserker still trades at the Warrior master and a Priest at the Acolyte master. Grimoires are tied to your base profession, and separate masters for advanced classes don't exist.
Which suggests a stockpiling habit you should start on day one even though you won't need a grimoire for a long time. Box of Origins drop from monsters all across the world — open them as you get them and park the artifact pieces in Mira's vault. Then pick one set and deliberately collect four pieces of that specific set. Chasing all seven at once is the reliable way to spend weeks without completing a single one. And the advice from the artifacts section bears repeating because it's worth real money: don't sell these pieces to NPCs. Even pieces from sets that are useless to your class are valuable goods to other players, and when the auction house comes back online they'll be one of the best income sources available to a low-level character.
There's no rush. Grimoires are optional power for the mid and late game, and you can farm every zone without one. But the player who has been quietly banking box artifacts since day one arrives at job level 50 with a grimoire ready to go, while the player who sold them to a merchant spends the next few weeks catching up.
Job Advancement: The Milestone That Defines Your Character
Reaching job level 50 is the central event in a SpiritVale character's life. This is where your base class becomes an advanced one: a second skill tree opens, the job level ceiling rises from 50 to 70, and the title over your head changes. Nothing is lost in the process — your base level, your stats, your equipment and everything you invested in the base class tree all stay exactly where they are. What resets is the job level itself, back to 1 against the new cap of 70, so you start accumulating skill points again, now spending them on advanced abilities. By job level 70 you'll have amassed 120 skill points in total.
The advancement itself involves no long quest chain. Hit Job Lv. 50, travel to the zone that houses your future class, and speak to the Class Master there — the master is marked on the zone's minimap. Each class has its own location:
- Warrior → Berserker: Windy Desert
- Knight → Paladin: Sanctum of Light (76–85)
- Mage → Wizard: Mystic Lake (31–40)
- Summoner → Necromancer: Festering Woods (21–30)
- Rogue → Shinobi: Underground Cavern (86–90)
- Acolyte → Priest: Wayfarer's Landing, by the church
- Scout → Gunslinger: Windy Desert
Note that Berserker and Gunslinger take their advancement in different parts of the same Windy Desert (whose sections cover the 26–35 range on the current map), so navigate by the specific master's marker on the minimap. And don't be alarmed by the level ranges on some of those zones. The fact that Underground Cavern is built for levels 86–90 doesn't mean a Rogue has to reach level 86 first — you only need to reach the master, not fight the locals. Tiptoeing through is entirely viable, and this is a good moment for Cloaking to earn its keep. Plan the route in advance and open the waypoints along the way while you're at it.
Weaver stands apart as the eighth advanced profession. Any base class can become a Weaver instead of taking its standard specialisation, with the master waiting in the far northern zone of Starfall Tundra (131–135). It's a hybrid built around support tools and flexible damage, and the choice is irreversible for that character: a Warrior who becomes a Weaver will never become a Berserker. Newcomers are generally steered away from it, since hybrids ask for a deeper understanding of the underlying systems — but you should know it exists before you speak to a "normal" master, not after.
One last practical note: before you set off for your new profession, stop by the Waybinder and bring your stats in line with the build you're heading toward. A Knight becoming a Paladin wants more VIT and STR; a Mage becoming a Wizard wants INT. The free reset will still be there after the job change, of course, but meeting a brand new skill tree with the right stats already in place is a much better first evening.
The Road Ahead: From Sunny Meadows to the Endgame
There are no quests pointing the way in SpiritVale, so you plot your own route using the level ranges printed on the world map. The logic is transparent: each map is built for a five-level band, and when the local monsters stop giving meaningful experience, it's time to move up. The current path from level one runs Sunny Meadows 1 (1–5) → Sunny Meadows 2 (6–10) → Forest Field 1 (11–15) → your pick of Forest Field 2, Treant Trail or Nevaris Sewers (all 16–20) → Bunny Woods or Festering Woods 1 (21–25) → Festering Woods 2, Lake Field or Windy Desert (26–30) → Mystic Lake 1, Fairy Glen or the Windy Desert North and South fringes (31–35) → Mystic Lake 2 and Swamp (36–40) → Goblin Field and Forgotten Depths 1 (41–45) → Forgotten Depths 2 and Goblin Village (46–50). Notice that nearly every step offers a choice of two or three zones. That's both variety for the grind and different loot pools for different goals.
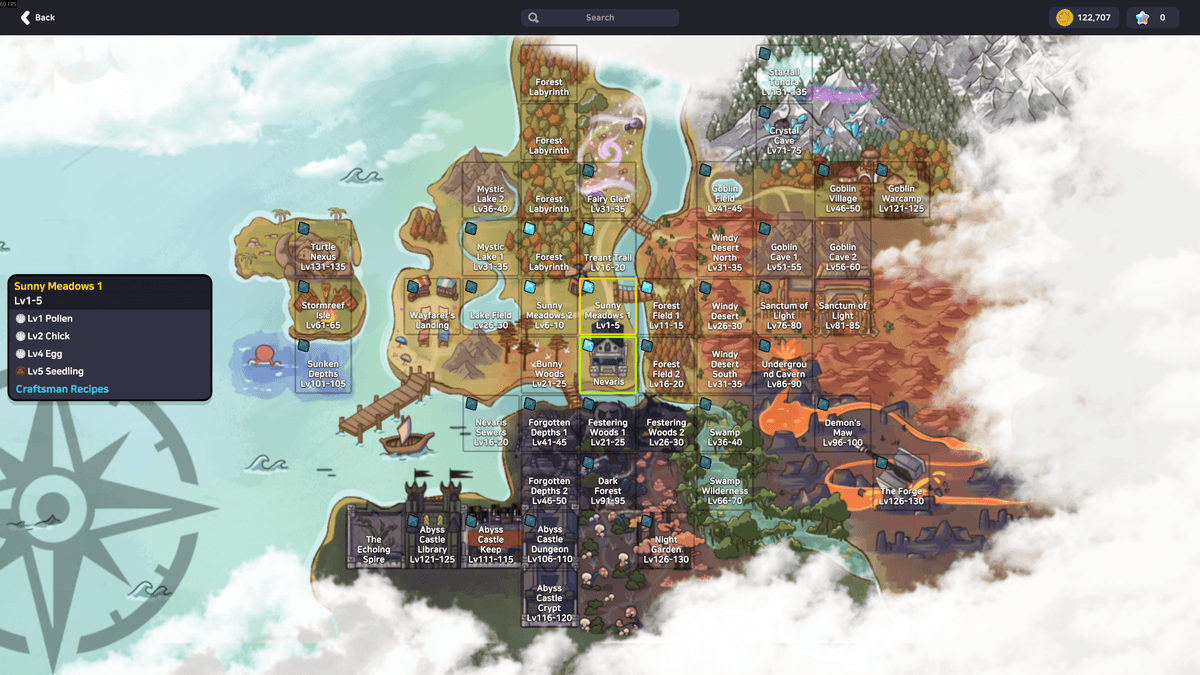
Past that, the world opens outward: Goblin Cave 1 and 2 (51–60), the island of Stormreef Isle (61–65), Swamp Wilderness (66–70), Crystal Cave (71–75), two tiers of Sanctum of Light (76–85), Underground Cavern (86–90), Dark Forest (91–95), Demon's Maw (96–100), the underwater Sunken Depths (101–105), the four floors of Abyss Castle — Dungeon, Keep, Crypt and Library (106–125) — Goblin Warcamp (121–125), Night Garden and The Forge (126–130), and finally Turtle Nexus and Starfall Tundra (131–135) at the edge of the map. Add special places like the multi-section Forest Labyrinth, which doesn't carry a conventional level label at all. All told: more than thirty maps, over 230 monster types and twenty-odd world bosses.
Put everything from the sections above together and an unexpected conclusion falls out: the starting zone is a complete power package that most new players walk straight past. Consider what one or two evenings in Sunny Meadows can produce. The full Novice set from the Craftsman (+1 to all stats, plus free Heal, Haste and Cure for any class). The complete Pioneer artifact set (another +1 to all stats, +150 HP, health and mana regeneration). A weapon with four card slots. The result is a character with self-healing, a speed buff and roughly thirty percent more durability than an identical classmate who skipped it — all of it free, all of it from dandelions and level-one chicks. Spend the extra hour in the meadows and the next twenty levels go by without a single crisis.
The rhythm of levelling comes down to one rule: don't overstay in a zone. The classic beginner mistake is farming a comfortable map long past the point where its experience means anything. Check yourself every few levels — if both the Base and Job bars are barely creeping, you've stayed too long. There's exactly one legitimate exception, and it's the deliberate farming of a specific card, gem or material. "Grinding for experience" and "grinding for drops" are different modes, and it helps to know consciously which one you're in.
Early money arrives through three channels. First, ordinary monster loot: surplus weapons and armour sell to the Material Vendor and other city merchants (five items from the starting meadows go for roughly 1,250 gold), and anything you'd rather not sell gets broken down at a Craftsman into refining materials. Second, zone materials: while the Craftsman is your gear source they convert into equipment, and once player trading returns they become a staple commodity. Third and most important long term: rarities — cards, gems, essences and artifact pieces from Box of Origins. The golden rule of Early Access is that anything rare you haven't found a use for goes into Mira's vault, not to a merchant. When the auction house is running properly again, that hoard becomes your starting capital.
And after job advancement? Essentially a second game. Levelling a new skill tree from job 1 to 70, pushing your base level toward 150, assembling full artifact sets with refined gems in them, building grimoires around a specific concept, hunting world bosses, and the guilds and PvP arena that shipped with Early Access. There are already hundreds of hours here, and the developer's roadmap promises new systems every few months.
Parties, Guilds, World Bosses and PvP
SpiritVale is generous about grouping in a way most modern MMOs aren't, and the numbers make the case on their own. A party raises both experience and drop rate for everyone in it, and that bonus keeps scaling all the way to 12 members. There's no loot competition to manage and no penalty for bringing more people. If you take one behavioural tip from this guide, make it this: even if you consider yourself a committed solo player, join a group on a busy spot occasionally and watch how much faster both bars move.
Finding one is done through Party Search, which since a launch-week patch lets you search by map name — so you can find people already farming exactly where you intend to go rather than advertising and waiting. Aim for groups within roughly ten to twenty levels of your own; too wide a gap and the zone stops making sense for one side or the other.
Guilds arrived with the Early Access build and give you a persistent group, a chat channel and shared storage. One caveat for right now: guild storage was taken offline on July 25, 2026 for maintenance on the item infrastructure, alongside the trading systems, and the team has said all of it is coming back together. Check the current state in the Steam announcements before you plan anything around guild banking.
World bosses — twenty-plus of them across the map — are the game's marquee group content, and they work differently from most MMOs. They don't spawn on a timer for you to camp. Instead, each is summoned using a boss lure, a consumable crafted from materials that only works on that boss's own map, and only when the boss isn't already alive. That last detail matters on a busy server: your lure is wasted effort if somebody else has already pulled the boss. A note on cost, too — the crafting price of boss lures was raised sharply from 5 to 20 materials in patch 0.30.6, so this is deliberately not something you do casually. What you get in return is the best loot in the game: boss cards drop at 3% against the usual 1%, and boss gems at 0.3% against 0.1%, with effects that are qualitatively different rather than just bigger.
Don't plan on soloing them. World bosses are built for coordinated groups, and this is where the elemental knowledge from the combat section pays off most concretely — bringing an element the boss takes x1.25 from, and avoiding one it resists, changes the fight more than an extra few levels would. Inspect first, then commit.
Finally, there's a PvP arena, also part of the Early Access launch build, complete with rank icons. It's the least developed corner of the game at the moment and it isn't where a new player should be spending time — but it's worth knowing that the Rogue's mana-draining poison and the Knight's Vulnerability stacks aren't only PvE tools. If arena play interests you long-term, that changes which stats and resistances are worth points, and it's the sort of thing to factor in before you're fifty levels deep.
Questions New Players Actually Ask
What follows are the questions that come up over and over in the Steam discussions, the official Discord and the game's subreddit during these first weeks of Early Access.
Is there really no questing and no tutorial? Really. SpiritVale is deliberately built in the spirit of early-2000s MMOs: no quest journal, no dailies, no arrows pointing anywhere. Progress means walking into a field, killing monsters, collecting loot and improving your character. It puts a lot of people off in the first hour and hooks them in the second. If you need a constant guide, the game is honestly not for you, and it isn't pretending otherwise.
Why are trading and the auction house switched off? It's a temporary measure. After the difficult launch on July 15, 2026, the developer disabled player trading, vending stalls and the auction house — and later guild storage — in order to rebuild the backend and deal with a serious bot problem. As of late July 2026 the work is still in progress, with the team saying the systems are days rather than weeks away from returning. The Steam announcement page is where updates land first, so check there for the current situation.
Can I change class without making a new character? No. Stats and skills reset for free at the Waybinder as many times as you like, but the class itself is bound to the character. If you want to try another one, roll an alt — Mira's storage is shared across your account, so passing along gear and materials is trivial.
Will my item break when I refine it? No. Neither equipment nor gems are destroyed by a failed refinement in SpiritVale. The worst case is losing a single refinement level, and that only happens if you turned off safe mode. The one genuine way to ruin an item is the Chaos essence — and that's a bet you place knowingly, not an accident that happens to you.
Are the advanced classes actually implemented? Yes, all of them. The final base class received its specialisation back in February 2026 — the Berserker patch, which the developer explicitly framed as completing the set for Early Access. If you read an old Steam review claiming half the second jobs are missing, it predates that work or misremembers it. All seven standard advancements plus the Weaver are live.
Is there a language other than English? The Early Access build ships with support for 15 languages and partial interface translations. Item, skill and location names, however, remain in English in the client regardless of your setting — which is exactly why this guide uses the original English terminology throughout.
Is it playable solo? Comfortably. A Summoner with a pet, and the sturdy Warrior and Knight, handle content alone without much trouble. But the game clearly nudges you toward groups: experience and drop bonuses scale up to 12 players, and world bosses are simply out of reach for a lone character. Even committed loners should drop into a party through Party Search from time to time.
Is there going to be a wipe? No wipes are planned now that Early Access has begun; characters persist through to full release. The one wipe happened during the transition from playtest to Early Access in June 2026, and it was announced well ahead of time. The developer publicly shot down the rollback rumours that circulated during launch week.
Is it worth buying right now? That depends entirely on your tolerance for Early Access. Steam reviews sit at Mixed, around 63% positive, and the negatives are overwhelmingly about stability rather than design — server restarts, lag spikes, and the disabled economy. The game underneath is genuinely well made and patched several times a week. If a rough month doesn't bother you, $15 buys a lot of game; if it does, wishlist it and check back after the backend work lands.
Where do I find current information? The official Discord is the best place to ask questions, since both community volunteers and the developer answer there. Among external tools, the fan-run spiritvaledb.com is worth bookmarking for its item database, interactive map and damage calculator. But don't forget the in-client tools either: the world map search and the F inspect window between them answer most of the "where do I get this" and "what should I be killing" questions you'll ever have — and unlike third-party sites, they're never out of date. Be a little sceptical of the wave of hastily assembled SpiritVale "wikis" that appeared after launch; several of them describe zones and NPCs that don't exist in the actual game.
Instead of a Conclusion
SpiritVale is that rare thing: a game that feels like it wandered out of 2004, arrived in 2026, and gathered a warm and helpful community around itself anyway. It won't lead you anywhere by the hand, but it pays out generously for curiosity. A skill description you actually read turns into a combo. A monster you inspected turns into the right farming spot. A box you shelved at Mira's rather than selling turns into the grimoire your build was waiting for.
Start small. Collect your Waystone from the Waybinder, walk north into Sunny Meadows, and craft your first sword for an armful of Flax. Get the full Novice set while you're there — you'll thank yourself around level fifteen. After that, the world around Nevaris does a decent job of pointing the way itself. See you out on the spots.