Fishing in Royal Quest: A Complete Guide for Beginner Anglers
Fishing in Royal Quest is a peaceful profession designed as a relaxing break from relentless dungeon grinding and mob farming. But do not let the serene waters fool you: beneath the calm surface lies a precision reaction mini-game with split-second timing. Blink, and you miss the bite. React too early, and you snap your line and lose your bait. In this comprehensive guide, we cover everything from your first visit to the guildmaster at Tri-Lakes to mastering hook timing and claiming every valuable drop.
Quick take: Fishing unlocks strictly at Level 23 from guildmaster Roub de Gisier at Tri-Lakes. The hook window lasts a razor-thin 0.5 seconds — rely on your status buff bar changing from "Waiting for Bite" rather than character animations alone. All fish are bound to your character and cannot be traded on the market.
Requirements and Starter Quest Chain
You cannot simply grab a branch, tie some line to it, and start casting in the nearest pond on a fresh level 1 character. The fishing mechanic is locked behind minimum adventurer experience:
- Minimum level: Exactly Level 23. Guildmasters will not even talk to you until you reach this threshold.
- Starting location: Head directly to Tri-Lakes, the scenic lake district situated northeast of the capital city of Varlone.
- Key NPC: Look for master angler Roub de Gisier standing right by the shoreline. He handles guild recruitment and equips beginners with their first gear.
- Starter quest: Speak with Roub and accept the quest Legend Fish from the introductory "Fishing" storyline. Completing it awards your first rod, a starter bait supply, and unlocks daily regional requests.
Hold onto your starter supplies carefully. Roub will hand you a starter rod and an initial pouch of universal CARP Bait. This package provides everything you need to practice the timing and earn your initial capital for professional gear.
Bite Anatomy: How the Mini-Game Works
Fishing in the world of Aura does not force you to balance float buoyancy or reel tension over several exhausting minutes. Everything hinges on razor-sharp concentration and rapid reflexes. The catch cycle consists of five strict steps:
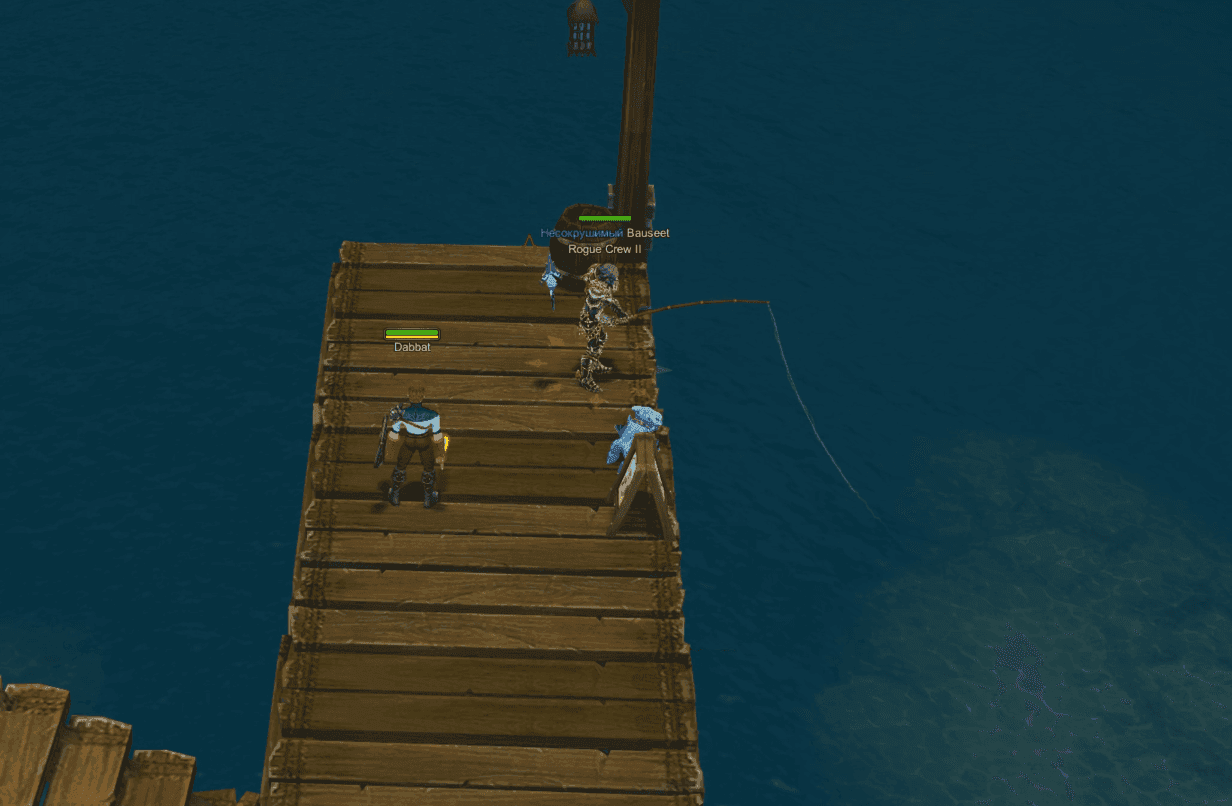
- Locating a fishing spot: Approach the shoreline in an allowed fishing sector. These spots are marked on your regional map by a white hook icon and in the game world by a wooden signpost stamped with the C.A.R.P. society logo.
- Casting your line: Place your fishing rod onto your quick-access hotbar (such as slot 1 or key E) and tap it once. Your adventurer will take a steady stance and cast the line into the water.
- Waiting phase and buff tracker: A temporary buff titled "Waiting for Bite" featuring a small yellow chest icon appears in your status bar. Do not touch any buttons during this phase. Expect the bite timer to tick between 5 and 15 seconds depending on whether groundbait is active.
- The strike signal: The crucial moment arrives. The status buff changes abruptly, a bright yellow exclamation point (!) lights up over your character's head, and an audible water splash echoes across the shore.
- Hooking the catch: Instantly press the fishing rod hotkey a second time. Hesitation is fatal here.
Your strike window lasts roughly 0.5 seconds. If you sneeze or look away, the fish escapes. If you jump the gun and press early, your bait is consumed for nothing. Arrive late, and your rod still loses durability while your hook comes back empty. The game shows zero mercy for sluggish fingers.
Pro Consistency Habits and Technical Quirks
A common novice pitfall is trying to track the exclamation mark in heavy rain, fog, or dark swamp water where visual cues blend into the backdrop. Veteran anglers keep their eyes glued to the status buff bar in the upper corner of the UI. As soon as the yellow chest icon clears, hit your button immediately. This prevents visual lag and bad camera angles from ruining your cast.
Keep economic reality in mind: all fish caught are bound to your character (Soulbound). You cannot auction your catch in Varlone or trade it to guildmates for gold. The sole gameplay purpose of caught fish is turning them in to specialized fishmongers for Fishcoins or processing them through cooking and alchemy recipes.
Quick take: Avoid burning your early savings on top-tier tackle right away. While the Master Fishing Rod boasts the highest rare loot multiplier, its accelerated durability loss will drain your wallet dry on ordinary fish. For daily progression, the Fine Fishing Rod paired with Speed Chum offers the ideal balance. Always double-check your CARP Oracle scroll location before activating it — otherwise, your 30-minute double-loot window evaporates into thin air.
Tackle: Rod Tier List and Durability Mechanics
A fishing rod in Royal Quest is a consumable tool with a rigid durability pool, not an immortal artifact. Every single cast chips away at its durability rating regardless of whether you pull in a massive catfish or botch your reaction. Higher-tier rods significantly boost the appearance rate of chests and lunchboxes, but they degrade much faster.
Offers peak probability for hooking lunchboxes, rare reagents, and sunken chests. Available from Takashi's fishmonger shop for a substantial sum of Fishcoins. The major drawback is steep durability burn. Swinging this rod blindly at common carp is a surefire path to bankruptcy. Save it exclusively for active Oracle windows or targeted sunken chest farming runs.
The gold standard for daily angling sessions. It strikes an optimal balance between repair longevity, fair purchase cost, and a noticeable bonus to landing heavyweight fish compared to basic sticks. This is the premier tool for completing regional daily quests efficiently.
An inexpensive entry-level tool suited for grinding plain Fishcoins on common fish. Your odds of pulling anything fancier than standard perch remain modest, but cheap restock pricing allows you to pack your bags with spares and fish casually without sweating overhead expenses.
The free starter tool awarded by Roub de Gisier during the "Legend Fish" questline. Strictly meant for mastering bite timings across your first 20–30 casts. Replace it at your earliest financial convenience.
Baits: Universal Standard vs. Regional Formulas
Fish in Aura are remarkably picky eaters. Tossing an unfavored lure into the water forces prolonged wait times and fills your basket with wet driftwood and empty shells. Baits are strictly divided into two distinct tiers:
- Universal CARP Bait: Engineered by the royal fishing society. Fish take this bait anywhere in Aura — from central riverbeds to frozen northern peaks. Indispensable for quick quest hand-ins when you lack travel time, and a crucial catalyst for high-tier alchemy crafting.
- Specialized Regional Baits: Formulated for specific biomes. Using the matched regional bait dramatically elevates your bite rate for rare trophy fish:
- Meadow Bait — Central Region (Tri-Lakes, Iris, Elgor);
- Midnight Bait — Grim Wolf Lands (Arkon, Vorlax);
- Dry Wind Bait — Scorching Desert (Moon Oasis, Makdar);
- Slimy Bait — Dead Marshes (Kvanik, Shamba);
- Cursed Bait — Valley of the Fallen (Interfluve, Teuton);
- Northern Bait — Obykan Plateau (Aloha, Aranta).
Purchasing ready-made bait in bulk from merchants quickly drains your coin pouch. The smart play is buying the corresponding crafting recipes from Takashi and hand-crafting bait with gathered wild herbs like stubborn fruit and river reed. This single habit saves tens of thousands of Fishcoins weekly.
Buffs and Consumables: Pacing and the Oracle Trap
Fishing unassisted is an unnecessary drain on your leisure time. Two game-changing consumables warrant regular use in any serious angler's rotation.
The first essential booster is Speed Chum. Applied right before casting, it compresses bite latency by roughly two to three times. Instead of waiting a sluggish 15 seconds, your float starts twitching in just 4 to 6 seconds. This drastically accelerates daily quest turnaround and keeps your reaction sharp.
The second and most prized item is the CARP Oracle scroll. Found inside fish lunchboxes, it doubles your rare catch rate for 30 minutes. But beware the sneaky mechanical pitfall that catches novices off guard.
Quick take: Aura is carved into 6 distinct climatic fishing territories. On your world map, valid water zones are indicated by a white hook icon, while physical shorelines feature C.A.R.P. wooden signposts. Each territory favors a matching regional bait that enhances rare catch rates. For stress-free fishing with zero mob aggression, pick Tri-Lakes; for high-stakes deep-water plunder, brave the Valley of the Fallen.
Aura's Geography: How Fishing Grounds Are Structured
You cannot simply cast a line into any random puddle crossing the main road. The developers established strict boundaries for all aquatic pursuits. To find an active sector, open your map overlay (M key) and scan for white fishing hook icons. Once you reach the bank, look for wooden piers or designated shorelines stamped with the official C.A.R.P. society sign.
Every water body belongs to one of six overarching biomes, each hosting unique climatic conditions and endemic fauna. While universal bait works anywhere, matching your hook to the regional specialty drastically weeds out driftwood and empty clams in favor of prize specimens.
Regional Directory: Territories and Bait Matching
Before setting off on an angling expedition across the continent, consult our regional reference chart to stock the correct lures from Takashi:
| Fishing Territory | Encompassed Maps | Dedicated Bait | Catch Characteristics & Ecology |
|---|---|---|---|
| Central Region | Tri-Lakes, Iris, Catalania, Quedok, Forest of Shadows, Maragorn, Tascon Valley, Tumangan, Elgor | Meadow Bait | Starter safe haven. Tranquil waters far removed from mob aggro radii. The premier spot for early progression and landing rare reaction stabilizers. |
| Wolf Lands | Arkon, Wolf Pits, Vorlax, Morra Forest | Midnight Bait | Murky woodland lakes. High rate of nocturnal predators. Wandering wolves and bandits roam close to piers — clear the surroundings before your first cast. |
| Scorching Desert | Moon Oasis, Makdar, Endinopolis | Dry Wind Bait | Isolated oasis springs. Home to hardy scaled fish resistant to drought. Water points are frequently patrolled by aggressive scorpions and nomads. |
| Dead Marshes | Kvanik, Tadano, Shamba | Slimy Bait | Stagnant bogs and bayous. Inhabited by marsh eels, mudskippers, and toxic catfish. Regular weed hooks occur, but lunchboxes drop potent alchemical oils. |
| Valley of the Fallen | Interfluve, Mushroom, Teuton, Trogul, Elona | Cursed Bait | High-tier haunted reservoirs with spectral fish. Features an elevated chance of snagging sunken chests packed with crystal keys. |
| Obykan Plateau | Aloha, Aranta and northern highland waters | Northern Bait | Freezing alpine torrents. Yields nutrient-rich salmonids essential for endgame cooking buffs. Exceptional territory for late-game Fishcoin farming. |
Waterside Safety: Avoiding Mid-Bite Deaths
Few moments are more infuriating than taking a stray hit from a respawned mob right as the strike exclamation mark flashes over your head. Taking combat damage instantly cancels your fishing channel, shears your tackle, and consumes your lure.
If you plan to fish in semi-AFK mode while listening for audio cues in your headset, choose safe havens. At Tri-Lakes, the wooden docks stand well beyond enemy detection ranges, letting you cast peacefully for hours. In hostile zones like Vorlax or Shamba, always clear local mobs first and ensure patrol routes do not brush past your casting dock.
Quick take: All fishing loot splits into direct water hooks and unopened containers. From open water, you will pull fish, junk, lunchboxes, sunken chests, and the ultra-rare alchemical reagent Reaction Stabilizer. Inside lunchboxes sit regional baits, Melios infusions, and remote warehouse tickets. Monster cards do NOT drop from fishing — save yourself thousands of wasted casts chasing forum jokes.
Direct Water Hooks: What Pulls Up on Your Line
When examining the full drop from fishing in Royal Quest, understand that every successful strike consults the game's internal loot tables. Depending on your rod tier, equipped lure, and active Oracle buffs, your haul resolves into one of six distinct categories:
| Catch Category | Specific Items | Base Probability | Practical In-Game Purpose |
|---|---|---|---|
| Standard Fish | Perch, Carp, Crucian, Catfish, Eel, Roach | Common (60–75% overall) | Turned in directly to fishmonger Takashi for Fishcoins. Character-bound; cannot be traded. |
| Trophy Fish | Heavyweight Catfish, Prismatic Trout, Deep-trench Eels | Low (boosted by regional lures) | Awards 3 to 5 times more Fishcoins than common catches. Required for completing advanced quest milestones. |
| Fish Lunchbox | Fish Lunchbox (sealed container) | Moderate (5–12% with quality rods) | Opened right in your bag. The primary source of Oracle scrolls, remote warehouse passes, and bait bundles. |
| Sunken Chests | Barnacled Chest, Sunken Coffer of Plunder | Low (3–6%) | Contains instant gold payouts, crystal keys, bag upgrades, and dungeon elixirs. |
| Rare Reagents | Reaction Stabilizer, lustrous river pearls | Ultra-rare (sub 1–2%) | High-value alchemical material. Verified in chat logs by anglers using Master Rods at Tri-Lakes. |
| Debris & Flotsam | Waterlogged boot, river weeds, cedar cones, driftwood | Moderate (rises with wrong bait) | Junk. Sell to standard general merchants for pocket copper to unclutter bag space. |
Unpacking the Fish Lunchbox: Guaranteed Loot Table
The Fish Lunchbox represents your most profitable recurring hook. Double-clicking it inside your inventory yields one or more guaranteed supplies from the following verified table:
- Warehouse Ticket: Grants remote access to your account storage vault from anywhere in the world without traveling to an Infanta shrine. A crucial asset for dumping loot during long shoreside grinds.
- Scroll of the CARP Oracle: Grants a temporary 30-minute buff that doubles your rare catch rate in a designated zone.
- Regional Bait Bundles: Packs of 5 to 15 specialized baits (Midnight, Cursed, Slimy, Meadow, Northern, or Dry Wind).
- Melios Infusion: A potent instant-recovery combat draught favored for grueling dungeon bosses.
- Fish Oil: High-demand alchemy base used in stat-enhancing culinary dishes and long-duration potions.
Sunken Chests: Is Bottom-Dredging Worth It?
Sunken coffers surface far less frequently than lunchboxes, but their rewards justify the wait:
- Crystal Keys: Universal keys required to unlock high-tier treasure vaults hidden across Aura.
- Storage Bags: Permanent inventory expansions like the Swift Fawn Storage Bag to broaden your carrying capacity.
- Purification Elixirs and Combat Scrolls: Consumables that cleanse debuffs and buff primary stats in endgame raids.
- Direct Gold Pouches: Instant currency infusions delivered straight into your purse without market tax cuts.
The Monster Card Myth: Separating Fact from Fiction
In global chat channels and community Discords, inquisitive newcomers constantly ask: "Can you hook monster cards while fishing?" and "Where does the Bream Card drop?". An entire folklore has sprung up around this topic.
Quick take: The dedicated currency of all angling activities is Fishcoins. Relying solely on selling common fish yields razor-thin margins. Your real bankroll comes from regional daily quests. Spend your initial earnings following a strict sequence: buy bait recipes first, upgrade to a Fine Rod, and only then stockpile currency for prestige shop exclusives like the Water Efreet pet and unique fishing mounts.
Fishcoin Economics: Sustainable Profits vs. Bankruptcy
Fishing in Aura operates within a self-contained economic loop. Because all caught fish are bound to your character, you cannot list them on the Varlone player auction for gold. Your objective is trading your daily catch for Fishcoins in Royal Quest with the certified guild merchant, Takashi.
A classic beginner blunder is buying 100 ready-made lures from the shop, catching 100 common roach, handing them to Takashi, and realizing you ended up with fewer Fishcoins than you started with. Selling plain fish barely recoups operational overhead. To turn a steady profit, tap into three essential income streams:
- Regional Daily Quests (Dailies): The true backbone of your fishing income. In every zone (Central District, Wolf Lands, Bogs), local angling NPCs issue daily quotas to reel in specific fish quantities. Daily rewards eclipse your daily tackle expenses several times over, delivering massive lump sums of Fishcoins.
- Trophy Specimen Turn-ins: Heavyweight predators and deep-trench catches command 3 to 5 times the payout of standard catches. This is why investing in regional specialized baits pays dividends by filtering out cheap filler fish.
- Starter Investment Quests: When beginning your career, complete the intro tutorial quests from Roub de Gisier and Takashi. Early milestones award up to 50,000 Fishcoins upfront, easily bankrolling your first full set of professional gear.
Takashi's Shop Directory: What to Buy with Fishcoins
All your hard-earned tokens are redeemed at Takashi's regional counter. His stock is divided into functional gear that accelerates your work and luxury vanity rewards:
| Catalog Category | Items in Stock | Purchase Priority | Mechanical Value & Usage |
|---|---|---|---|
| Bait Crafting Recipes | Formulas for regional lures (Midnight, Slimy, Meadow, etc.) | #1 · Mandatory First Buy | One-time purchases. Enables brewing bait from wild herbs, permanently eliminating shop markup costs. |
| Operational Rods | Fine Fishing Rod, Master Fishing Rod | #2 · Milestone Upgrade | Buy the Fine Rod immediately for dailies. Acquire the Master Rod later strictly for use with active Oracle scrolls. |
| Efficiency Boosters | Speed Chum | #3 · Quality of Life | Lets you wrap up daily quotas in 10–15 brisk minutes instead of half an hour of static shoreside waiting. |
| Companion Pets | Water Efreet | Endgame Trophy | Exclusive non-combat cosmetic companion. Bound to your account; serves as a badge of dedicated angling mastery. |
| Mounts & Transmogs | Aquatic mounts, weapon reskins, straw hats | Endgame Vanity | High-status cosmetics priced in the hundreds of thousands of Fishcoins for dedicated hobbyists. |
Step-by-Step Angler Progression Roadmap
- Leveling checkpoint: Hit Level 23, complete the quest "Legend Fish" at Roub de Gisier in Tri-Lakes, and claim your free Novice Rod and starter CARP Bait.
- Seed capital: Clear early dialogue investment tasks from Takashi to pocket roughly 50,000 Fishcoins. Immediately invest this into a Fine Fishing Rod and the recipe for Meadow Bait.
- Self-sufficiency loop: Forage wild herbs around Tri-Lakes, brew your own bait batches, and knock out daily requests across the Central Region.
- Capital accumulation: Once your balance stabilizes above 100,000 Fishcoins, unlock remaining biome recipes, purchase backup Master Rods, and wait for Oracle scroll drops from lunchboxes to run high-yield sunken chest sessions.
Quick take: Nine out of ten novices bleed their initial bankroll on three preventable habits: buying pre-made bait from vendors, grinding through Master Fishing Rod durability on plain roach, and popping Oracle scrolls in mismatched zones. Master audio cue reaction via sound effects, monitor your status buff bar, and keep a spare Warehouse Ticket handy for bag clearance.
Top 5 Critical Mistakes Costing Anglers Millions
Fishing in Royal Quest seems deceptively simple until you find yourself stranded in a swamp with zero Fishcoins and a broken rod. Avoid these classic pitfalls that trap early practitioners:
- Popping Oracle scrolls in the wrong zone: Upon pulling a rare CARP Oracle scroll from a lunchbox, novices reflexively right-click it. This is a costly mistake. Each scroll rolls a designated zone (such as Arkon, Tri-Lakes, or Shamba). Activating an Arkon scroll while sitting at Tri-Lakes lets your precious 30-minute timer run out fruitlessly without yielding a single bonus chest.
- Routine fishing with the Master Rod: The S-tier rod tempts with supreme rare multipliers, but its punishing durability decay makes routine use disastrous. Swinging it at common fish without an active Oracle and matching regional bait is purely financial self-sabotage. Reserve the Master Rod for high-stakes treasure runs; handle routine dailies with the Fine Fishing Rod.
- Purchasing pre-made bait at vendor markup: Buying specialized lures hundreds at a time from Takashi drains your wallet fast. Make the one-time investment in crafting recipes. Stubborn fruit and river reeds can be harvested in surrounding fields in 10 brisk minutes, saving you tens of thousands of tokens weekly.
- False-start hook strikes: Trying to predict the bite rhythm leads players to strike a fraction of a second before the exclamation mark appears. The engine treats this as an impatient jerk: your bait is consumed, your rod loses durability, and your hook returns bare. Wait patiently for the status buff to change.
- Losing chests to inventory clutter: Waterlogged boots, river weeds, and cedar cones clog bags quickly. If your inventory is completely full when a lunchbox or sunken chest rolls, the item cannot enter your pack and is permanently lost. Always reserve at least 10 to 15 free slots, or keep Warehouse Tickets ready for instant field dumping.
Pro Quality-of-Life Tips for Relaxed Sessions
To prevent long angling grinds from straining your eyesight, veteran players employ several field-tested habits:
- Audio Cue Hooking (The Blind Strike Technique): The distinct water splash sound plays at the exact millisecond the strike exclamation mark triggers. Turn sound effects to maximum in game settings while lowering background music. You can watch a movie or chat in Discord and hook fish flawlessly by sound alone upon hearing the loud "splash!".
- Status Bar Tracking: In heavy rain, thick fog, or when nearby players on giant mounts block your character view, disregard the visual float. Watch your status buff icon in the top screen corner: the moment the yellow chest icon clears, hit your hook key immediately.
- Streamlined Expedition Loadout: The optimal setup for a one-hour shoreside session consists of: 1 Fine Fishing Rod, 100 dedicated regional baits, 20 Speed Chums, and 1 Warehouse Ticket. This package guarantees clean daily completions without running back to city shrines.
Fishing in Royal Quest is a rewarding change of pace, a dependable source of endgame reagents, and your pathway to prestigious mounts. Approach it with financial discipline, honor your strike timings, and enjoy the tranquil waters of Aura. Tight lines!