Farming in Royal Quest: Cards, Tier Lists, and the Best Spots to Grind
Why smart farming matters in Royal Quest
Most players in Royal Quest farm the same way: pick a comfortable location, grind through mobs one after another, and sell everything to the nearest merchant. It works, but it leaves a huge amount of potential income on the table — sometimes several times more than the killing itself brings in.
The gap between "just farming" and smart farming comes down to small things: the right card in your gloves, a consumable activated at the right moment, knowing exactly where to sell your loot. Each detail on its own adds a modest bonus. Together, they change the picture completely — the same hour of play can bring in 100,000 gold or a full million, depending on how well you prepared beforehand.
What this guide covers
We'll walk through three parts of efficient farming. First, consumables and bonuses that raise the drop chance from mobs and chests. Second, farming cards that go into your gear and unlock access to additional loot types — gum, pearls, springs, gems, and bonus gold from every kill. Third, everything that speeds up the process itself, from running-speed consumables to the right boots.
We'll also build a tier list — the actual order in which it makes sense to buy farming cards, with a payback calculation for each. And we'll close with a short overview of the locations where all of this is worth applying.
One thing worth flagging upfront: Royal Quest is developed by a Russian studio, and the screenshots in this guide come from the Russian-language client, since that's where the numbers were verified item by item. The item names shown in the images will appear in Russian even though the guide itself is in English — the English names used in the text are the closest available official or community-recognized equivalents.
Who this guide is for
This is aimed at players who already know the basics and want to squeeze the most out of their farming time — whether that's for gear, for gold, or just for efficiency's sake. If you're just starting out in Royal Quest, some of the cards below will be out of reach in your first few weeks — but knowing the priority order ahead of time is useful right away, so you don't burn your first hard-earned millions on the wrong purchase.
How item drop chance works
Before going through specific cards and consumables, it's worth understanding what they actually affect. Every farming item — gum, pearls, springs, moss, tiger eye, gems — has a fixed percentage chance to drop when you kill a suitable monster. That chance has nothing to do with your character's level or how hard the fight was — only with whether you have the right card equipped and whether the mob meets its conditions.
Conditions vary by card. Some work on any mob regardless of level — the gum cards, for instance. Some require monsters of a specific level — pearls and springs only drop from creatures level 40 and above. And some have an even narrower condition: the chance to get a tiger eye, for example, only applies to Fire-element creatures level 40 and above — against any other mob, even one of the right level, the card simply won't trigger.
General loot-chance bonuses — a separate category
Alongside cards tied to specific item types, there's a separate category of consumables and buffs that raise the overall drop chance from any mob or chest, regardless of which cards you have equipped. This includes the Royal Blessing, the four-leaf clover, the guild skill, and a few other effects covered in the next section. It's useful to think of these separately from farming cards: they stack with each other and boost overall farming output, rather than unlocking a new loot type.
The distinction matters: a farming card gives you access to an item you couldn't get without it at all. A drop-chance bonus increases the odds of something that could already drop. So the first step is deciding which card fits your farming goal — the general bonuses are something you stack on top afterward, since they amplify a card's effect rather than replace it.
Consumables and buffs for overall loot chance
The heaviest hitter here is the Royal Blessing. It grants a flat +50% to the chance of item drops from mobs and chests — this is a premium effect, and if you're playing with an active premium account, it's applied automatically without needing to activate anything separately.
Next is the Four-Leaf Clover — a consumable that lasts 30 minutes and stacks three bonuses at once: +30% to item drop chance, +20% to experience gained, and +7% damage against bosses and elite monsters. This isn't a narrow loot booster — it's a full-purpose consumable for any active farming session, and 30 minutes is plenty for one solid run through a location.
A more modest but still useful effect comes from the regular Clover Leaf — +5% to item drop chance for 5 minutes. The duration is short, so it's worth reapplying often if you're farming long and systematically.

Standing sources of bonus
Worth calling out separately is the guild passive skill Treasure Hunt — +5% to the chance of getting items when killing monsters. This isn't a consumable but a node in the guild's skill tree, unlocked with guild development points; once invested, it stays active for as long as you're a member of a guild that has it trained. If your guild is short on development points for the skill, they can be topped up with tokens bought from the blacksmith.

Another long-lasting bonus comes from your mount's satiety — a well-fed necro-hound, for example, grants an extra +5% to drop chance. Unlike consumables, this doesn't need constant attention: feed your pet on time, and the bonus runs in the background on its own.
How it all adds up
All of the bonuses above stack with each other. An active premium account with the Royal Blessing, a Four-Leaf Clover in effect, a trained guild skill, and a well-fed pet together produce a substantial boost to loot chance before a single farming card even enters the picture. A sensible approach is to keep the standing bonuses — the guild skill, pet satiety — running at all times, and save consumables for the sessions where every percentage point actually counts.
Cards for herbal gum
The first group of glove-slot farming cards gives a chance to get Herbal Gum when killing a monster — regardless of the mob's level. That makes this the most accessible type of farming card: it works even for a low-level character grinding through the early zones.

This group includes several cards with the same effect: the Card of the Mantis, the Card of the Taus, the Card of the Spiral-Horned Taus, and the Card of the Infected Taus. All of them go into the gloves and give a 2% chance to get gum from every kill. The difference between them is in the secondary stat: the Spiral-Horned Taus card adds +7 Strength, but only for Warriors and Rogues, while the Taus card adds +7 Accuracy, but only for Archers. Pick the specific card based on your class, not on price — the gum effect is identical across all of them.
How much this actually earns
At a 2% chance, gum drops on average from roughly one in every fifty kills. Over 1,000 kills, that's around 20 pieces. Gum sells on the market for about 1,450–1,500 gold each, so net profit over 1,000 mobs comes to roughly 29,000 gold — a modest figure next to the card's own price, which runs 2.5–4 million gold depending on the variant.
Paying off the card through gum sales alone is nearly unrealistic — it would take around 85,000 kills, which stretches into an unreasonably long grind for most players. So this group of cards shouldn't be viewed as a gold source. It makes far more sense to look at it differently: if you need gum anyway as a running-speed consumable (more on that in the speed section below), the card saves you from buying it on the market — and any surplus you sell adds a little extra on top.
Card of the Northern Clawgnawer — pearl farming
The Card of the Northern Clawgnawer goes into the gloves and gives a 1% chance to get a pearl when killing a creature level 40 and above — unlike the gum cards, this one requires a reasonably high-level location to trigger at all. As a side stat, it also adds +5 Stamina and +4 Dexterity.

There's an alternative version with the same effect — the Ancient Card of the Black Crab. Its stats are identical, but it shows up on the market far less often and costs noticeably more: while the Northern Clawgnawer card averages 2.7–3 million gold, the ancient version might not be available for sale at all, and when it is, its price can climb into the tens of millions. For practical farming, the Northern Clawgnawer card is the sensible choice.
White pearl vs. black pearl — there's a real difference
Worth noting: pearls come in two types, white and black, and the card doesn't distinguish between them — the chance is shared across both. A white pearl sells for next to nothing, while a black pearl is noticeably more valuable, around 33,000–38,000 gold each. Since white and black drop in roughly equal proportion, the real profit calculation should split the overall chance in half.

With a 1% overall chance, roughly 10 pearls drop over 1,000 kills of level-40-plus mobs, about half of which are black. That's around 5 black pearls per 1,000 kills, which at current market prices comes to roughly 177,500 gold in net profit. The card pays for itself after about 16,000 kills — the fastest payback of any glove-slot farming card, which makes the Northern Clawgnawer a sensible first purchase in this category.
Card of the Strekoskop — the most profitable glove card
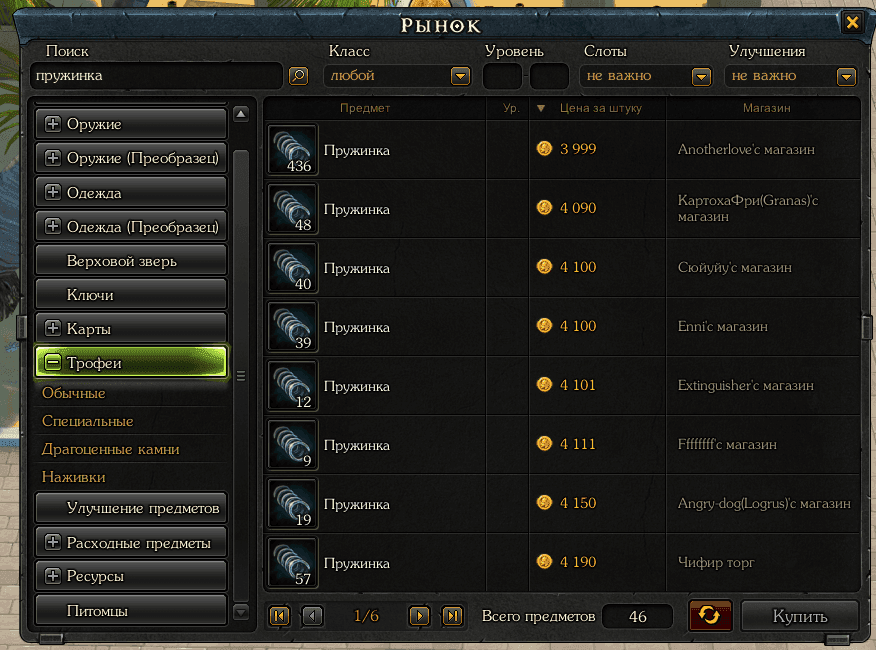
The Card of the Strekoskop is the only card that gives a chance at a spring, and in pure profitability it beats every other glove-slot option. It goes into the gloves, adds +4 Dexterity, and gives a 7% chance to get a spring when killing a creature level 40 and above.

A 7% chance is noticeably higher than what the gum or pearl cards offer, and it shows directly in the payout. On average, a spring drops from roughly one in every fourteen suitable kills. Over 1,000 kills of level-40-plus mobs, that comes out to around 71 springs.
Doing the math
A spring sells on the market for around 4,000–4,200 gold each. With 71 springs per 1,000 kills, net profit comes to roughly 291,000 gold — more than the gum and pearl cards combined over the same number of kills.
The trade-off for that payout is the card's price. The Strekoskop card runs around 14 million gold on the market, making it the most expensive card in this group. It pays for itself after roughly 48,000 kills — longer than the pearl card, but noticeably more efficient over the long run: once the card breaks even, every following thousand kills earns more gold than any other glove card can. The sensible approach is to skip this one as a first purchase and switch to it once the Northern Clawgnawer has paid itself off and you've built up the capital for the upgrade.
An extra bonus — masks from the summer event
There's a not-fully-confirmed way to push the spring drop chance even higher — masks obtainable only during the seasonal summer event "Cardigan's Mystery." Each mask adds +1% to the spring drop chance. Whether this bonus stacks with the Strekoskop card's own effect is an open question in the community: some players claim the bonuses add up, others don't notice a difference. The mask costs around 350 Reales and is only available during that particular season, so it's not something to count on as a permanent source of extra drop chance.
Golden Card of the Treasure Seeker — income without RNG
Unlike the gum, pearl, and spring cards, the Golden Card of the Treasure Seeker doesn't grant a chance at a separate item — it directly increases the gold received from every kill, by 10 to 40 gold depending on the mob's level. Your character's level has no effect on this bonus, only the level of the creature killed. The card also adds +3 Luck and can go into greaves, boots, or gloves.
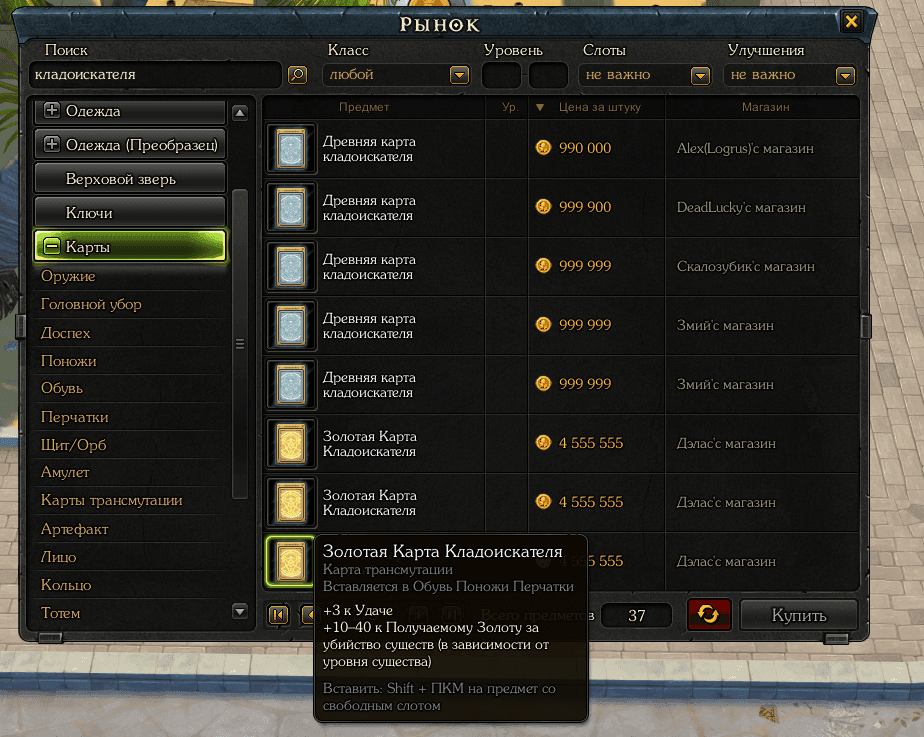
That slot flexibility is exactly what makes this card so convenient: since the gloves are usually already occupied by one of the gum, pearl, or spring cards, it makes sense to put the Treasure Seeker card in the two remaining slots — greaves and boots. That lets you run two of these cards at once without sacrificing your main glove-slot farming card.
Doing the math
With two Treasure Seeker cards equipped (greaves plus boots), the combined bonus is 20–80 gold per kill, depending on the mob's level. Using a rough average across a typical location, that works out to about 80,000 gold per 1,000 kills — income that doesn't depend on luck and accrues steadily from every mob, no matter its level.
The main edge the Treasure Seeker card has over the other farming cards is predictability. A spring or a pearl can fail to drop for dozens of kills in a row, while the Treasure Seeker bonus is credited every single time, without exception. That's why this card is worth treating as a base, independent income stream — it doesn't compete for the glove slot and works equally well alongside any of the cards covered above.
Card of the Mature Clawgnawer — gem farming
The Card of the Mature Clawgnawer goes into the artifact slot and gives a 2% chance to get a gem when killing a creature level 40 and above. It has a rarer and pricier alternative — the Ancient Card of the Pink Slime — with the same effect. One important catch: equipping the Mature Clawgnawer card cancels the extra drop chances from the Card of Solo the Marksman and the Ancient Card of the Pink Slime — so wearing them together expecting a combined effect is pointless, they conflict with each other.

The gems this card can produce vary wildly in value. The most interesting ones are the diamond, which sells to an NPC for around 20,000 gold, and morion, worth about 10,000–11,000 gold on the market. The full list of possible gems is much longer, and the rest sell for noticeably less, so an exact average profit over 1,000 kills is hard to pin down — the spread is simply too wide. The card itself costs 8–15 million gold, and it's best treated as an addition to a farming set you've already put together, not a first purchase.
Card of the Shimmering Zhuzha — tiger eye with a catch
The Card of the Shimmering Zhuzha goes into the armor slot and gives a 2% chance to get a tiger eye — but only from creatures of the Fire element, level 40 and above. That's a narrow condition, not a general chance from any mob: the card simply won't trigger if you're farming a location without high-level fire monsters.
Tiger eye sells to an NPC for 5,000 gold. Given the right element and level, around 20 pieces drop per 1,000 suitable kills, which comes to roughly 100,000 gold — a solid number if you're already farming a fire-themed level-40-plus location anyway. The card itself is cheap, usually no more than 3 million gold and often sold for close to scrap value — so if fire mobs of the right level are already in your farming rotation, slotting this card in costs very little.
Card of the Moss-Eater — the weakest earner
The Card of the Moss-Eater goes into the shield or orb and gives a 5% chance to find moss when killing a creature, along with +1 Stamina for every enhancement level on the item. There are four types of moss in the game, the most valuable being Shimmering Moss, which sells for around 650–900 gold — but the card doesn't distinguish between types when it triggers, so the real average value of a find is lower.
Averaged across all four moss types, 1,000 kills bring in around 10,000 gold — a sum that barely justifies the mechanic itself, let alone the card's price. This one is worth keeping in mind more as a curiosity than as a working income source; it only makes sense if you already have a free shield slot and nothing better to put in it.
Running speed — a quiet but powerful multiplier
Everything covered so far affects profit per individual kill. But your total income per hour also depends on how many mobs you manage to kill in that time, so your movement speed between targets directly multiplies the result of every section above. A 10–15% speed difference over an hour of active farming translates into noticeably more kills — and that means more gum, more pearls, more springs, and more gold from the Treasure Seeker card.
The most accessible boost is Herbal Gum: +10% running speed for 15 minutes. Since gum can already drop from the cards covered earlier, or simply be bought on the market for 1,450–1,500 gold, it's a cheap option you can keep reapplying throughout a session.
A stronger, and considerably pricier, effect comes from the Treasure Seeker's Elixir — +15% running speed for a full hour. At around 200,000 gold apiece, regular use gets expensive fast, so it's smarter to save purchased elixirs for particularly valuable farming sessions and rely on the free versions handed out for daily login the rest of the time.
Boots and speed cards
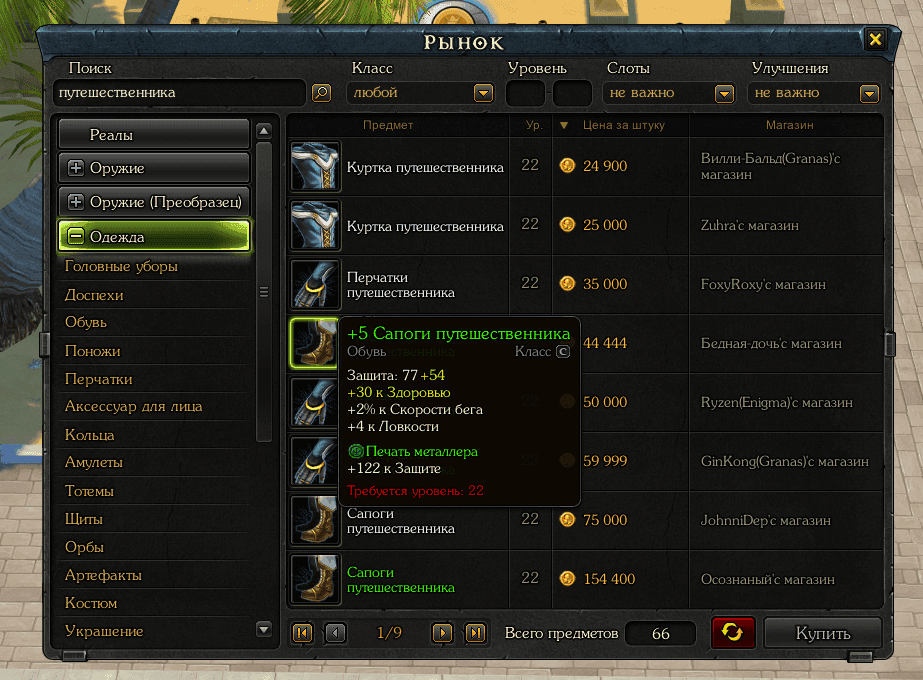
The baseline source of a permanent speed boost is the right pair of boots. Traveler's Boots, level 22, already give +2% running speed on their own and come with a card slot. There's also a rarer option — Laced Boots — which, when enhanced to a certain level, add an extra stat, but their base characteristics and general use are otherwise identical to the Traveler's Boots.
The boot slot can hold the Card of the Cockroach, which gives a flat +4% running speed — it can be equipped alongside the Treasure Seeker card if your boots have enough slots, but with only one slot available, the two compete for the same spot. Since the Treasure Seeker card delivers direct, predictable income while the Cockroach card only speeds up farming indirectly, the Treasure Seeker card is the better use of a single slot, with the speed card reserved for a second, upgraded slot if you have one.
What order to buy farming cards in
Having gone through every card individually, let's put them into an actual buying order. What matters here isn't just how much gold a card earns per 1,000 kills, but how many kills it takes to pay off its own price — and those two numbers don't always point the same direction.
The gum, pearl, and spring cards all go into the same slot — the gloves. That means at any given moment you're only farming one of the three loot types, not all of them at once, and choosing between them isn't "get them all eventually" but "pick one, and possibly switch to another later." That's why the gloves need their own tier list. The remaining cards — Treasure Seeker, Mature Clawgnawer, Shimmering Zhuzha, Moss-Eater, and the Cockroach card — go into other slots and don't compete with each other nearly as directly, so they get a separate tier list of their own.
Tier list 1: the glove slot
The first sensible glove purchase. Pays for itself faster than any other card in this group — in about 16,000 kills of level-40-plus mobs — at a reasonably accessible price of roughly 2.7–3 million gold.
An upgrade, not a starting purchase. Delivers the highest profit per 1,000 kills of any card in this group, but its 14-million price tag and roughly 48,000-kill payback only make sense once the Clawgnawer card has already paid for itself and you've built up capital for the switch.
The weakest option by raw profit — priced close to the pearl card, but with a payback that stretches to nearly 85,000 kills. Worth it only if you need gum anyway as a running-speed consumable, not as an income source.
Tier list 2: everything else
Top priority regardless of which glove card you pick. Income doesn't depend on RNG for a rare loot type — gold accrues from every kill without exception, making this the most predictable earner of all.
Doesn't compete with anything above and adds another income stream on top of an already-built set. Remember the conflict: don't pair it with the Ancient Card of the Pink Slime or Solo the Marksman's card — the bonuses cancel each other out.
Cheap and easy to pay off, but only if you're deliberately farming Fire-element creatures level 40 and above. On a location without matching mobs, the card is simply dead weight.
Weak by gold standards — the profit barely covers the mechanic itself. Worth considering only if a free shield slot has nowhere better to go.
Bottom of the list — not a gold source at all, just an indirect farming speed boost. It competes for the boot slot with the Golden Treasure Seeker card, and in that fight the Treasure Seeker almost always wins: direct, predictable income beats a bit of extra movement speed.
Where to put this into practice
The cards and consumables from the previous sections work at any location, but how much they earn depends heavily on where you're farming. Here's a quick rundown of spots that pair especially well with the cards covered in this guide.
Below level 40: gum instead of pearls and springs
While mob levels stay under 40, pearls, springs, and tiger eyes won't drop from your cards at all — all three require creatures level 40 and above. At this stage, it makes sense to lean on the gum cards. Big Rift is a good fit — Battle Mantises and Irexes here already drop gum at a decent rate even without a card, and a glove card noticeably boosts the income further. Baron Logart's Island, home to Amber Ants, is also worth a mention — it gives good experience and drops gear on the side that sells reasonably well.
Past level 40: the full card set opens up
From this point on, every card covered in this guide becomes relevant. Andynopolis makes a solid transitional spot — Hariras, scorpions, and desert crabs of the right level show up here, and the location is spacious enough to farm without heavy competition.
Shamba — the best location for this card set
Shamba deserves special mention: it's one of the few locations where several cards from this guide work well at the same time. Kill speed here is high, and springs and gems both show up regularly among the local loot — meaning gloves with the Strekoskop card and an artifact with the Mature Clawgnawer card both shine here. Add a Golden Treasure Seeker card in your greaves and boots, and the location turns into one of the most efficient spots to run the entire card set at once.
For higher levels, it's worth looking at the Mara Desert and the northern coastal locations — there are enough level-40-plus mobs there too for the pearl, spring, and gem cards to keep paying off steadily.
Putting it all together
Smart farming in Royal Quest isn't built around one magic card — it's a system where every piece reinforces the others. Loot-chance bonuses boost the effectiveness of farming cards, farming cards unlock access to extra loot types, and running speed increases how many kills you get per hour — and all of these multipliers work simultaneously, not in isolation.
If you're starting from scratch, a sensible path looks like this: keep the standing bonuses running first — the guild skill and pet satiety cost nothing extra and work in the background. Then pick up the Northern Clawgnawer card for your gloves and a pair of Golden Treasure Seeker cards for your greaves and boots — the two fastest-paying-off income sources among all the farming cards. Once you've built up capital, switch to the Strekoskop card as a more profitable replacement for the Clawgnawer, and gradually add the niche cards — Mature Clawgnawer, Shimmering Zhuzha — based on the location you're actually farming.
A quick checklist before a farming session
- Is your premium account active, and with it the Royal Blessing
- Have you eaten a Four-Leaf Clover if the session is going to be long and focused
- Is the card in your gloves the right one for your current farming goal — pearl, spring, or gum
- Are your greaves and boots slots filled with Golden Treasure Seeker cards
- Does the location match your cards' conditions — level 40+ for pearls, springs, and gems, Fire element for tiger eye
- Do you have a running-speed consumable on hand for a long session
Consumables and market prices in Royal Quest shift over time, so treat the specific numbers in this guide as a general reference rather than a fixed truth — but the underlying payback logic and the priority order stay valid regardless of the current gold exchange rate.