Once Human Base Building Guide: Territory Relocation, Power Grids, Generators, and Water Purification
Forget the offline raid nightmares of Rust or ARK: nobody can wipe your base overnight in Once Human. Your homestead here is an advanced, fully mobile outpost. Production workbenches, storage vaults, water filtration towers, and generators are packaged into a unified coordinate cube that relocates across the map in seconds. Zero lost loot. However, a poor starting location or blindly spamming half-blocks can cripple your camp progression by the second week. Here is how to maximize your build limits, bypass vertical height ceilings, and relocate without losing a single item.
Quick take: your entire homestead teleports instantly without losing any stored items via Territory Relocation on key Z. Unlock nodes in the Tech Tree to expand structural piece caps from 300 to 1400, build primary frames with full slabs rather than half-blocks to preserve your allowance, and settle near water or polluted zones for passive power and automated acid farming.
Territory Terminal: The Core of Your Camp and Limit Expansion
The heart of every homestead is the Territory Terminal — a secure command console with 9999 durability. The terminal projects your active build boundary (the glowing boundary cube), governs structural placement caps, and initiates weekly territory purification defense waves (the primary source of premium currency detailed in our Starchrom and Wish Machine guide):
- Starter Limits: Fresh accounts start with a cap of 300 structural pieces (foundations, walls, roofs), 100 furniture and decorative items, 100 production facilities or storage chests, and strictly 4 power generators. Space runs out fast.
- Territory Expansion: Once you unlock at least 4 nodes in the Tech Tree (press O), approach your Territory Terminal and trigger expansion. Your borders expand outward immediately. Structural limits jump to 1400 pieces, decor to 300, and facilities to 250. Plenty of room for large automated operations.
Ideal Base Locations: Where to Settle
You can pitch your territory almost anywhere across the open world, with standard exceptions: safe-zone settlements, Rosetta strongholds, paved highways, and quest bottlenecks. Seasoned players prioritize four primary location advantages:
- Direct Water Access: Riverbanks and lakefronts allow you to place submersible Water Pumps directly in shallow water and deploy Hydropower Generators in moving currents. Free round-the-clock power.
- Polluted Zones: If passive acid farming is your goal, your territory border must cross into Stardust contamination (where your cradle meter ticks). This lets pumps draw Polluted Water to feed Deviation Energy Generators and fermentation vats.
- Blackfell Oil Fields: Dark, oil-slicked soil around industrial zones allows pumps to extract Crude Oil directly from the ground for refining into Portable Mixed Fuel.
- Ground Incline: Avoid steep cliff sides and jagged terrain. If the ground angle is too steep, the building engine blocks outer foundation placement with terrain collision errors. A level clearing remains the safest choice.
Instant Territory Relocation Mechanics
The greatest feature in Once Human is never needing to tear down your home when advancing into higher-level zones (such as migrating from beginner forests to Iron River or Red Sands). Relocation is instantaneous:
- Enter Build Mode: Press B on keyboard (or D-Pad Up on controller).
- Trigger Territory Relocation: Press Z on keyboard, or press and hold the Touchpad (PlayStation) / View button (Xbox).
- Travel to your desired plot. A full holographic wireframe of your entire estate will appear before you.
- Rotate and align your base (mouse wheel or RT/R2 + D-Pad Left/Right) to fit the terrain contours. The projection grid must show green.
- Press confirm (Left Mouse Button / Cross). That is it! Every wall, workbench, decoration, planter box, and all storage chests with 100% of their contents instantly teleport to the new location. Zero item loss.
System cooldown for territory relocation is 10 minutes (a live countdown displays in the top right corner of the building HUD). Relocating within your local region is free, while long-distance jumps across territories require a negligible Energy Link fee.
The Vertical Territory Trick: Building Above 8 Floors
Standard building physics restricts structure height to roughly 8 wall heights from ground level. That is the hard cap. However, an architectural trick with territory volume elevation lets dedicated high-rise builders bypass this limitation:
- Start with a completely empty plot containing only your Territory Terminal, or clear out heavy structures first.
- Initiate Territory Relocation (Z on PC).
- Before placing the base, adjust the vertical height upward (elevation hotkeys on PC or D-Pad Up / Down on controller). Push the territory cube as high as the interface permits.
- Confirm placement. You will notice your territory house icon now floats high above the ground. The trick worked!
- Because your systemic boundary volume has shifted vertically upward, your building ceiling rises several stories higher, allowing you to construct towering observation platforms and skyscrapers unreachable through standard ground-level framing.
Blueprint Systems: Wipe Protection and Modular Builds
Before any major relocation or seasonal reset, preserve your architectural layouts using the Territory Terminal blueprint feature. The game offers two blueprint categories:
| Blueprint Type | What It Saves | Optimal Use Case |
|---|---|---|
| Territory Blueprint | Saves the complete homestead: walls, roofs, interior workbenches, generators, wiring, and light fixtures. | One-click reconstruction of your favorite base layout in a fresh season, provided you have the raw building materials in your backpack. |
| Structure Blueprint | Saves a specific modular building: a vehicle garage, fortified defense bunker for purification, or a gravity water tower. | Modular construction. Allows you to snap pre-designed functional outbuildings into any base and share blueprints with teammates. |
Build Mode Controls, Flight Camera, and Smart Snapping Tools
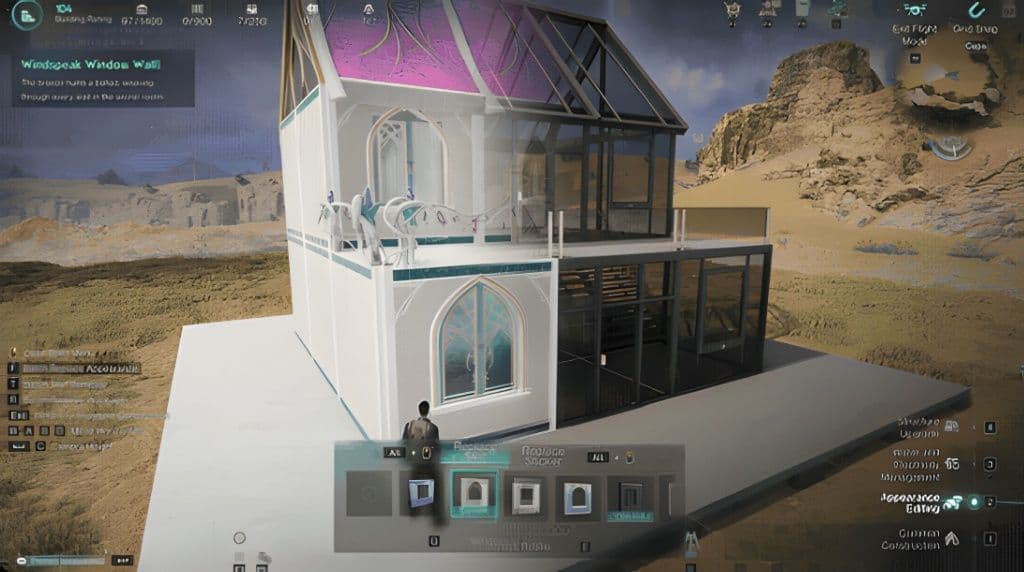
Base building in Once Human can either be a zen-like creative playground or an aggravating headache of falling off makeshift scaffolding and misaligned corner walls. The developers integrated a comprehensive architectural toolkit into the build engine, including a free-flying drone camera, coordinate grid snapping, and instant piece duplication. However, the game rarely emphasizes its keybindings, leaving newcomers to manually search bulky sub-menus for every single wall and foundation piece.
Quick take: press ~ (tilde) inside Build Mode to launch a free-flying drone camera that eliminates the need for ladders or scaffolding. Use middle-click (MMB) to clone any existing piece instantly, hold MMB to lock alignment to the world grid, and always upgrade wood to stone via the Structure Upgrade overlay to avoid structural cave-ins.
Entering Build Mode and Interface Navigation
To begin construction or remodel your existing compound while standing inside your territory borders:
- Press B on your keyboard (or D-Pad Up on your controller, then select your building category).
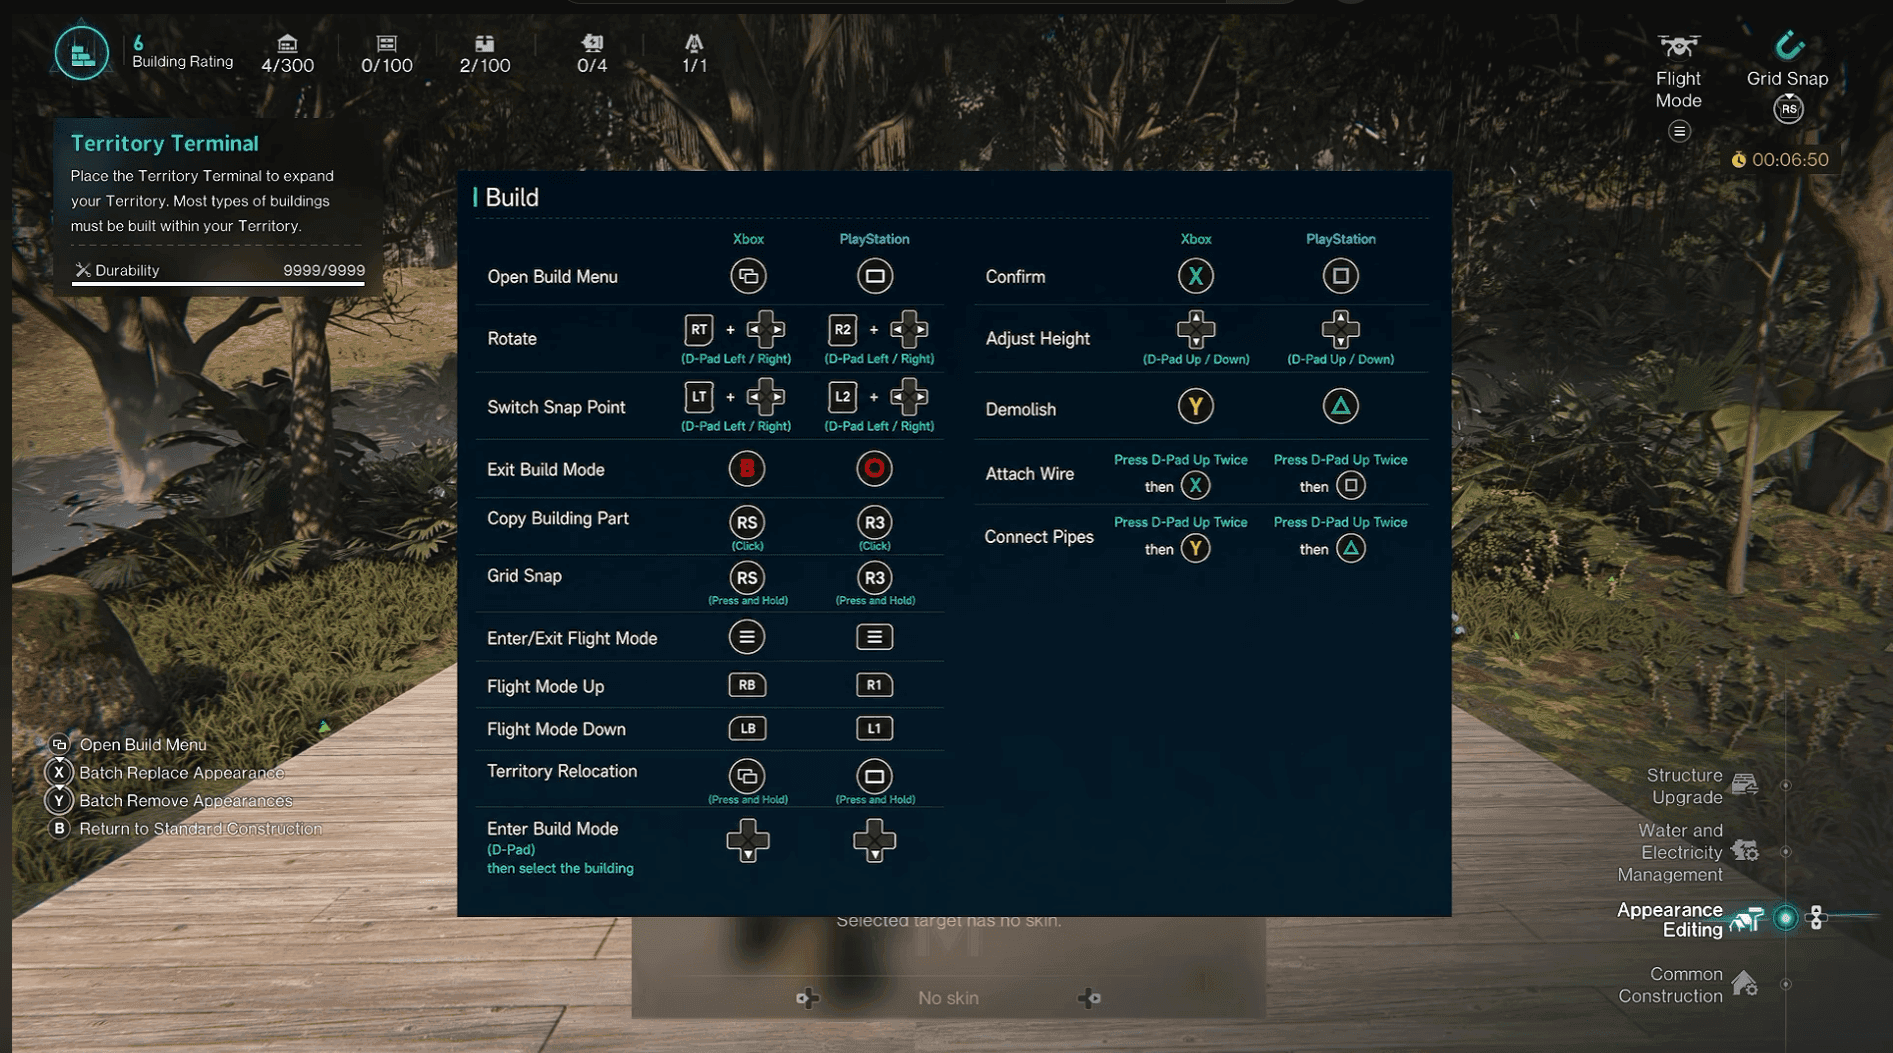
- Your interface transitions into active construction mode. Press RMB (or the View / Touchpad button on controller) to open the piece wheel and catalogue: foundations, framing, walls, ceilings, doors, roofs, functional workbenches, and utility connections.
- To exit construction mode, press B or Esc (or B / Circle on controller).
The right sidebar features four dedicated sub-modes that streamline your workflow:
- Common Construction: The foundational layout mode for snapping foundations, framing walls, stairs, and arranging furniture.
- Structure Upgrade: A seamless material enhancement mode for converting lower-tier materials (like wood) into reinforced stone, concrete, or glass without demolishing frames.
- Water and Electricity Management: A specialized engineering overlay that highlights all concealed conduits, pipelines, fluid directional arrows, and generators.
- Appearance Editing: The cosmetic finishing mode for applying wallpapers, custom stains, exterior siding, and window skins.
Flight Mode: Scaffolding-Free Aerial Construction
The single most powerful feature for any serious builder is Flight Mode, which turns your viewpoint into a free-floating aerial drone. You never need to stack storage crates or build disposable stairs just to reach roof gables or mount ceiling wires:
- While in Build Mode (key B), press ~ (tilde) on keyboard (or the Menu / Options button on controller).
- Your camera detaches from your character and enters free flight. Your character remains grounded on foot while your view glides smoothly anywhere across your territory.
- Drone Elevation Controls: Press Space (ascend) and C (descend) on PC. On controller, use your bumpers: RB / R1 to fly upward and LB / L1 to descend downward. Standard WASD or the left analog stick manages horizontal panning.
- Pressing ~ (or the Menu button) toggles the camera straight back to your survivor.
Precision Assembly: Grid Snap, Snap Points, and Quick Copy
By default, structural pieces automatically magnetic-snap to adjacent pieces. While helpful in basic rooms, this magnetic pull frequently snags pieces into awkward reverse angles when framing complex verandas or curved stairwells. Master these key manipulation controls to take total command of your geometry:
| Function & Tool | PC Keybinding | Controller Binding | Practical Structural Benefit |
|---|---|---|---|
| Grid Snap | Press and Hold Middle Mouse Button (MMB) | Press and Hold Right Stick (RS / R3) | Forces foundations and floor tiles to align rigidly to the world coordinate grid, eliminating crooked corners when laying out large industrial compounds. |
| Switch Snap Point | Cycle Snap Key (or Wheel with modifier) | Hold LT / L2 + D-Pad Left / Right | If a wall or roof stubborn snaps to the wrong joint, this command cycles through all available connection anchors (left corner, center, right edge) until it sits flush. |
| Rotate | Scroll Mouse Wheel | Hold RT / R2 + D-Pad Left / Right | Rotates the selected piece in fixed 45- or 90-degree increments around its vertical axis to orient doors, siding grain, or angled roof slopes. |
| Copy Building Part | Click Middle Mouse Button (MMB) | Click Right Stick (RS / R3 Click) | Aim at any existing wall, pillar, or floor tile and click MMB — the game immediately places an identical piece into your hand without needing to browse catalogues. |
| Demolish | Press R | Press Y / Triangle | Instantly deconstructs a misplaced building block, returning 100% of the crafting resources directly into your personal inventory. |
Seamless Structure Upgrades: Upgrading Wood to Stone Safely
A classic beginner mistake is starting with a wooden house, unlocking reinforced stone in the Tech Tree, and manually demolishing ground-floor wooden foundations to replace them with stone. The result is catastrophic: upper floors collapse, support framing shatters, and expensive storage chests spill their entire inventories across the dirt.
To upgrade your homestead safely without destroying structural integrity:
- Enter Build Mode (key B).
- Switch to the right-hand tab: Structure Upgrade.
- Select your target material from the upgrade catalogue (such as Stone Foundations or Reinforced Walls).
- Aim your crosshair directly at the wooden wall or floor and press LMB (or controller confirm).
- The wooden piece instantly converts into stone, updating its durability and blast resistance on the spot. Load-bearing integrity is perfectly preserved, and overhead furniture or storage chests will not budge an inch.
Massive structure upgrades require a steady supply of gravel and mineral ores — check out our mining and ore farming guide for optimal gathering routes.
Cooperative Building: Setting Permissions for Hive Teammates
If you play within a squad or Hive, you do not have to shoulder construction duty alone. Once Human allows you to grant granular building permissions to trusted allies:
- Open the social menu: Press O (or navigate to Esc ➔ Friends / Hive).
- Select your teammate's profile card and open their interaction permissions menu.
- Toggle the switch for Territory Building Permission.
- After authorization, your friend can enter your base, activate Build Mode (key B), place workbenches, route power conduits, and repair combat damage.
Power Grid Infrastructure, Generator Types, and Wattage Scaling
Electricity in Once Human is the lifeblood of mid-game survival and end-game industrial wealth. Without consistent power, refrigerators switch off (spoiling your stock of valuable combat food), automated extractors on acid and oil fields grind to a halt, electric furnaces go dark, and defense turrets turn into inert statues. Unlike casual survival sandbox games, the power grid here adheres to rigid wattage balance: if the combined power consumption of your running machines exceeds your total generated wattage by even a single Watt, the entire circuit triggers an emergency overload shutdown, cutting power across your entire camp.
Quick take: every generator produces a fixed wattage pool, and workstations consume power constantly. Interlink all generators into a unified network with electrical cables, raise your base cap from 4 to 8 generators via the Tech Tree, unlock specialized tech enhancements, and house an Electric Eel inside a securement unit for an immediate 10% to 30% territory wattage boost.
Power Grid Physics: Reading Your Load Monitors
To inspect and balance your camp's electrical infrastructure, enter the engineering overlay:
- While standing inside your camp perimeter, enter Build Mode (press B on PC or D-Pad Up on controller).
- Select the right-hand sidebar mode: «Water and Electricity Management». Structural walls and floors will turn semi-transparent, while power generators, junction terminals, consumers, and electrical cables light up with distinct bright outlines.
- Aim your crosshair at any active generator or distribution junction. An on-screen wattage readout will display:
- Generated Power: The total pooled wattage supplied by all generators physically wired into this specific circuit.
- Consumed Power: The active electrical load drawn by all running workstations, purifiers, and turrets on the line.
Generator Types: Efficiency and Operational Breakdown
Each generator type features unique fuel requirements, biome restrictions, and operational efficiency. The table below details all primary power sources available:
| Generator Model | Base Wattage Output | Fuel / Operating Condition | Pros and Operating Peculiarities |
|---|---|---|---|
| Small Biomass Generator | 20 W | Wood logs, charcoal, plant fiber, crops | Available from level one and operates indoors in any biome. Requires frequent manual restoking: if fuel runs out, the grid cuts off immediately. |
| Biomass Generator | 25 W (up to 30 W with enhancement) | Refined bio-fuel, dense charcoal, treated logs | Large fuel reservoir and highly dependable for extended offline periods. Bulky footprint and demands continuous raw material harvesting. |
| Solar Generator | 20 W (Day) / 0 W (Night) | Direct sunlight (requires open sky placement) | Completely free power requiring zero fuel maintenance. Output drops to strictly zero at night or during sandstorms, requiring backup power for automated farms. |
| Hydraulic Generator | 25–30 W (up to 37 W with enhancement) | Placed directly into flowing river channels | Continuous 24/7 power output with zero fuel maintenance. The gold standard for camps along the Iron River and Broken Delta. Cannot be placed in deserts. |
| Deviation Energy Generator | Up to 35–40 W (45 W+ with enhancement) | Polluted Zones | Highest base wattage output in the game. Ideal synergy: polluted ground powers the very pumps extracting acid. Generates zero power outside contaminated areas. |
Expanding Generator Limits: Scaling Past 4 Generators
Fresh survivors face an early bottleneck: the Territory Terminal restricts your camp to a maximum of 4 generators (indicated by the 0/4 counter in your building header). To power expansive industrial refineries and automated pumps, expand your cap via specialized progression:
- Tech Tree Progression: Advancing through technology tiers (press O, Management tab) using standard Tech Points expands your camp's structural allowance (see our full Tech Tree and Cradle guide), raising your default generator cap to a maximum of 8 generators (indicated as 8/8 on high-level territories).
- Tech Enhancement «Generator: Electrical Expert»: Unlocked with rare Tech Enhancement Points under the Management branch. It increases your territory's generator placement cap by +1 additional unit (allowing 9 generators total) and applies a permanent passive +2 W boost to every single generator placed on your property.
- Tech Enhancement «Biomass Generator: Sustained Output»: Upgraded with Tech Enhancement Points, increasing biomass generator output by +5 W and reducing fuel burn consumption rate by 150%.
- Tech Enhancement «Hydropower Generator: One With the Tides»: A golden technology node adding +0 to +7 W of dynamic bonus output to each hydraulic generator based on river flow velocity.
Biological Output Scaling: Electric Eel Deviation
When you have maxed out your generator cap and still need extra wattage, enlist biological power multiplication via the territorial deviation: Electric Eel (explore all companions in our Deviations master guide). This is the single most valuable utility pet for camp infrastructure:
- Catch an Electric Eel by fishing in freshwater rivers (catches reliably with standard dough bait in low-level waterways).
- Construct a Securement Unit on your base and house the eel inside.
- Optimize its containment mood: install blue mood lighting and place a running electrical generator directly beside its isolation chamber.
- Power Multiplication Mechanic: Whenever the Electric Eel's energy rating is active, it radiates a territory-wide passive surge that amplifies the maximum wattage output of every generator on your base by 10% to 30% (scaling with its skill level and mood rating). A compound running 8 generators producing 240 W instantly jumps past 310 W under a high-tier eel buff, burning zero extra fuel.
Step-by-Step Wiring Procedure
To connect a generator to your power distribution network:
- Enter Build Mode (key B) and switch to the right-hand mode: «Water and Electricity Management».
- Aim at the generator. Its terminal connector box will highlight with an interactive prompt.
- Execute the «Attach Wire» command: Press X on PC (or press D-Pad Up twice, then press X / Square on controller).
- A glowing conduit line will tether to your cursor. Route the line to your target machine or terminal junction and press confirm (key LMB / Cross). The conduit locks into place, and the status changes to connected.
Clean Wiring Architecture: Terminals, Circuit Switches, and Concealed Cables
Most novice builders commit the same architectural blunder: after placing a generator on the back porch, they string black electrical cables directly through front doorways, windows, and living rooms to every standalone machine. By level 20, the homestead degenerates into an unnavigable web of clipped wires that obstructs sightlines, causes visual clutter, and causes base-wide grid failures whenever a single table is nudged. Once Human incorporates a dedicated concealed electrical distribution system, allowing you to route tidy conduits beneath floorboards, across wall studs, and along ceiling rafters.
Quick take: never route cables directly from generators to individual crafting stations. Use ground, wall, and ceiling terminals as distribution hubs, split high-draw machinery into separate circuits using switchable pylons on key F, and activate the built-in wire concealment setting for a pristine modern interior.
The Mounting Terminal Trio: Ground, Wall, and Suspended Terminals
Instead of stretching direct wires from a power source to end devices, professional wiring relies on intermediate distribution junctions — Terminals. In Build Mode under the «Water and Electricity Management» overlay, three specialized conduit junctions are available:
| Junction Model | Mounting Surface | Durability | Engineering Application |
|---|---|---|---|
| Ground Terminal | Floorboards, stone foundations, soil tiles | 850 HP | Installs flush against baseboards or inside narrow maintenance alleys between crop plots. Keeps conduits pinned flat along floor seams and hidden behind cabinets. |
| Wall Terminal | Vertical walls, support columns, structural pillars | 850 HP | Serves as vertical risers to carry primary power conduits from ground floor generators to upper stories and workbench rows. |
| Suspended Terminal | Ceiling slabs, roof trusses, overhead beams | 850 HP | Fastens upside-down to ceilings for overhead distribution. Essential for wiring pendant lights, chandeliers, ceiling fans, and perimeter defensive turrets. |
Conduit Installation Controls and Quick Duplication
To establish clean conduit runs using distribution terminals:
- Enter Build Mode (key B on PC, D-Pad Up on controller) and toggle the right-hand mode: «Water and Electricity Management».
- Place a Ground Terminal adjacent to your cluster of machines (such as beside automated planter boxes or an electric smelter row). To quickly duplicate terminals along a perimeter wall, aim at the placed terminal and click the Middle Mouse Button (MMB) or click the right stick (RS / R3) for instant part copying.
- Aim at your generator (or upstream junction box) and trigger the «Attach Wire» command: Press X on PC (or press D-Pad Up twice, then press X / Square on controller).
- Tether the glowing conduit to the terminal and press Left Mouse Button (LMB) to lock it in place. The junction status updates to connected.
- From this localized terminal, branch short, unobtrusive wires directly into nearby workstations. Conduits remain pinned against boundaries rather than cutting through living spaces.
Switchable Pylons and Breaker Switches: Preventing Grid Collapses
As your compound expands, your aggregate peak power draw will inevitably surpass baseline generator capacity. For instance, multiple advanced electric furnaces and osmotic purifiers running concurrently can pull 80–100 W. If they fire up while your automated acid pumps are drawing power, the whole grid collapses into a blackout.
To maintain absolute control over power consumption, install Switchable Pylons and wall switches:
Wiring switches correctly turns them into interactive circuit breakers: walk up to the pylon, press key F, and you immediately disconnect an entire industrial wing, freeing up 60–80 W in a single click whenever combat turrets or emergency crafting stations require priority power.
Designing a Central Switchboard Room
The gold standard for end-game homestead architecture is creating a centralized utility closet or basement switchboard room:
- Consolidate all generators (biomass, hydraulic, or deviation) into a secure utility room and wire them into a common distribution bus terminal.
- From the bus terminal, route separate feeder lines into a bank of 3–4 Switchable Pylons, each regulating an isolated circuit:
- Circuit 1 (Critical Infrastructure): Food preservation refrigerators, territory security alarms, and base defense turrets (always energized 24/7).
- Circuit 2 (Heavy Manufacturing): Electric smelters, synthesis benches, and battery chargers (switched on manually during batch crafting).
- Circuit 3 (Resource Extraction and Refining): Automated water/oil pumps, fermentation barrels, and osmosis purifiers (runs passively during farming cycles).
- Circuit 4 (Aesthetic and Ambient): Exterior neon lighting, spotlights, and interior accent fixtures (switched off during night raids or power deficits).
The Hide Wires Display Feature
If you desire a magazine-worthy modern home aesthetic with zero visible cables crossing your wallpaper, Once Human provides a built-in wire concealment setting:
- Open your camp options or construction display settings.
- Toggle on the option for «Hide Wires».
- All routed electrical conduits and connection terminals vanish from view in normal gameplay mode. Current flow and electrical conductivity continue to function with 100% efficiency.
- Whenever you re-enter Build Mode (key B) and switch to the Water and Electricity Management tab, all concealed conduits instantly illuminate for maintenance and upgrades.
Hydraulics and Water Supply: Gravity Flow, Pumps, and Water Tower Architecture
Water management in Once Human is the second vital engineering lifeline alongside your electrical grid. Clean water keeps your survivor hydrated (preventing stamina loss and dehydration penalties), serves as a foundation for stat-boosting cooking recipes, irrigates automated hydroponic planters, and acts as an indispensable catalyst in mass-scale acid refining. Crucially, the in-game fluid mechanics are governed by realistic gravity physics, allowing builders to transport tons of fluid across compounds at exactly zero Watt power consumption.
Quick take: fluids in Once Human flow downward entirely for free under natural gravity. By building an elevated rooftop water tower with holding tanks, you only expend electrical wattage pushing water up once, while all subsequent distribution into purifiers and fermentation barrels runs downhill at 0 Watts.
Fluid Mechanics: When Electricity Is Completely Unnecessary
Unlike electrical wires that transmit current in any direction, water pipelines adhere to rigid elevation gradients:
- Downward Gravity Flow (0 Watts): If the outlet fitting of a reservoir, pump, or tank sits even half a meter higher than the intake fitting of a downstream machine (such as an osmosis purifier, fermentation barrel, or planter box), liquid flows freely under its own weight. Zero booster pumps and zero electrical wattage are required to move fluids downhill!
- Upward Pressurized Flow: Pushing fluids uphill against gravity is physically impossible via standard pipe slope. Transporting water to upper stories or into elevated holding tanks requires either an active electrical Water Pump or an in-line mechanical booster pump.
Water Extraction and Storage Modules
To establish an uninterrupted water supply for your homestead, deploy three specialized plumbing structures:
| Plumbing Unit | Power Consumption | Placement Requirements | Capacity and Practical Utility |
|---|---|---|---|
| Water Pump | 10–20 W | Placed on bare dirt, foundations, or shallow waterbeds | Draws liquids from subsurface tables. Extracts Dirty Water in clean biomes, Polluted Water in Stardust zones, and Crude Oil on black petroleum slicks. Generates head pressure to drive liquids vertically. |
| Rainwater Collection System | 0 W (Passive) | Requires unblocked open sky exposure | Harvests natural precipitation during rainstorms and squalls. The technology formula «Portable Rainwater Collection System» unlocks a compact field version. Burns zero fuel and draws no power. |
| Water Tank | 0 W (Passive) | Any level foundation or ceiling slab | Holding reservoir holding up to 500 units of liquid. Functions as an essential pressure buffer between extraction pumps and refining machines, and forms the core of rooftop gravity towers. |
Architectural Design: Building a Rooftop Gravity Water Tower
A classic beginner pitfall is clustering water pumps, holding tanks, and osmosis purifiers side-by-side on ground-floor foundations. On flat ground, fluid in pipelines routinely stalls and backs up, forcing players to install redundant in-line electric pumps that needlessly consume limited generator wattage.
The optimal engineering solution is a Rooftop Gravity Water Tower:
- Construct a vertical utility tower 3–4 wall heights tall, or dedicate an elevated pad on your compound's flat roof.
- Mount one or two Water Tanks on this rooftop platform.
- Install electrical Water Pumps at ground level (on soil or in nearby river shallows) and connect them to your power grid.
- Run a single high-pressure pipe vertically from ground to roof: connect the pump's outlet fitting to the upper inlet of your rooftop Water Tank. The electric pump will continuously push raw liquid upward into the elevated reservoir.
- Zero-Watt Gravity Distribution: Connect a main downward trunk line to the lower outlet fitting of your rooftop Water Tank. Drop this line vertically through floor openings. From this gravity riser, branch feeds into Osmosis Water Purifiers, fermentation barrels, and kitchen sinks on lower floors. Water cascades naturally into every machine at 0 Watts of power consumption!
Plumbing Controls and Pipe Routing
Connecting water lines utilizes dedicated plumbing tools within the engineering overlay:
- Enter Build Mode by pressing key B (or D-Pad Up on controller).
- Switch to the right-hand tab: «Water and Electricity Management».
- Aim at the connection fitting on your pump or reservoir. The circular pipe connection port will highlight.
- Trigger the «Connect Pipes» command: Press L on PC (or press D-Pad Up twice, then press Y / Triangle on controller).
- Tether the flexible pipeline to the intake fitting of your destination tank or purifier and click Left Mouse Button (LMB) to confirm. Ensure directional flow arrows point toward the consumer.
Territory Deviations for Water Management
You can optimize and automate camp plumbing using specialized territorial deviations:
- Hydronaut Fish: An aquatic utility deviation. When housed in a Securement Unit, it autonomously gathers freshwater from surrounding natural sources and directly tends your camp's filtration equipment, accelerating refining rates by 20% to 40%.
- Rain Man: A meteorological deviation. When active, it summons a localized rainstorm directly over your compound. All exposed Water Tanks and Rainwater Collection Systems instantly top off to maximum capacity, and exterior crop plots receive free automated irrigation without drawing from your reserve pipelines (learn crop automation in our farming and cooking guide).
Water Purification and Acid Refining: From Potable Water to Industrial Cycles
The crowning achievement of an autonomous homestead in Once Human is deploying a self-sustaining purification and biochemical refinery. Untreated surface water harvested from open lakes harbors dangerous pathogens and contamination that induce gut sickness and drain your survivor's Sanity gauge. More importantly, your water refining infrastructure serves as the primary gateway to end-game industrial wealth — the mass automated production of Acid, without which you cannot smelt high-tier Aluminum and Tungsten ingots or craft armor-piercing ammunition.
Quick take: a fully automated acid cycle requires three stages: pumps in a polluted zone push contaminated fluid to a rooftop water tank, gravity feeds it down into an Osmosis Water Purifier, and the separated streams of purified water and impure acid drain into fermentation barrels to produce pure acid 24/7.
Fluid Classification: Identifying Your Raw Inflow
Before snapping pipelines together, builders must differentiate the four fundamental liquid resources harvested across camp territories:
| Fluid Type | Harvesting Source & Extraction Method | Refined Product Output | Primary Gameplay Application |
|---|---|---|---|
| Dirty Water | Rivers, lakes, and ground Water Pumps placed in unpolluted biomes | Purified Water | Hydration recovery, stamina management, cooking consumables, and crop irrigation. |
| Polluted Water | Water Pumps deployed within Polluted Zones | Impure Acid + Purified Water | The foundational raw feedstock for industrial Acid manufacturing. Only extractable in Stardust fields. |
| Sea Water | Water Pumps installed along coastal ocean shorelines | Purified Water + Salt | Supplies table Salt for cured meat preserves, fish canning, and long-shelf-life travel rations. |
| Crude Oil | Water Pumps placed on petroleum slicks in Blackfell | Portable Mixed Fuel | Refined via refinery facilities to fuel motorcycles, heavy trucks, and mobile fortress bases. |
Osmosis Water Purifiers: Port Configuration
The technical nucleus of any filtration facility is the Osmosis Water Purifier. This compact processing unit draws 10 Watts of electricity and features three distinct fluid ports:
- Single Intake Port (Input): Accepts incoming raw fluid from your main supply pipeline (delivered from a rooftop gravity tower or direct pump lines).
- Dual Discharge Ports (Outputs): The primary lower port expels Purified Water, while the secondary upper port discharges concentrated chemical residue (yielding Impure Acid when processing Polluted Water, or table Salt when desalinating Sea Water).
Automated Closed-Loop Acid Manufacturing
To establish a fully passive, 24/7 Acid refinery that operates continuously while you explore dungeons, implement this cascading gravity schematic (see complete rate calculations and technology upgrades in our Acid and Fuel Farming guide):
- Feedstock Extraction: Deploy a cluster of Water Pumps inside a Polluted Zone where your cradle meter detects active Stardust radiation. The pumps will extract Polluted Water from the water table.
- Rooftop Pumping: Connect high-pressure pipes to push this raw Polluted Water up into your elevated rooftop Water Tank (your gravity tower).
- Osmotic Fractionation: Gravity feeds the Polluted Water downward into the intake ports of your Osmosis Water Purifiers. The purifiers split the stream into two distinct outputs:
- Stream 1: Impure Acid.
- Stream 2: Purified Water.
- Fermentation: Position a row of Fermentation Barrels on the floor directly beneath the purifiers. Route two independent pipelines from the dual outputs of the purifier straight into the fermentation barrels: one carrying Impure Acid, the other carrying Purified Water.
- Biochemical Synthesis: Bacterial cultures inside the barrel automatically ferment 10 units of Impure Acid and 1 unit of Purified Water into 1 unit of refined pure Acid. Because the osmosis purifier outputs both ingredients simultaneously in matched proportions, your refinery operates non-stop as long as power flows to the pumps!
Troubleshooting & Frequently Asked Questions (FAQ)
Why did my entire camp suddenly lose power when all generators are full of fuel?
Your combined electrical draw exceeded total generated capacity by even a single Watt (such as a refrigerator cycling on or an electric furnace firing up). The circuit tripped emergency overload protection. Fix: Enter Build Mode (key B), switch to «Water and Electricity Management», isolate heavy machines using your Switchable Pylon breakers, or add an extra generator to expand your wattage overhead.
My Water Pump is running, but water will not enter my second-floor purifier. What is wrong?
You have violated the law of gravity. Liquid cannot flow uphill without active pump pressure. Check the directional arrows along the pipeline: if they appear static or faded red, fluid has stalled. Solution: Relocate the purifier below the pump's elevation, or pump the fluid into an elevated rooftop Water Tank to let gravity push it down into the purifier.
My solar panels powered the camp during the day, but my automated farm died overnight. How do I fix this?
Solar Generators produce strictly 0 Watts of electricity at night and during heavy sandstorms. To sustain 24/7 automated operations, always pair solar arrays with reliable baseline power sources, such as Hydraulic Generators (on riverbanks) or Biomass Generators.
What happens to my wiring and plumbing lines when I relocate my base to another territory?
All internal conduits, junction terminals, and piping networks inside your structural perimeter relocate 100% intact with your walls. The only adjustment required after landing on a new plot is reconnecting any external submersible pumps (placed outside your foundation footprint in lakes or raw dirt) back to your central water tower and switchboard.
Why are crops wilting in my hydroponic boxes even though my water tanks are full?
Automated overhead sprinklers and grow lights require dual utility connections: you must attach both a water pipe line from your tank and an electrical conduit from a Ground Terminal. Without electrical power, the automated misters will not trigger, leaving soil dry despite adequate water reserves.