
Once Human Farming, Animal Taming & Cooking Guide: Gardener Greenhouses, S-Rank Pets & 4 Food
Spawning onto Nalcott immediately presents a surprising choice: the Select spawn area and class screen asks you to pick between Beastmaster, Chef, Gardener, or Free Person. Do not panic. This choice does not lock you into rigid traditional MMO archetypes like tanks or healers. Your guns and armor remain identical. Classes in Once Human function as a specialized production and utility engine, eliminating hundreds of hours of tedious city looting while granting unmatched combat buffs.
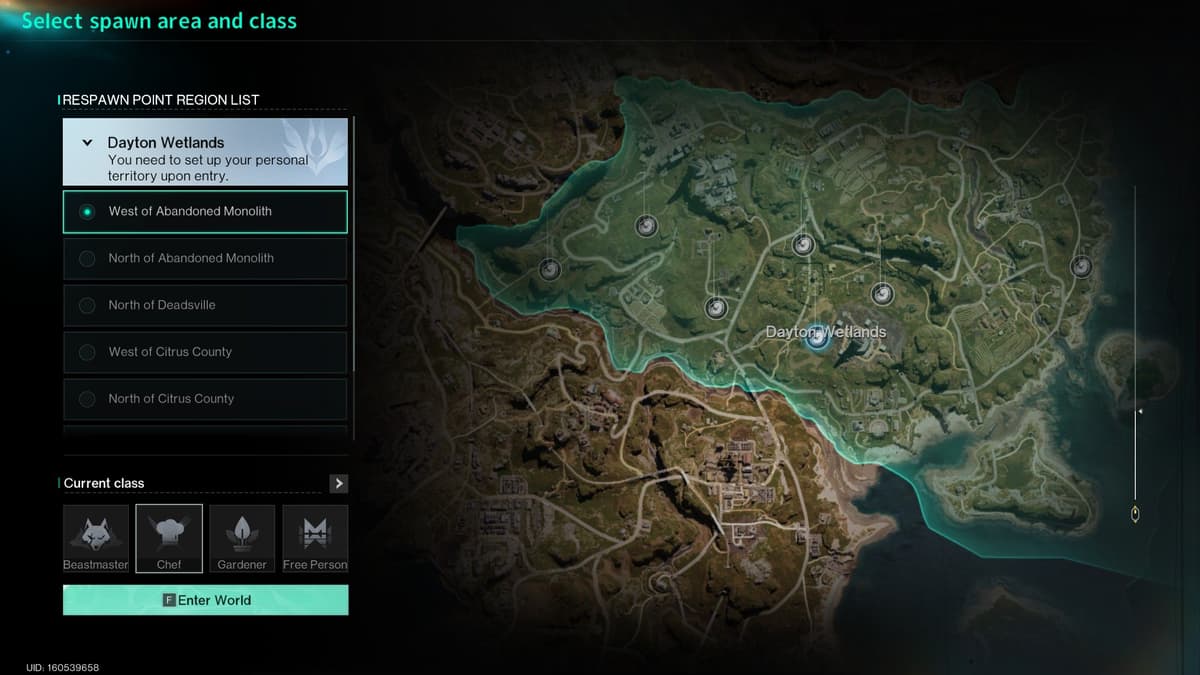
Forget outdated MMORPG tropes. In Once Human, picking a Chef does not prevent you from wielding heavy machine guns or sniping across the map. These specializations are production and utility powerhouses. They reshape your account's logistics, automate base chores, and unlock unique passive traits unobtainable by standard survivors.
In this guide, we break down the complete survival production ecosystem: from engineered greenhouse automation and industrial rubber farming to genetic predator breeding and dominating the server's culinary marketplace.
The Novice Server Mystery: Where Did the Class Selection Go?
If you started your journey on a Novice Manibus server and spent hours scouring your backpack for a missing class token, you probably noticed something strange: the class selection panel never appeared. Your client is not bugged, and you did not accidentally delete anything.
Developers intentionally disabled the class selection interface on introductory Novice servers. The reasoning is straightforward: during the first 30 to 40 levels, beginners need to focus on core survival loops, Cradle mechanics, plumbing, and electricity without being overwhelmed by livestock genetics or food auction bidding. On Novice servers, all players start automatically as a Free Person.
Full access to the class system opens up in two scenarios:
- Starting on Normal or Hard Servers: when rolling a character directly into standard or high-difficulty scenarios (such as Normal/Hard Manibus, Endless Dream, or The Way of Winter), the class selection interface greets you right at the Dayton Wetlands deployment screen.
- Seasonal Scenario Transfers: once your character finishes an introductory season and signs up for a new scenario through Eternaland, you can lock in your chosen class via storyline dialogues or activate your starter Class Fragment from the materials inventory tab.
Three Pillars of the Post-Apocalyptic Economy
The three specialized roles form a tightly closed loop. Raw crops grown by the Gardener feed the Beastmaster's livestock, while meat, spices, and golden dairy products become raw ingredients for the Chef's game-changing combat meals.
1. Gardener: An Industrial Assembly Line in Your Garden
The true value of the Gardener is not bundles of wheat or lettuce, but massive time savings. Standard players spend countless hours clearing abandoned factories and fuel stations, rummaging through rusted car hoods for rubber, adhesive, electronics, and batteries to repair gear. The Gardener moves that factory straight to their backyard.
- Industrial Harvest: specialized Gardener crops allow you to directly cultivate vulcanized rubber, batteries, gunpowder, and wiring coils. Plant your seeds before logging off, and wake up to a fresh batch of ammunition components.
- Farming Scale: support up to 220 planter boxes on your territory with minimal power consumption (around 46W when properly wired), supplemented by up to 50 wild plots outside your base perimeter.
- Grafting and Mutations: fuse crop strains with mutation agents to breed defensive plant morphs and harvest ultra-rare flower mutations (black, purple, and white hydrangeas) required for crafting premium furniture and gear dyes.
2. Beastmaster: An Apex Pack and Polluted Golden Dairy
The Beastmaster tames the hostile fauna of Nalcott, turning dangerous wilderness predators into lethal combat companions and rare organic resource generators.
- Three Active Companions: unlike standard survivors, a Beastmaster can summon up to three active combat pets simultaneously. Running a trio of wolves triggers a devastating pack synergy bonus that shreds elite enemies and monolith bosses.
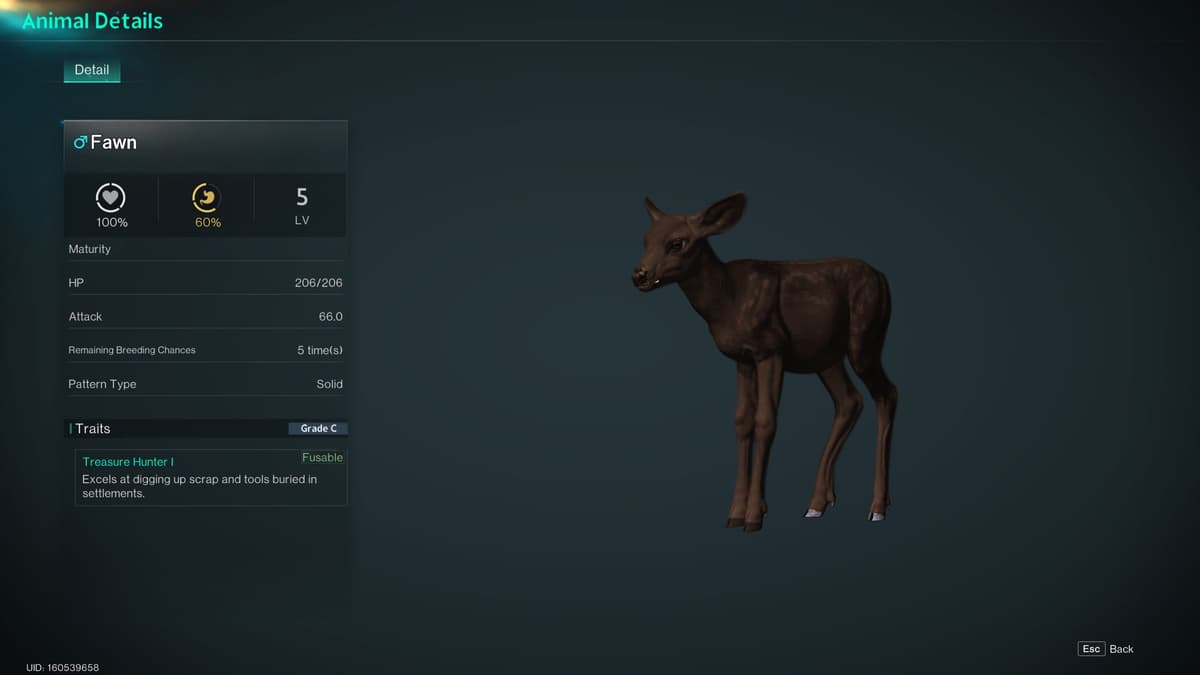
- In-Depth Wildlife Inspection: approaching animals in the wild allows the Beastmaster to inspect their complete profile (Animal Details), revealing rank grades (up to Grade S), breeding limits, and latent combat traits before engaging.
- Polluted Zone Dairy Monopoly: positioning your ranch on the border of a pollution zone stimulates cows and buffalo to produce Golden Milk. This is the core ingredient for top-tier butter and aged cheeses required by endgame raid recipes.
3. Chef: The Ultimate Combat Buffs and Server Monopoly
While the Gardener and Beastmaster supply raw goods, the Chef stands at the top of the food chain. This is the single most coveted class for high-tier dungeon clears and competitive Hive squads.
- The "Glutton" Passive Trait: the uncontested king of combat passives. Regular players can only maintain one food buff and one drink buff at any time. The Chef can stack two food buffs and two drink buffs simultaneously. This lets you combine elemental status damage, weakspot multipliers, stamina efficiency, and double-jump mobility into a single unstoppable loadout.
- Creative Cooking: experiment at the stove without pre-learned recipe formulas. Freely mixing meats, mushrooms, and exotic syrups triggers a chance for "Great Success," doubling buff potency and extending duration timers up to 60 minutes.
- Server-Wide Food Franchise: deploy an automated Field Kitchen at your base and bid on neutral Food Order Terminals across public hubs to deliver packaged meals to customers across the entire server via in-game mail.
Class Decision Matrix: Which Role Fits Your Playstyle?
To choose the right path for your scenario, pinpoint your primary bottleneck:
| Your Gameplay Priority | Recommended Choice | Core Practical Advantage | Who Should Avoid It |
|---|---|---|---|
| Maximum raid damage and solo bossing | Chef | Stretching 4 simultaneous buffs (2 food + 2 drinks) provides massive flat DPS, crit value, and stamina scaling in dungeons. | Players who dislike monitoring satiety timers and managing fresh consumable inventories. |
| Base automation and skipping junk runs | Gardener | Cultivating rubber, batteries, and gunpowder directly on planters cuts out 80% of tedious city scavenging. | Pure combat rushers who refuse to design plumbing lines, grow lights, and planter grids. |
| Companion gameplay and rare genetics | Beastmaster | 3 combat predators distract boss aggro while polluted dairy pens generate high-demand Golden Milk for trade. | Survivors frustrated by managing feeding troughs, obedience meters, and breeding chance caps. |
| Uncertain about scenario goals | Free Person | Zero commitment. Keeps the option open to activate your preferred class token later once you inspect server market trends. | Min-maxers looking to leverage class-exclusive traits from the very first hour. |
For organized groups, the golden standard is division of labor: your primary character runs Chef for unmatched raid uptime, while an alternate character or Hive teammate handles a Gardener farm to continuously supply raw wheat, peppers, and industrial materials.
With specialization roles mapped out, the priority shifts to execution. True survival autonomy always starts with an engineered greenhouse compound.
Greenhouse Engineering in Once Human: Blueprint for an Efficient Agricultural Base
Most novice survivors treat agriculture as an afterthought: planting a few corn seeds outside their front porch, watering them manually with canteens, and forgetting about them for days. In the modern game, that approach is a massive waste of time and resources. Professional Gardener agronomy covers your account's demand for high-tier cooking ingredients while producing essential industrial materials, eliminating the need to endlessly scavenge abandoned factories and fuel depots.
A properly engineered agricultural facility runs like clockwork: automated sprinklers distribute purified water through overhead pipes, suspended grow lights compensate for nighttime darkness, and territory deviations handle routine weeding. However, operating such a facility requires an understanding of soil mechanics, moisture thresholds, and microclimate controls.
Choosing Planter Types: Why the Medium Box is the Gold Standard
The construction menu offers several planting options. Each container type carries distinct trade-offs that affect growth speeds and grafting logistics.
| Container Type | Power and Space Footprint | Maturity Speed | Key Traits and Verdict |
|---|---|---|---|
| Fertile Soil | 0W, requires exposed ground | Baseline (10–15% slower than boxes) | Planting directly into topsoil saves build materials and power. Useful for early homesteads, but crops mature slower and grafted morphs cannot be packaged into your inventory. |
| Planter Box (Small) | Compact footprint | Standard | Provides a slight bonus to mutation chances and deviation spawns compared to open ground, but limits inventory packing when working with hybrid morphs. |
| Medium Planter Box | Optimal size (1x1 tile footprint) | Accelerated | The absolute meta choice for Gardeners. Takes up significantly less room than bulky large boxes, offers identical mutation perks, and allows you to package completed biomechanical morphs directly into your backpack for transport. |
| Large Planter Box | Excessive space footprint | Accelerated | Shares identical capacity and mutation bonuses with the medium box, but consumes valuable greenhouse floor space. Highly inefficient for scaled farming. |
| Flower Pots | Minimal footprint | Standard | Restricted strictly to decorative and pigment flowers (hydrangeas, edelweiss). Perfect for compact dye-breeding setups. |
Greenhouse Microclimate: Lighting, Automated Irrigation, and Soil Fertility
Crops in Once Human possess environmental needs that directly dictate growth speed. To monitor your plots accurately, keep an Environmental Detector on your hotbar to read soil moisture, light exposure, and fertility levels across individual planters.
1. Installing Proper Greenhouse Lighting
Crops require stable photoperiods. When planted indoors or during nighttime hours, active photosynthesis slows down. Suspending Grow Lights over your planters eliminates this downtime:
- Mount lights exactly one wall height above your planters. Mounting them too low overheats the soil, while mounting them too high disperses the light cone past your crops.
- A single properly positioned grow light covers a 2x2 grid of four Medium Planter Boxes.
- Connect your grow lights into the territory power grid using standard wall switches or junction boxes.
2. Automated Piped Irrigation
Watering by hand is a dead end. Automated lines are non-negotiable. Modern agricultural infrastructure relies on Automatic Irrigation Facilities:
- Mount spray nozzles to ceiling rafters and link them via water pipes to purified water storage tanks.
- Access each sprinkler interface to dial in your target moisture level. For standard staples (wheat, cabbage, beets), the ideal moisture band sits between 60% and 80%.
- Avoid overwatering above 90%: waterlogged soil rots root systems, stalls maturation, and destroys the chance to harvest high-grade mutation seeds.
3. Managing Fertility and Fertilizer Types
Soil fertility depletes as crops grow and recovers naturally over time. Outdoor plots left exposed to acid rain can suffer rapid fertility drops within minutes. To maximize yields, utilize three specialized fertilizers:
- Compound Fertilizer: standard soil restorer produced in the compost bin using spoiled food and botanical waste.
- Improved Compound Fertilizer: advanced memetic formula that boosts base harvest yields by 30% to 50% per plant.
- Time-Acceleration Fertilizer: slashes maturation cycles by 25% to 40%, vital for sustaining high-volume ammunition and livestock feed pipelines.
Gardener Industrial Crops: Cultivating Rubber, Batteries, and Gunpowder
The defining feature of the Gardener specialization is the ability to bypass conventional scavenging entirely. Instead of spending hours raiding commercial districts for discarded tires and scrap electronics, the Gardener plants high-demand manufacturing components directly on territory plots.
Using specialized seed stock and chemical additives, Gardeners can harvest:
- Industrial Rubber: essential for upgrading vehicle tires, body armor plating, and protective hazmat suits;
- Batteries and Energy Cells: critical consumables for base defense turrets, electric generators, and bio-scanners;
- Gunpowder and Reagents: bulk resources for mass-producing firearm ammunition without needing to smelt raw sulfur manually;
- Wiring Coils: wiring materials for expanding territory power grids.
The Golden Rule of Industrial Crops: territorial harvest deviations (Growshrooms) do not gather industrial manufacturing crops. Their AI is coded strictly for organic produce. Industrial crops must be harvested by hand, and the next batch must be sown manually. This routine takes only a couple of minutes during your morning login, yet provides total autonomy from open-world scavenging loops.
Scaling Your Operation: 220 Base Planters vs. 50 Wild Plots
To supply an entire Hive or sustain large-scale trading, Gardeners can scale up their facilities significantly. Practical testing confirms that an industrial farm of 220 Medium Planter Boxes consumes only 46W of electricity when wiring lights and sprinklers efficiently in parallel, a load easily covered by a pair of solar panels or a single water turbine.
However, the game also offers an additional mechanic: Wildness plots, allowing Gardeners to plant up to 50 extra crops outside their base boundary. While this sounds like free real estate, it introduces two dangerous hazards:
- Crop Theft: wild plots lack territory barrier protection. Any passing player can walk up and harvest your crops.
- Server Chunk Delays: if no active players occupy the sector containing your wild plots, the server unloads that map chunk from active memory. This stretches a standard 6-hour maturation cycle into 10 to 12 hours.
Use wild plots strictly for cosmetic greenery outside your fence or for planting low-value common berries. Keep all high-value industrial and mutation crops locked inside your secure base perimeter.
Automating Farm Chores: Growshroom and Buzzy Bee
To avoid spending your playtime manually harvesting rows of vegetables, assign two indispensable territorial deviations to your facility:
- Growshroom: an autonomous field hand that gathers ripe organic crops, stores them in nearby crates, and automatically replants seeds from your inventory. Prioritize Growshrooms with the "Diligent Worker" perk or "Green Touch" (which yields bonus acid during harvesting). Pairing them with a Mutagenic Rebekka keeps your Growshrooms working 24/7 without mood drops.
- Buzzy Bee: hovers above your garden beds pollinating crops. Its presence increases mutation probabilities, spawns higher-rarity seeds, and stimulates vibrant color variants across decorative flowers.
An automated greenhouse forms the operational backbone. The next tier of mastery lies in crop hybridization, rare pigments, and combat bio-morphs.
Grafting and Plant Breeding in Once Human: From Rare Pigments to Combat Morphs
Once your basic wheat, corn, and industrial rubber lines run on auto-pilot, the Gardener unlocks the advanced tier of botany: Grafting and mutating hybrid plant species. The game allows you to cross-breed crops and bind them with specialized mutation agents, transforming standard garden shoots into decorative flowers for territory design or into deployable bio-mechanical plants that spray acidic rain and provide fire support on the battlefield.
However, beneath the flashy ability tooltips lies an expensive economic reality. Grafting consumes significant amounts of rare reagents, while combat plants operate under strict durability limits. Here is how plant hybridization truly works: where botany delivers genuine value, and where it wastes precious crafting materials.
Grafting Mechanics: Success Rates and Container Restrictions
The grafting process takes place directly inside a planter box by combining a base crop with a Mutation Agent. In early versions of the game, success rates were notoriously brutal (as low as 20% for elite strains), causing players to burn through stacks of rare reagents. Recent balancing patches significantly improved these odds, establishing higher baseline success rates:
| Hybrid / Morph Strain | Legacy Success Rate | Modern Success Rate | Combat Role and Profile |
|---|---|---|---|
| Agent | 50% | 80% | Stationary ranged turret. Fires targeted bio-projectiles at individual hostiles. |
| Rain Reaper | 20% | 80% | Area of effect (AoE). Summons caustic spore showers dealing continuous damage to swarming packs. |
| Portal Spore | 50% | 80% | Tactical mobility plant for rapid repositioning and breaking engagement distances. |
| Bulb Fly | 60% | 80% | Taunts nearby enemy aggression, detonating in a blinding flash upon sustaining critical damage. |
Crucial Container Rule: always perform grafting inside a Medium Planter Box. If you graft a plant in open topsoil or a small box, the resulting hybrid remains permanently rooted to that spot and cannot be packed into your backpack. The medium box is the only planter that allows you to safely package the completed morph into your inventory to load into portable crates or store on workbenches.
Risk remains. 80% is not a guarantee. Failed attempts consume your mutation catalysts and base seeds without recourse. Always maintain a buffer of spare reagents before starting a hybridization run.
Flower Breeding: Cultivating Organic Pigments for Furniture and Gear
Beyond combat utilities, botanical hybridization is the primary non-monetized method to obtain organic dyes for deep cosmetic customization. Unlike premium gacha skins from the Lightforge, botanical dyes are crafted on the Customization Workbench and consumed per item painted (certain couches or wardrobes allow up to three distinct structural accents to be dyed independently).
The testing ground for florists centers on Hydrangeas. Standard seeds yield default blue and yellow blossoms, but placing a Buzzy Bee deviation nearby and fine-tuning environmental parameters causes the petals to mutate into rare colorways:
- Blue Hydrangeas: mutate into pure white, pitch black, or deep purple blossoms;
- Yellow Hydrangeas: produce soft pink, crimson red, or vibrant magenta petals.
The mutation rate for ultra-rare pigments sits at roughly 1 rare bloom per 100 harvested plants. Grinding these petals produces a versatile paint palette, giving base architects access to sleek monochrome and contrasting interiors without spending Starchrom or premium currency.
Cultivating Trees and Harvesting Unique Flora
A Gardener's catalog extends beyond herbs and row crops. You can cultivate full-sized fruit-bearing trees and rare fungi:
- Fruit Orchards (Coconuts, Bananas, Apples): tree saplings cannot simply be purchased from settlement vendors for Energy Links. To acquire planting stock, scout the open world for mature wild trees that visibly display fruit hanging from their branches. Chopping down a fruit-bearing tree guarantees both fresh harvest and viable planting cuttings for your base.
- Snow Mushrooms: endemic to arctic scenario zones. Unlike desert cacti, snow mushrooms readily fuse with mutation agents to yield cold-resistant defensive morphs.
- Deviation Spawns: harvesting mature onions grants a rare chance to extract the Gloomy Bulb deviation, while cultivating dedicated mushroom beds remains the primary loop for acquiring additional Growshroom helpers.
The Combat Gardener: Theory vs. Harsh Reality
On paper, the "Combat Gardener" concept sounds tempting: grow a battery of biomechanical plant turrets, pack them into a Portable Planter Crate, carry them into monoliths, and deploy personal turrets that draw aggro. Developers even buffed these systems by assigning independent cooldowns to different morph strains and permitting up to three active plants simultaneously. However, rigorous endgame testing reveals fatal flaws in actual combat situations.
Why deployable plants struggle against conventional firearm builds:
- Crate Durability Caps: the Portable Planter Crate is not permanent. Its durability lasts for roughly 20 deployment cycles before breaking, requiring repairs with valuable refined metals and electronic scrap.
- Permanent Morph Destruction: the biggest flaw of the mechanic. If your deployed plant is wiped out by a boss's ground slam, an explosive missile, or wide AoE attacks, you only recover an empty crate. The expensive crafted morph inside is destroyed permanently. Replacing it requires returning to your base and restarting a multi-hour grafting cycle with a 20% fail risk.
- Rotational Clunkiness: fast-paced dungeon boss fights demand continuous movement and uninterrupted weakspot fire. Setting down a planter box, activating the morph, monitoring its health bar, and tracking its energy reserves wastes crucial seconds and frequently gets the player killed by boss mechanics.
Practical Verdict: deploying combat plants on a permanent basis is an economic trap. If you want to experiment with plant summons for fun, the most viable option is deploying three Agents behind your cover for supplementary passive chip damage. However, burning expensive mutation catalysts to fuel consumable flowers for monolith clears is completely inefficient when standard weapon builds clear content faster, safer, and at zero consumable cost.
A Gardener's real strength is logistics. That botanical output feeds the Beastmaster's livestock, opening the door to elite predator companions.
Beastmaster and Pet Taming in Once Human: Hunting Grade S Wildlife
Animal taming in Once Human spent months as a quiet base hobby: animals wandered inside rustic wooden pens, yielded meager batches of raw meat, and rarely ventured into high-level combat. However, the introduction of the Beastmaster class and a complete overhaul to companion mechanics transformed the wildlife of Nalcott into an apex strike force. Commanding a coordinated pack of three trained predators completely alters the flow of solo dungeon clears and open-world farming.
To ensure your four-legged partners survive punishing dungeon hits instead of getting one-shotted by elite mutants, you must master the art of tracking, inspecting, and sedating wild specimens. Here is the field-tested protocol for capturing elite animals: from your starter pet token to non-lethal stun tricks that keep rare specimens alive.
Starter Beast Partner: Activating Your Token for a Guaranteed Grade S
When starting a scenario with the Beastmaster specialization, the game does not force you to rush your initial companion choice. Check your backpack: under the Consumables tab, you will find a dedicated item labeled Starting Beast Partner.
Press [F] Use on this item to open the companion selection screen. You are presented with a selection of named starter companions (such as Pongo the Boar, Misha the Bear, Grizz the Deer, or other seasonal offerings). Regardless of which animal you pick, your companion arrives as an elite Grade S (Level 10) specimen equipped with a high energy reserve, available breeding attempts, and baseline talent slots that unlock as your character levels up.
Combat Tier List: Choosing the Best Animals for Raid Runs
A Beastmaster can field up to three active companions simultaneously. However, not every creature roaming the wasteland belongs on the front lines.
| Animal Species | Combat Effectiveness | Core Advantages | Hidden Drawbacks and Verdict |
|---|---|---|---|
| Wolf | S-Tier (Apex Meta) | High sprint velocity, lunging leap attacks, and an overwhelming passive pack synergy bonus when running three wolves together. | Moderate health pool requiring attentive feeding. The undisputed best choice for offensive assaults. |
| Leopard | S-Tier (Burst Single-Target) | Massive burst DPS against isolated targets, fixed map spawn anchors, and prestigious rare fur patterns. | Lacks wolf pack synergy in chaotic horde encounters. Superb for melting lone monolith bosses. |
| Bear / Polar Bear | B-Tier (Meat Shield) | Enormous base health pool, capable of absorbing heavy boss cleaves. | Cumbersome collision hitboxes. Regularly clips into doorframes, trenches, and silo ramps, breaking line of sight. |
| Fox | C-Tier (Territory Only) | Aesthetic appeal and essential passive aura that accelerates ranch taming rates. | Peaceful temperament. Foxes cannot roll the offensive "Ferocity" trait. Ineffective in actual combat. |
The optimal combat loadout is either three wolves (maximum swarm damage through pack scaling) or three leopards (rapid priority-target takedowns).
Inspecting Wildlife: Mounting vs. Reading Animal Details
From a distance, wild animals appear as generic silhouettes on the horizon. The game does not broadcast internal genetics from a kilometer away. To evaluate an animal's rank and talent tree, you must approach the target closely.
Once you enter interaction range, a health bar and context-sensitive keybinds appear above the creature. Pay close attention to the control prompts:
- For standard predators and smaller wildlife, pressing [F] Details opens the stat window;
- For mountable animals (such as wild Eclipse Deer and horses), the [F] Mount prompt allows you to immediately leap onto their back and ride them down the highway. In this case, opening the stat profile shifts to [G] Details.
Accessing the Animal Details window provides a complete genetic x-ray:
- Overall Rating and Traits: displays the specimen's final grade (Grade C, B, A, or the coveted Grade S) along with unlocked and locked passive talents;
- Mood and Satiety Meters: the heart icon indicates current taming mood (up to 100%), while the stomach icon tracks hunger levels;
- Combat Baselines: current level (LV), maximum health (HP), and base attack power;
- Breeding Potential: remaining breeding attempts (Remaining Breeding Chances) and coat pattern type (Pattern Type).
Only draw your weapons after confirming that the target possesses the desirable traits and rank grade you need.
Capture Protocol: Advanced Workbenches and the Football Trick
Capturing wild animals requires tranquilization. Standard capture gear uses Anesthesia Tools (tranquilizer darts). Critical progression note: the Anesthesia Tool cannot be built on a basic tier-1 bench; it requires the Advanced Supplies Workbench unlocked in the Production memetics tree.
Sourcing Neurotoxins for Tranquilizers:
- Mushroom Cave (Broken Delta): an expansive underground cavern in Broken Delta situated in a Level 14–15 monster zone. Exact map entrance coordinates: (5137, -6990) / (5111, -6956), located east of Sunbury and Meyer's Market. Harvesting this cave yields hundreds of wild mushrooms in a single run, providing enough neurotoxins for dozens of darts.
- Cultivated Mushroom Beds: harvest mature toxic morels on your home greenhouse plots.
- The Way of Winter Scenario: open-world mushrooms are scarce across frozen biomes. Purchase neurotoxins directly from the season supply store for 5 points each or import seeds through Eternaland.
Safe Subdual Tactics:
Target at full health? Darts bounce off. Weaken the beast first. Do not use high-end endgame weapons equipped with Burn, Shock, or Acid mods, as damage-over-time (DoT) ticks will incinerate the animal right as your dart hits.
- Standard Method: equip a weak green-tier basic firearm without elemental mods. Carefully whittle the animal's health bar down to the white threshold (around 10–15% remaining HP), then fire your tranquilizer.
- The Pro Secret (The Football / Мяч Trick): avoid firearms entirely. While looting settlements and abandoned towns, you will regularly find Football items (often 2 to 5+ per district sweep). Drag the football onto your hotbar and hurl it at the animal. A direct hit inflicts an instant non-lethal Stun without dealing lethal damage, allowing you to safely deploy your tranquilizer without any risk of accidentally killing a rare Grade S find.
Building Obedience: The Crucial Role of Doctor Foxes
Captured animals delivered to your base pens arrive wild and defensive. To summon a companion into combat using your whistle, you must raise its Obedience meter to at least 20 points.
How to quickly train and stabilize companions:
- Favorite Diet: open the animal's stall interface to check its preferred diet (fresh meat, grain mash, roasted fish, or berries). Feeding preferred treats provides predictable obedience gains every few hours.
- Doctor Foxes: the secret accelerator of animal husbandry. Housing tamed foxes on your base radiates a passive nurturing aura that speeds up obedience growth across all stalled animals. Key note: this speed bonus operates exclusively while the territory owner is logged online.
- Double Offspring Multipliers: beyond training speed, Doctor Foxes boost the probability of triggering twin births during subsequent breeding cycles.
With a trained wolf pack ready for combat, animal husbandry turns to deep genetics: mutant trait evolution and radiation-zone dairy operations.
Selective Breeding, Mutant Traits, and Polluted Dairy Farms in Once Human
While basic wildlife taming centers on capturing animals in the wild, the true power of the Beastmaster unlocks through controlled genetic selection, breeding rare mutations, and establishing specialized production facilities. In the modern 2026 meta, an optimized livestock operation yields higher net profits in Energy Links than endlessly strip-mining ore nodes, while engineered predators with evolved elemental traits can solo entire waves of high-tier mutants.
Here is the mathematical framework behind animal genetics: from guaranteed Grade S pairings and evolving elemental traits to building a legendary dairy facility on the rim of high-radiation zones.
Genetics in Once Human: Offspring Ranks and Breeding Caps
Every tamed animal on your base possesses a strictly limited counter of available breeding attempts. The total number of breeding charges scales with the specimen's native rank. Once these charges are exhausted, the animal cannot produce further offspring, remaining strictly as a combat companion or resource producer.
When pairing two animals in a breeding pen, the rank inheritance follows strict genetic rules:
- S + S Pairings (The Golden Standard): guarantees a 100% chance of yielding a Grade S offspring. Only Grade S specimens possess the full four active ability slots and maximum attribute scaling.
- S + A Pairings (A Costly Gamble): carries a severe risk of genetic degradation. You risk hatching a Grade A offspring with only three ability slots, permanently wasting one of your Grade S parent's irreplaceable breeding charges.
Never dilute your gene pool. Crossing S with A is a net loss. If you lack a matching Grade S partner, spend the extra thirty minutes capturing wild stock with tranquilizers to preserve a clean pedigree.
Evolving Elemental Abilities via the "Mutant" Trait
Wild predators can spawn with innate elemental traits: Thunderborn, Fireborn, Stardust-born, or Primordial. Each imbues your companion's attacks with corresponding elemental damage.
However, baseline traits are only the beginning. The game features an advanced evolutionary path that upgrades these abilities into Tier II and Tier III variants boasting tripled damage multipliers. The key to unlocking this evolution is the "Mutant" trait:
- Capture or breed an animal that carries the passive "Mutant" trait.
- Pair the mutant in a breeding pen with your combat predator carrying a desired elemental trait (such as Fireborn).
- The Mutant gene stimulates an evolutionary leap in the offspring, granting a significantly enhanced version of the elemental ability that unlocks new combat procs on hit.
Combat Trophy Drop Rule: if you are leveling a companion to harvest specialized trophies and hide materials, keep in mind that exclusive loot drops from defeated hostiles trigger only when the companion delivers the final killing blow, not your firearm.
The Polluted Dairy Farm: Sourcing Golden Milk in Radiation Zones
Fresh milk in modern Once Human scenarios has evolved into one of the most profitable server commodities. While ordinary milk churns into standard butter, high-end raid feasts demand a far rarer resource: Golden Milk.
Golden Milk cannot be produced in idyllic green meadows. Cows and buffalo produce it exclusively under heavy environmental pollution (Pollution Zones). However, plopping your territory directly inside a radioactive zone causes base structures to rapidly corrode and collapse. Experienced livestock ranchers use an ingenious architectural layout:
The Boundary Ranch Blueprint:
- Locate a sharp boundary on your map separating clean terrain from a Stardust pollution zone.
- Place your Territory Terminal strictly on clean, unpolluted ground. If the terminal sits inside the pollution zone by even an inch, your entire base will suffer continuous structural decay until it crumbles.
- Construct your power generators, storage containers, and living quarters in the clean sector, while extending your livestock pens to the opposite edge of your perimeter — directly inside the pollution cloud.
Subjected to the Stardust environment, your adult cattle begin producing elite dairy batches. Every 4 hours of continuous operation yields an average of 3 to 4 bottles of Golden Milk, with chances for purple-tier milk and 1 to 2 standard bottles. Golden Milk converts on cooking stations into top-tier cheese and butter at an efficient 1-to-1 ratio.
Territory Livestock Capacity: a Beastmaster can house up to 10 adult animals on their territory simultaneously (adjusted from 12 in recent balance updates to optimize server performance). This capacity easily supports a full dairy rotation while leaving room for combat mounts and doctor foxes.
Secondary Livestock Branches: Wool, Rabbits, and Rare Coats
Beyond combat predators and dairy pens, a diversified livestock yard covers several lucrative markets:
- Rams and Sheep: reliable sources of raw fleece and elite Golden Wool, required for crafting thermal hazmat gear in arctic scenarios.
- Lethal Rabbits: bred for lean meat and passive luck bonuses when skinning carcasses and opening field loot.
- Rare Coat Breeding: animal species feature dozens of visual fur variations (snow-white leopards, obsidian wolves, ash-gray buffalo). High-tier specimens with striking coats command millions of Energy Links on player trading markets.
Quality of Life: The "Return Lost Animals" Button
In older game versions, managing large herds was a headache: cattle frequently clipped through fence collision, wandered up nearby cliffs, or became trapped beneath foundation tiles, forcing owners to search the countryside. Modern game versions eliminate this issue with a dedicated "Return Lost Animals" button inside the stall management interface. One click instantly teleports all stray companions back into their assigned stalls.
Securing Golden Milk and prime meats closes the primary loop. These high-tier ingredients flow straight to the cutting board of the Chef.
Chef 2.0 in Once Human: Creative Cooking and the "Glutton" Passive Trait
While the Gardener saves your personal time and the Beastmaster provides a living shield, the Chef dictates your character's combat ceiling. In recent major system overhauls, developers completely redesigned the culinary craft. The Chef transitioned from a humble campfire cook constrained by rigid recipes into the indispensable backbone of every endgame raid team and an offensive juggernaut across Nalcott's deadliest dungeons.
The foundation of this culinary supremacy rests on two interlocking mechanics: unrestricted recipe experimentation and an exclusive passive trait that breaks standard combat buff limits.
The "Glutton" Passive Trait: Stacking Four Simultaneous Buffs
Standard survivors in Once Human are shackled by basic physiological constraints: your buff bar can only sustain one food buff (satiety meter) and one drink buff (hydration meter) at a time. Ate another dish? The first buff vanished. Wasted resources.
The Chef specialization completely shatters this limitation through the "Glutton" passive trait:
- Chefs can simultaneously maintain two active food buffs and two active drink buffs (yielding four concurrent combat multipliers!).
- This unlocks staggering combat synergies impossible for any other class. For instance, you can stack dedicated elemental status multipliers, add flat weapon crit damage, drink sanity-restoring teas to block madness, and top off your loadout with Stardust energy drinks for double-jump aerial mobility.
| Buff Category | Standard Survivor | Chef ("Glutton" Trait) | Example Meta Combat Loadout |
|---|---|---|---|
| Satiety Slot (Food) | Strictly 1 dish | 2 dishes simultaneously | Bacon Burger (+20% Weakspot DMG + Crit) + Sparkling Pumpkin Soup (+10% Power Surge DMG) |
| Hydration Slot (Drinks) | Strictly 1 drink | 2 drinks simultaneously | Whimsical Drink (+25% Status DMG at full sanity) + Stardust Energy Drink (double jump and <Aero> mod synergy) |
Stacking Rules for Identical Dishes: if a Chef consumes two identical creative dishes with the same ingredient profile, the effects do not conflict — they merge, amplifying base stat magnitude and extending the overall duration timer. If the recipe ingredients differ, the game treats them as distinct dishes and activates both independent buffs side-by-side.
Creative Cooking: Experimentation Free from Recipe Chains
The second pillar of the modern kitchen is Creative Cooking. You no longer need to scour abandoned towns for paper recipe blueprints to prepare high-end rations. At specialized cooking stations, Chefs can freely combine any available ingredients:
- Cross-Category Blending: combine elite cuts of rabbit or buffalo meat with fresh Gardener morels, splash with refined oil, dust with chili peppers, and sweeten with beet molasses.
- Gourmet Atlas: every successful combination discovered in the creative cauldron is automatically recorded in your personal atlas. You can name your culinary creations and queue them up again with a single click.
- Spices and Seasoning Notes: adding specialized botanicals (ginger, chili, mint) unlocks hidden properties — ranging from instantaneous body temperature regulation to temporary immunity against psychological anomalies.
The "Great Success" Proc
Every time a Chef cooks a meal, the system rolls a hidden check for culinary brilliance. Triggering a "Great Success" marks the finished dish with an unmistakable golden border: its numerical combat bonuses scale up by an additional 20% to 30%, while the satiety timer doubles from the standard 30 minutes to a full 60 minutes of uninterrupted buff uptime. This makes a Chef's meals the premier commodity across every server.
Kitchen Automation: Chefosaurus Rex at the Stove
Mass-producing raid rations for an entire Hive consumes valuable playtime. To automate kitchen chores, assign the specialized territorial craft deviation — Chefosaurus Rex:
- Mount the Chefosaurus containment unit right beside your cooking station.
- Stock your kitchen pantry crates with raw produce, meat, and seasoning, then queue up your desired dishes.
- The miniature chef-hatted dinosaur handles the frying, stewing, and baking, steadily depositing finished feasts into storage even while you are logged off or clearing Silos.
The Return of the Portable Fridge
The persistent dread of every food crafter was natural spoilage. Preparing a banquet of steak feasts with Golden Milk only to watch them spoil into foul mush in your backpack after a few hours was devastating.
Recent updates officially restored the Portable Fridge to the memetics tech tree with substantially reduced crafting costs:
- The unit equips into your tactical gear loadout, running autonomously on internal battery power.
- All perishable dishes, raw meats, unpasteurized milk, and squeezed juices placed inside benefit from a tenfold reduction in spoilage rate.
- Chefs can embark on extended multi-hour dungeon expeditions or stock vendor terminals without fearing financial losses from expired inventory.
Personal combat buffs are locked in. The final step is scaling your culinary production into a lucrative server-wide enterprise.
The Server Food Economy in Once Human: Field Kitchens and Public Terminal Leases
Food trading in Once Human previously relied on rudimentary vending machines: players stocked a few roasted steaks in a vending kiosk outside their fence and waited days for a wandering stranger to stumble past. Major 2026 updates completely reimagined this dynamic by introducing a full-scale server-wide food and beverage economy. Today, a Chef can establish an automated restaurant network featuring direct in-game mail delivery, high-paying system supply contracts, and commercial monopolies over the continent's busiest social hubs.
This system transformed the Chef into one of the wealthiest archetypes on any server. Here is how the Field Kitchen operates, how to invest Star Chef Popularity points, and how to win 7-day public terminal auctions outside high-level monoliths.
The Field Kitchen: Your Automated Command Center
At the center of a Chef's commercial empire sits the Field Kitchen, an advanced commercial cooking complex installed directly on your territory. Unlike standard stoves, the Field Kitchen operates as an automated fulfillment hub:
- Menu Curation and Pricing: select signature dishes from your Gourmet Atlas, stock the kitchen's integrated pantry with raw produce, and set your own profit margins in Energy Links for each meal.
- Handling Dual Order Streams: the kitchen processes custom orders submitted by real server players as well as lucrative, periodic system contracts (faction NPC orders) requesting bulk ration deliveries for expedition squads.
- Automated Mail Logistics: customers never need to physically walk to your base. Players place orders remotely through the world map, linked territory vending machines, or public street terminals. Once a meal is prepared (either manually or by Chefosaurus Rex), it is vacuum-packed and dispatched directly to the buyer's in-game mailbox. If an order fails to complete before its expiration timer, the customer receives an immediate, automated refund.
Star Chef Popularity: Scaling Your Restaurant Tech Tree
Fulfilling orders and selling gourmet feasts awards player experience, Energy Links, and an exclusive currency: Star Chef Popularity. Accumulated points unlock two specialized progression branches:
| Progression Tree | Unlocked Perks and Capabilities | Commercial Advantage |
|---|---|---|
| Branch 1: Kitchen Operations & Order Scaling |
| Enables the kitchen to run offline without storage bottlenecks and attracts lucrative high-tier NPC contracts paying tripled rates. |
| Branch 2: Recipe Refinement & Enhancers |
| Imbues your catalog with amplified stat bonuses, guaranteeing that players purchase their raid supplies from your kitchen rather than competitors. |
Food Order Terminal Auctions: Dominating High-Traffic Hubs
The centerpiece of the public culinary market is the network of neutral Food Order Terminals. These sleek kiosks are pre-installed in strategic map locations: on central plazas in safe camps (Deadsville, Meyer's Market, Citrus County) and right outside the entrance arches of major Monolith boss arenas.
These terminals do not belong to NPC vendors. They represent prime commercial real estate fought over by the player base:
- Chefs-Only Closed Bidding: bidding on terminal leases is restricted strictly to players holding the Chef specialization. Auctions conduct bidding entirely in pure Energy Links.
- Seven-Day Commercial Lease: the highest bidder when the timer expires secures undisputed ownership of the terminal for exactly 7 days. When the lease expires, the kiosk returns to the public auction block.
- Direct Kitchen Tether: the winning Chef links the public terminal directly to their home Field Kitchen. Every player gathering in safe camps or gearing up for a monolith raid sees your curated menu right in front of them. Customers purchase fresh crit and defense buffs on the spot, funneling a continuous stream of Energy Links into your account.
With player-to-player trade limits expanded near 10,000,000 Energy Links, a successful Chef who leases a prime terminal outside a popular dungeon easily recovers their entire auction bid within the first 48 hours of server activity.
The commercial pipeline is established. To command premium prices, your menu must showcase the definitive combat feasts of the current season.
Encyclopedia of Best Recipes and Combat Food Buffs in Once Human: 2026 Meta
In Once Human, food and beverages are not merely survival tools to fend off starvation or dehydration. A properly composed meal provides massive attribute scaling rivaling an extra legendary mod slot or several weapon calibration tiers. When tackling Master and Pro difficulty Silos or challenging Nightmare Manibus, competitive strike teams are permanently fueled by high-tier culinary buffs.
Below is the definitive catalog of the season's premier combat dishes and gathering rations, complete with exact numerical multipliers, ingredients, and build synergies.
The Premier Beverage Vault: Status DMG, Sanity, and Aerial Mobility
Beverages occupy the hydration slot (thirst meter). In the modern meta, two drinks overwhelmingly dominate high-end raid encounters.
| Drink Name (EN / RU) | Required Ingredients | Numerical Multipliers | Target Build Synergies |
|---|---|---|---|
| Whimsical Drink (Причудливый напиток) | Purified water, beet sugar, mint leaves, wild berries | +25% Status DMG as long as your character's Sanity remains capped at 100%. | The undisputed baseline for all elemental builds: Burn, Frost Vortex, Power Surge, and Unstable Bomber. |
| Stardust Energy Drink (Энергетик звездной пыли) | Stardust Ore, distilled water, fruit extract, sugar | Enables a full double-jump in mid-air and reduces sprint stamina consumption by 20%. | Essential mobility drink for loadouts utilizing modern <Aero> mod suffixes and 4-piece Rabbit Hide armor (+20% mid-air damage), allowing players to sustain continuous aerial damage bonuses. |
| Spore Tea / Sanity Tea (Споровый чай) | Tea leaves, morel spores, pure water | Steadily restores Sanity over time, preventing psychological corruption inside contaminated zones. | Mandatory during LEA Research Lab and polluted Silo runs to keep your Sanity bar locked at 100%, preventing Whimsical Drink from deactivating. |
Striking Feasts: Crits, Weakspots, and Elemental Multipliers
Satiety meals dictate raw firearm power, weakspot scaling, and burst damage.
| Dish Name (EN / RU) | Required Ingredients | Combat Multipliers & Duration | Target Playstyle |
|---|---|---|---|
| Bacon Burger (Бургер с беконом) | Gardener wheat flour, prime boar bacon, tomato, Golden Milk cheese | +20% Weakspot DMG and +10% Critical Hit Chance for 30 min (60 min upon "Great Success"). | Premier combat dish for marksmen running Shrapnel on SOCR The Last Valor and high-precision sniper rifles. |
| Sparkling Pumpkin Soup (Игристое тыквенное пюре) | Mutated pumpkin, spices, purified water, mineral salt | +10% Power Surge DMG and increases shock strike frequency. | Dedicated consumable for MP7 Outer Space submachine guns and shock-focused assault rifles. |
| Stargazy Pie (Пирог звездочета) | Fresh fish (caught via pheromones), wheat dough, eggs, churned butter | Increases base Critical Hit Chance by +15% and boosts burst explosion radius. | Excellent for hybrid crit setups to bridge early gear calibration thresholds. |
| Surprise Spring Roll (Весенний рулет с сюрпризом) | Cabbage leaves, soy sauce, vegetable oil, chili pepper | Grants +12% Elemental DMG (Frost, Fire, Shock) and raises incoming elemental resistance by 15%. | Versatile choice when pushing hazardous thermal dungeons across arctic or volcanic scenarios. |
| Canned Steak (Консервированный стейк) | Prime beef/buffalo, tin can, preservatives, salt | +15% Weapon DMG. Completely immune to inventory spoilage. | Reliable baseline ration for weapon-based builds embarking on extended open-world exploration without mobile coolers. |
| All-Weather Stew (Всепогодное рагу) | Meat trimmings, ginger root, fresh onion, sliced pepper | Expands body thermal tolerance by 15 degrees in both directions, immunizing against hypothermia and heat stroke. | Crucial for surviving extreme blizzards in The Way of Winter or scorching deserts in Blackheart. |
The Mining Monarch: Canned Seafood in Oil
While combat dishes spark endless debate, resource harvesting features an absolute champion that commands fortunes on player markets: Canned Seafood in Oil.
The Mineral Jackpot Mechanic:
Crafted from rare marine fish fillets, high-grade cooking oil, and refined spices, this ration grants a 30-minute miner's blessing:
- Every finishing pickaxe strike on a mineral node (Tungsten, Aluminum, Silver, Gold, or Chaosium) rolls a chance for a massive harvest multiplier.
- Tier 1 Jackpot: +66% bonus ore from the vein;
- Tier 2 Jackpot: +666% bonus ore from the vein;
- Mega Jackpot: a staggering +6666% ore from a single node!
Under this buff, one lucky swing on a rich gold or tungsten vein can instantly flood your backpack with hundreds of ingots, solving metal bottlenecks for an entire season. Experienced miners never run harvesting routes without it.
Pro Chef Techniques: Maximizing Buff Potential
To squeeze maximum performance out of every ration, utilize three master-level techniques:
- Substitute with Golden Milk: when recipes call for standard milk or butter, use dairy sourced from your Beastmaster's polluted ranch. This automatically elevates the base chance for a "Great Success" proc by 15%.
- Hermetic Tin Canning: pack stews and steaks into sealed tin cans at the Supplies Workbench. Canned goods possess zero spoilage decay, allowing you to stockpile weeks of raid rations inside base crates.
- The Ultimate "Glutton" Synergy: before entering a monolith, drink Whimsical Drink (+25% Status DMG) + Stardust Energy Drink (double jump), then eat Bacon Burger (+20% Weakspot DMG) + Sparkling Pumpkin Soup. Operating with four concurrent multipliers turns your character into an unstoppable force.
A tailored ration plan guarantees raid readiness. The remaining step is safeguarding your homestead against the most common rookie missteps.
Critical Rookie Traps, FAQ, and the Ultimate Homestead Checklist in Once Human
Constructing a self-sufficient agricultural and livestock compound in Once Human is rewarding, yet punishingly unforgiving of minor oversights. Placing your territory terminal a few yards too close to a pollution zone can reduce your ranch to radioactive rubble, while a stray elemental shot during animal taming can incinerate hours of tracking a Grade S predator. To protect your time and resources, we synthesized the collective lessons of veteran survivors into ten essential warnings, answered core community questions, and provided a turnkey launch checklist for your homestead.
Top 10 Costly Mistakes: Where Beginners Burn Resources
- Placing the Territory Terminal Inside the Pollution Zone: the most catastrophic mistake when building a dairy farm. Your Territory Terminal must sit strictly on clean ground. If the pollution boundary touches the terminal, your entire base will suffer continuous structural decay until it completely collapses.
- Expecting Growshrooms to Harvest Industrial Crops: territorial deviations are coded exclusively for organic produce (wheat, beets, berries). Growshrooms will completely ignore industrial rubber, batteries, and gunpowder plants. Industrial crops must be harvested and replanted manually.
- Overwatering Planters Above 90% Moisture: more water is not better. Excess moisture rots root systems, slows maturation, and eliminates the probability of yielding mutated seeds. Keep moisture dialed between 60% and 80%.
- Pairing Grade S and Grade A Animals: trying to rush breeding without a second Grade S parent risks degrading the offspring to Grade A, permanently losing the fourth ability slot and wasting an irreplaceable breeding charge.
- Shooting Wild Targets with Status Firearms: using weapons equipped with Burn, Shock, or Acid mods while lowering an animal's health is fatal. Damage-over-time (DoT) ticks inevitably execute the beast right as your tranquilizer dart connects. Whittle health down with unmodded basic green firearms or stun the target with a thrown Football.
- Bringing Foxes into Dungeon Combat: foxes possess a peaceful nature and cannot roll the core offensive "Ferocity" trait. Keep foxes on your base to accelerate ranch taming; bring wolves or leopards into actual combat.
- Sinking Rare Mutagens into Consumable Combat Plants: crafting deployable plant morphs that perish permanently upon taking heavy boss AoE damage drains valuable catalysts. Standard firearms deal higher, safer, and zero-cost damage.
- Sowing Valuable Strains on Wildness Plots: planting rare mutations outside your base perimeter invites passing survivors to steal your crops and risks doubling maturation times to 12 hours if the sector unloads from server memory.
- Accidentally Overwriting Food Buffs on Non-Chef Characters: forgetting that only the Chef possesses the "Glutton" passive trait. A standard player eating a second dish immediately deletes their previous expensive combat buff.
- Carrying Gourmet Feasts Without a Portable Fridge: leaving high-tier steaks and unpasteurized Golden Milk in standard backpack slots guarantees they will spoil into worthless mush within hours. Always equip a Portable Fridge during extended outings.
Frequently Asked Questions (FAQ)
Can I switch my chosen specialization mid-season?
Yes. If you started the scenario as a Free Person, you can activate your desired specialization at any time using the starter Class Fragment item in your backpack's materials tab. If you have already chosen a class, re-specializing requires specialized re-training items or occurs naturally when transferring into a new scenario via Eternaland.
Why is the class selection panel missing on Novice Manibus?
Developers intentionally restricted the class system from Novice servers to avoid overwhelming new players with intricate sub-systems during their initial onboarding. The full class interface unlocks automatically when transferring to Normal or Hard difficulty servers or starting on advanced scenarios like Endless Dream.
How many adult animals can I house on my territory simultaneously?
In the current balance, a Beastmaster can house up to 10 adult animals on their territory simultaneously. This provides ample capacity to maintain three active combat wolves, a rotation of dairy cattle in the polluted pen, and doctor foxes to accelerate taming.
Does food delivery through terminals function across different servers?
No. Field Kitchens and leased Food Order Terminals serve players exclusively within your current server instance (scenario). The entire restaurant economy is contained within your local server community.
Turnkey Launch Checklist for an Autonomous Homestead
Ready to deploy your automated compound? Verify your homestead against this launch checklist:
| Launch Phase | Required Construction and Action | Verification Criteria |
|---|---|---|
| 1. Territory Placement | Identify a boundary between clean ground and a Stardust pollution zone. | Territory Terminal stands on clean ground, while the far perimeter fence encloses a radiation pocket for dairy pens. |
| 2. Greenhouse Layout | Install Medium Planter Boxes in a 2x2 grid configuration. | A Grow Light suspends one wall high over each 2x2 cluster, with overhead pipes feeding purified water to automated sprinklers. |
| 3. Deviation Staffing | Position containment units adjacent to your garden plots and kitchen stove. | A Growshroom with Diligent Worker handles organic crops, a Buzzy Bee pollinates blooms, and Chefosaurus Rex staffs the stove. |
| 4. Companion Pack | Capture and tame three Grade S wolves. | Obedience exceeds 20 points through favorite meat treats supported by Doctor Foxes; wolf pack synergy is active. |
| 5. Golden Dairy Pipeline | Stock cattle in the polluted ranch zone. | Every 4 hours yields 3–4 bottles of Golden Milk for crafting elite butter and aged cheeses at a 1:1 ratio. |
| 6. Commercial Franchise | Erect a Field Kitchen and set your menu pricing. | Win a 7-day terminal lease outside a popular Monolith; orders automatically fulfill and dispatch to buyers via mail. |
To integrate your agricultural facility into broader account pipelines, consult our companion guides:
- Base Building, Plumbing, and Electrical Grids in Once Human — optimizing water purifiers and territory power;
- Automated Acid and Fuel Refining Farms — combining agriculture with fuel pumps on pollution borders;
- Rare Ore and Crystal Mining Routes — maximizing jackpot yields from Canned Seafood in Oil;
- Memetics Specializations and Cradle Perks Tier List — selecting top passive perks for solo autonomy.