
Once Human Tech Tree & Cradle Guide: Best Overrides, Tech Synthesis, and Meta Setups
Two Character Progression Systems: Tech Tree and the Cradle
Quick Take: Character progression in Once Human splits into two independent pillars: the Tech Tree for territory crafting and the Cradle for combat overrides. Access the master hub by pressing I → "Tech - Cradle", or jump straight to technologies with O. Two separate systems. Zero shared points. Swapping combat overrides is completely free out of combat.
Character progression in Once Human is split into two independent clusters:
- Tech Tree: This is where you master practical knowledge, granting the ability to construct base facilities and craft essential items (workbenches, tools, weapons, armor, ammunition, food recipes, and power generators).
- Cradle: This is where you configure your combat build, socketing passive overrides directly onto your character. For instance, the "Automatic Weapon Enhancement" perk grants +20% damage to SMGs, rifles, and LMGs while automatically refilling 10% of the magazine upon killing an enemy.
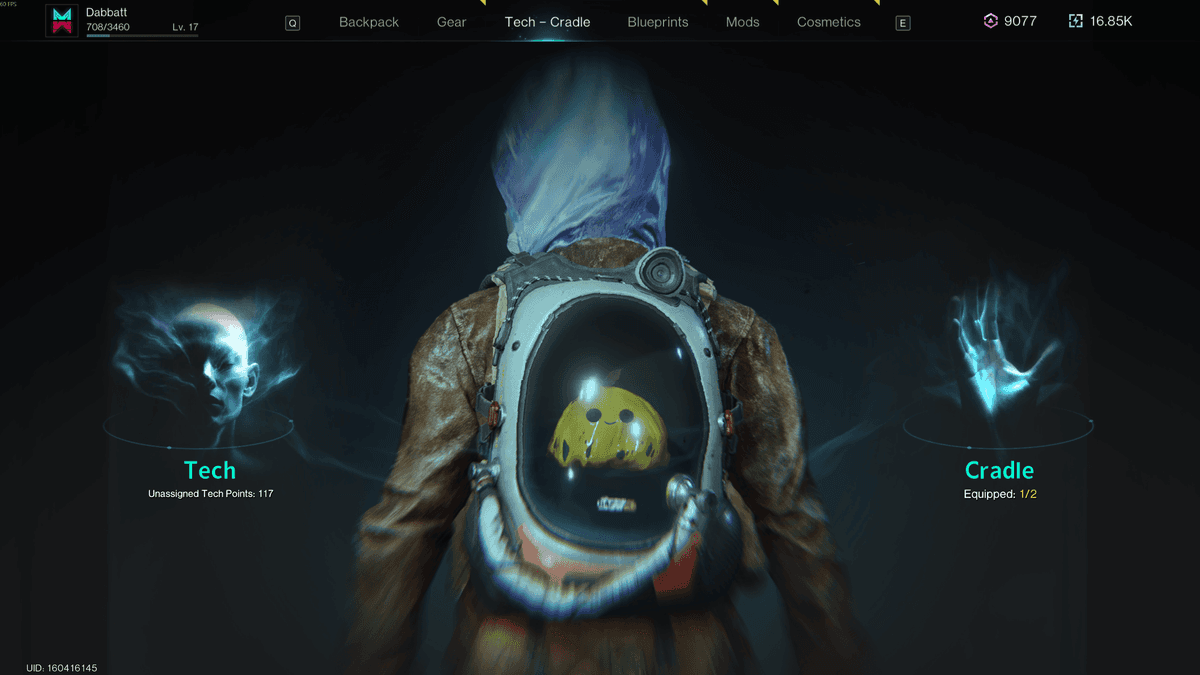
Two distinct branches. One builds your home; the other keeps you alive in dungeons.
To access both trees from a single hub, press "I" and select the "Tech - Cradle" tab at the top. The Tech Tree can also be accessed directly by pressing the "O" hotkey. Because of this direct shortcut, many beginners spend dozens of hours completely unaware of the Cradle, missing out on massive combat multipliers and defensive buffs.
| Progression Cluster | Menu Location | Primary Purpose | Resource & Slot Mechanics |
|---|---|---|---|
| Tech Tree | Left side of the screen (blue hologram) or press O | Unlocks crafting formulas and territory structures | Nodes are unlocked with Tech Points. Key facilities are enhanced using Tech Upgrade Points. |
| Cradle (Override) | Right side of the screen (glowing palm) | Passive combat tuning: weapon bonuses, elemental triggers, shields | 100% Free. No points spent; perks swap freely out of combat. Sockets unlock by clearing Securement Silos. |
The Four Tech Tree Categories
Formulas in the Tech Tree are organized across four specialized categories, progressing from primitive survival gear to high-tech industrial automation:
| Technology Category | What It Covers | Key Formulas & Facilities | Role in Survival |
|---|---|---|---|
| Survival | Cooking, water purification, medicines, and temperature regulation | Stoves, compact water filters, healing bandages, antibiotics, refrigerators | Supplies clean drinking water, disease-free food, and Sanity restoration |
| Production | Raw material harvesting, metallurgy, power generation, and refining | Electric mining drills, chainsaws, electric furnaces, Stardust filters | Builds economic foundations and provides ingots for high-tier gear |
| Combat | Gear workbenches, ammunition manufacturing, explosives, and defense turrets | Advanced gear workbenches, AP ammo, heavy machine guns, automated base turrets | Enables high-tier weapon crafting and sustains combat reserves for raids |
| Building | Structural frames, reinforced walls, furniture, storage crates, and vault doors | Reinforced walls, structural supports, high-capacity metal storage crates | Expands territory building space and maximizes base storage limits |
Tech Level (Tech Lv.): Earning Tech Upgrade Points
In the top-left corner of the Tech Tree interface, you will find your Tech Level (Tech Lv.), ranging from 1 to 12. This rank increases automatically as you unlock a cumulative number of technologies across any category.
The primary value of Tech Levels lies in earning Tech Upgrade Points (golden tokens). These points unlock powerful permanent enhancements for key territory workbenches and tools:
| Tech Level Milestone | Required Unlocked Technologies | Milestone Reward | Where Rewards Are Spent |
|---|---|---|---|
| Tech Lv. 2–3 | 2 and 4 technologies | Basic Tech Points and starter workbench formulas | Initial campsite setup and basic tools |
| Tech Lv. 8 | 35 technologies | 3 Tech Upgrade Points | First major facility enhancements (Mining Drill, Disassembly Bench) |
| Tech Lv. 10 | 70 technologies | 4 Tech Upgrade Points | Upgrades for industrial electric furnaces and heavy production lines |
| Tech Lv. 12 | 125 technologies | 5 Tech Upgrade Points | Final upgrades for high-end endgame territory facilities |
Progression Currencies: Blue Tech Points and Golden Tech Upgrade Points
Quick Take: Once Human uses two distinct progression currencies: blue Tech Points permanently unlock new recipes across four categories, while golden Tech Upgrade Points enhance existing workbenches via the "Advanced Technologies" tab. After activating an upgrade perk, you must demolish and rebuild the physical workbench on your territory for the bonus to take effect.
Advancement within the Tech Tree relies on two separate currencies with completely different roles and availability limits:
- Tech Points (blue molecule icon): The standard operational currency. Spent on unlocking base technology nodes across all four branches (Survival, Production, Combat, Building). Each unlock permanently grants crafting formulas and structures. Tech Points are awarded for character leveling, completing seasonal Scenario milestones, and discovering new Deviations for the first time.
- Tech Upgrade Points (golden chevron emblem): A rare, strictly capped resource. They do not unlock new items; instead, they permanently enhance key territory workbenches and harvesting tools via the "Advanced Technologies" tab. Exactly 12 points are awarded across all Tech Level milestones (with limited additional purchases in the Challenge Shop). Spend them wisely.
| Progression Resource | Interface Icon | Acquisition Method | Usage & Role |
|---|---|---|---|
| Tech Points | Blue molecular cluster | Character leveling, seasonal Scenario milestones, first-time Deviation discoveries | Unlocking standard technology nodes across all 4 branches (10–125 points per node) |
| Tech Upgrade Points | Golden radiating chevron | Milestone rewards at Tech Lv. 8, 10, and 12, plus Challenge Store exchanges | Activating permanent advanced facility perks (strictly 1 point per node) |
The "Advanced Technologies" Tab: Guaranteed Facility Enhancements
Clicking on any major workbench or key harvesting tool in the Tech Tree opens a details panel with two distinct tabs: "Basic Technologies" (the core right to craft or construct the object) and "Advanced Technologies" (a quality tier upgrade purchased with 1 golden point).
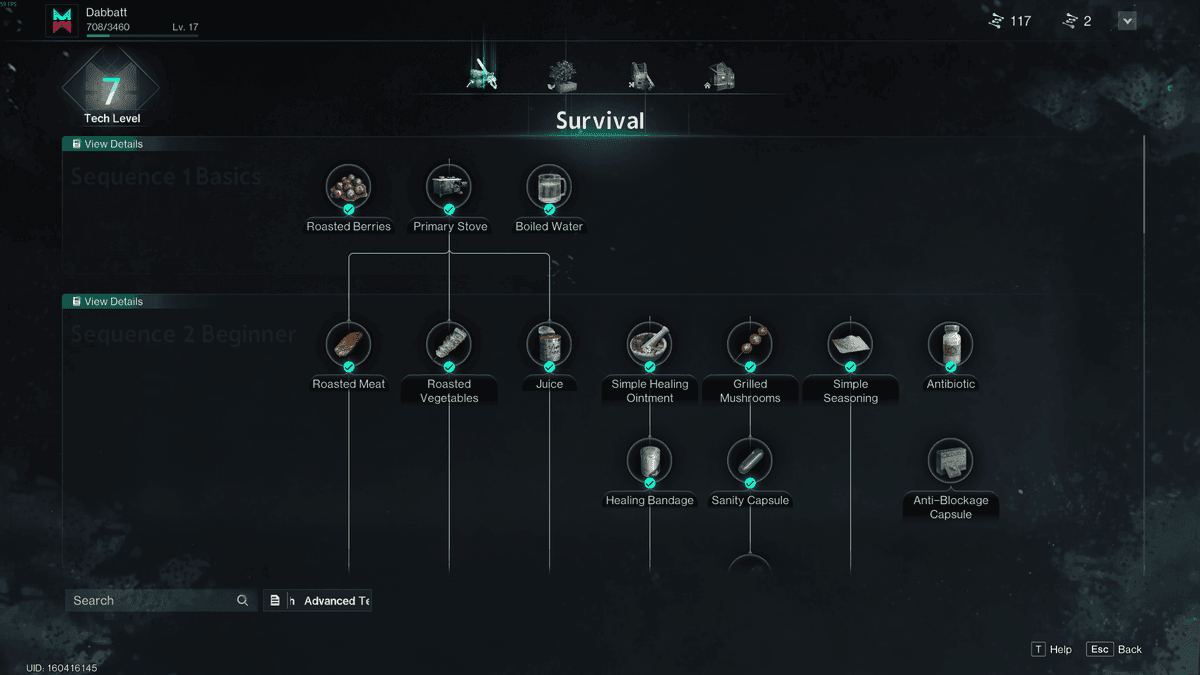
Unlike outdated legacy random perk cards, all modern facility enhancements are fixed directly to their respective nodes and activate with 100% certainty:
| Facility Node in Tech Tree | Official In-Game Enhancement | Practical Territory Advantage |
|---|---|---|
| Electric Mining Drill | +100% mining yield for gold, silver, and Stardust ore | Doubles extraction of high-tier ores per node, cutting mining expeditions in half while stockpiling Stardust ore for weapon calibration. |
| Disassembly Bench | +10% yield for parts, plastics, rubber, textiles, and electronic components | Passively increases raw material yields from all junk dismantled on your territory, generating thousands of bonus crafting components over time. |
| Advanced Stoves | Cooking takes 60% less time and doubles food shelf life | Drastically accelerates bulk cooking while doubling expiration timers (e.g., meals lasting 24 hours now stay fresh for 48 hours). |
| Advanced Supplies Workbench | Reduces crafting time by 40% on supplies, ammunition, and medicine workbenches | Massively speeds up mass production of thousands of rounds of AP ammunition and healing injectors before endgame dungeon runs. |
The Territory Rebuild Rule: Why Existing Facilities Don't Auto-Upgrade
The single most frequent technical mistake made by players when allocating golden Tech Upgrade Points involves facilities that have already been placed inside their base:
To apply the upgrade bonus to your camp, follow this exact sequence:
- Enter territory building mode by pressing "B".
- Select the demolition tool by pressing "R" and dismantle the previously placed workbench (100% of construction materials are refunded immediately to your inventory).
- Reconstruct the workbench in the exact same spot. It will now spawn with its upgraded golden status and active output multipliers.
- For handheld tools (such as the Electric Mining Drill), existing crafted drills in your backpack do not upgrade retroactively; simply craft a fresh drill on your upgraded workbench.
Formula Unlock Methods: Tech Tree and Tech Synthesis Workbench
Quick Take: Crafting recipes in Once Human are unlocked through three distinct systemic pathways: manually inside the Tech Tree using blue Tech Points, by bringing intact world devices to the Tech Synthesis Workbench for reverse engineering (hotkey F), or via "Technological Inventions" (hotkey G on the same workbench), where basic camp materials are researched over ~15 minutes to unlock permanent formulas without spending Tech Points.
Inside the Tech Tree, formulas for tools, structures, and workbenches are not handed out automatically upon leveling. The player chooses. You decide which industrial production chains to prioritize first. To unlock nodes, the game provides three complementary systemic mechanics:
- Manual Unlocks in the Tech Tree: You spend accumulated Tech Points directly inside the tree interface (hotkey
O), instantly unlocking the formula permanently. - Reverse Engineering Finished Devices: Exploring abandoned research facilities, military bases, and settlements allows you to discover fully assembled, working devices (such as the Compact Water Filter). Bringing a retrieved sample to the Tech Synthesis Workbench (hotkey
F) grants the permanent crafting formula completely free. - Technological Inventions: Scientific synthesis at the Tech Synthesis Workbench (hotkey
G). You load surplus camp materials, the interface reveals potential formula outcomes, and an in-game research timer begins (averaging approximately 15 minutes). Once finished, the formula unlocks permanently, while any leftover materials can be reclaimed via the "Material Refund" tab.
| Unlock Method | Menu / Location | Player Requirement | Primary Advantage |
|---|---|---|---|
| Direct Tech Tree Unlock | Tech Tree interface (hotkey O) | Reserve of blue Tech Points and active Phase gate | Instant formula access at any time without waiting or exploring |
| Reverse Engineering | Tech Synthesis Workbench (hotkey F) | Intact finished device looted from open-world crates | Saves 100% of Tech Points: unlocks formulas for free with physical samples |
| Technological Inventions | Tech Synthesis Workbench (hotkey G) | Surplus territory resources, ~15 min timer, and willingness to accept experiment failure risk | Unlocks formulas using common materials instead of points, but carries a chance of failure and partial resource loss |
Tech Synthesis Workbench: How "Technological Inventions" Work
The Tech Synthesis Workbench is a specialized territory research console combining two engineering functions:
- "Reverse Engineering" Mode (hotkey
F): Guaranteed analysis of whole, intact appliances and facilities salvaged from open-world expeditions without any risk of material loss. "Technological Inventions" Mode (hotkey
G): Converts excess territory materials into permanent technology formulas. This is an experimental scientific procedure that carries an inherent risk of failure.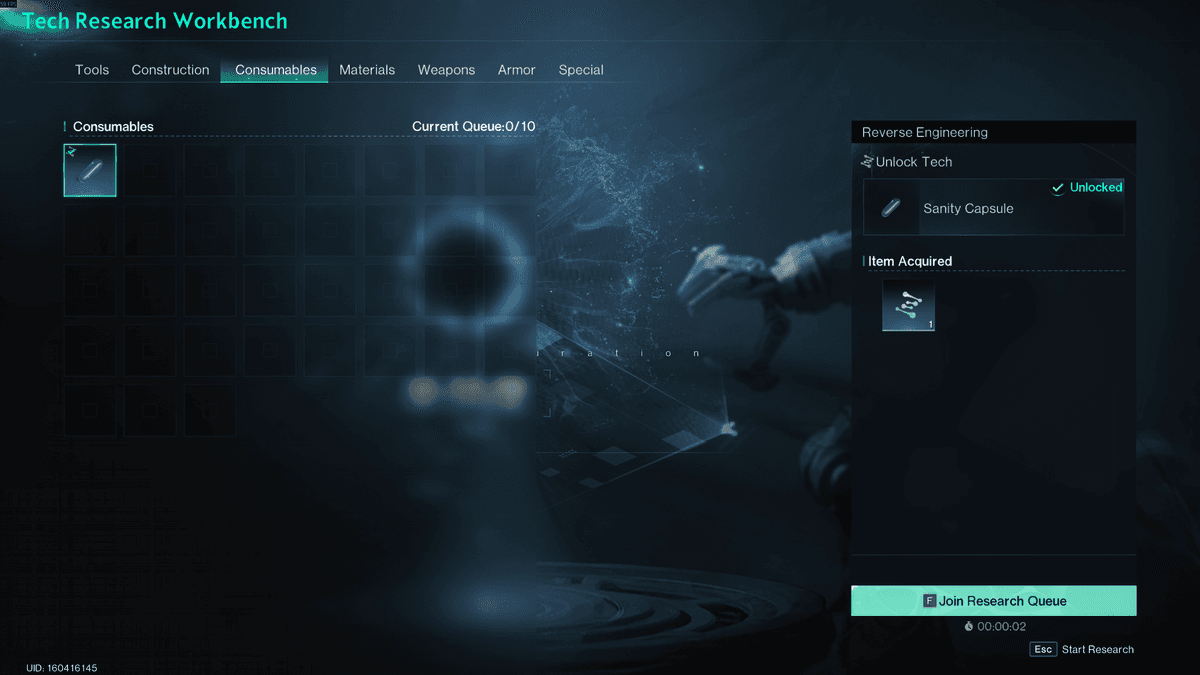
The Technological Inventions workflow and failure mechanics operate as follows:
- Approach the Tech Synthesis Workbench on your territory and press "G" ("Technological Inventions").
- Select surplus building materials and crafting components from your inventory or territory storage chests, transferring them into the right-hand panel ("Materials for Invention").
- Examine the "Invention Result Preview" box in the lower-right: the system dynamically calculates the material combination and displays potential formula rewards sorted in descending order of success probability.
- Press "[F] Activate Invention". A holographic 15-minute countdown timer (
00:15:00) begins, ticking away in the background while you adventure, build, or clear dungeons. - Risk of Failure & Material Consumption: Research is not 100% guaranteed. Experiments can fail. Regardless of whether the attempt succeeds or fails, a portion of the committed materials is permanently consumed as research cost.
- Upon timer completion, return to the workbench:
- Upon success: The screen displays "Invention Successfully Completed: Technology Unlocked", permanently adding the blueprint formula to your crafting repertoire.
- Reclaiming leftovers: Always check the "Material Refund" tab — any unburned raw materials remain stored here and must be manually collected back into your backpack.
Three Official Sources of Tech Points
Unlike standard crafting materials, Tech Points cannot be fabricated on workbenches or farmed infinitely by slaying common open-world mobs. Under official game rules, exactly three systemic channels supply this currency:
| Point Source | In-Game Acquisition Mechanic | Payout Cadence | Practical Recommendation |
|---|---|---|---|
| Character Leveling | Each level gained awards a fixed batch of Tech Points (maximum level cap is 50) | Steady baseline income throughout the main story campaign | Focus on story and side quests early on; quest completions yield the fastest EXP chunks |
| Scenario Milestones | Completing seasonal phase objectives (accessed via Esc or the Season Journey panel) | Substantial lump-sum payouts upon reaching key world milestones | Always check current weekly objectives; scenario goals complete naturally alongside normal exploration |
| First-Time Deviation Discoveries | Securing or registering each unique anomalous entity across the game world | One-time reward granted for every distinct Deviation species cataloged | Never ignore anomaly bubbles and secure containment domes using our Once Human Deviations Guide |
Conditions of Cognition: Seasonal Scenario Phase Gates
Even if you accumulate a massive stockpile of Tech Points, rushing directly into Tier 5 technologies is impossible. The server sets the tempo. Progression is governed by the core game rule — "Conditions of Cognition":
Official System Rule: "Technology knowledge is restricted by the player's current scenario phase and the amount of tech points."
Every server in Once Human operates on a scheduled seasonal timeline divided into weekly phases:
- Phase 1: Unlocks foundational survival tech, copper smelting, primitive wooden shelters, and Tier 1 weapons.
- Phases 2–3: Lifts restrictions on mid-tier categories: advanced gourmet cooking, biomass generators, reinforced steel structures, and refined alloy processing.
- Phases 4–5: Unlocks heavy industrial power, automated defense grids, exotic calibration alloys, and endgame military armaments.
Because of this phased gating, hoarding points early on is counterproductive. Within any active phase, available points are always more than sufficient to fully equip your character and automate your campsite.
Novice Tech Allocation Priorities
Because technology unlocks are permanent and do not require resetting, beginners should avoid wasting early points on cosmetic base decorations, directing them instead toward essential camp infrastructure:
- Clean Water and Food (Survival Branch): Unlock basic cooking stoves and water filters immediately. Pure water and cooked meals prevent dehydration, starvation, and sanity drops.
- Smelting and Metal Refining (Production Branch): Copper and bronze furnaces unlock metal ingots required for advanced weapon frames and workbench tiers.
- Territory Storage (Building Branch): High-capacity storage crates prevent inventory encumbrance during extended salvage runs.
- Ammunition and Equipment (Combat Branch): Keeping ammunition workbenches and gear stations upgraded ensures smooth boss battles in Securement Silos.
Tier List of Best Advanced Technologies: Allocating Tech Upgrade Points
Quick Take: Golden Tech Upgrade Points are awarded in strictly capped quantities at Tech Lv. 8, 10, and 12 (with limited exchanges in the Challenge Store). Never spend them on primitive starter camp equipment: absolute priority belongs to the Electric Mining Drill (+100% rare ores), Disassembly Bench (+10% scrap yield), and Advanced Stoves (doubles food shelf life). Whenever you unlock an upgrade perk, you must demolish and rebuild the facility on your territory.
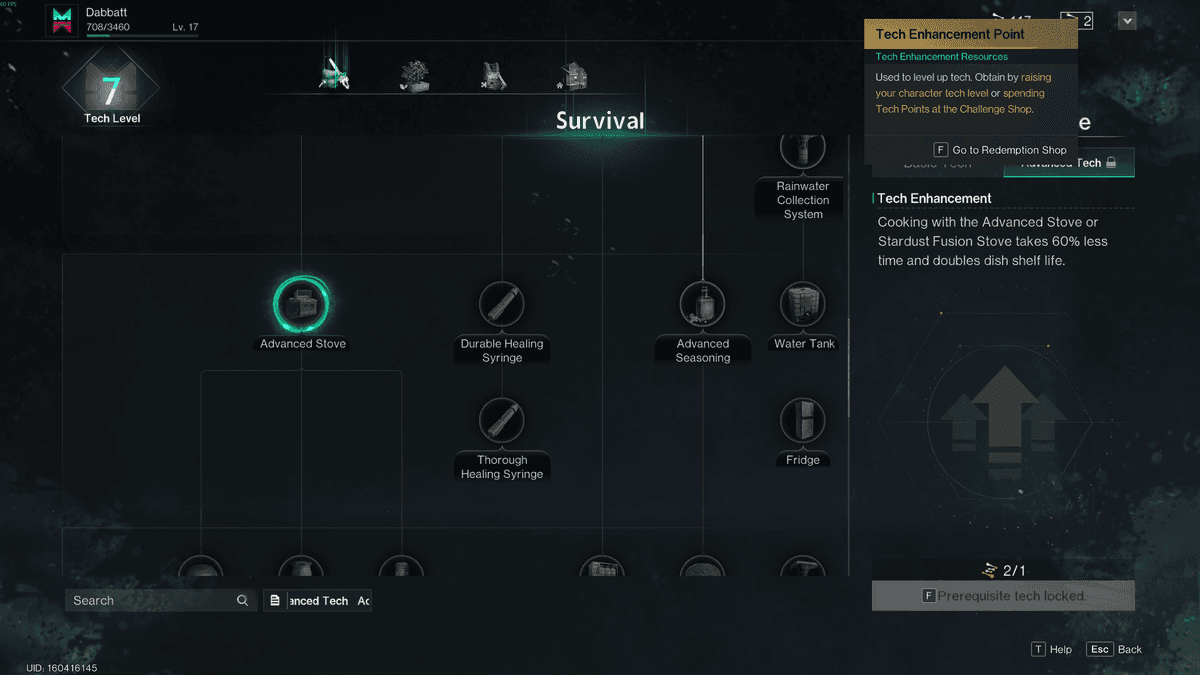
Golden Tech Upgrade Points fundamentally transform the efficiency of base campsite facilities. While standard blue Tech Points unlock hundreds of baseline recipes, golden tokens unlock permanent specialized passive multipliers on key workbenches and tools via the "Advanced Technologies" tab.
Because the total seasonal pool of golden points is strictly capped (12 points across Tech Level milestones plus limited purchases in the Challenge Store), they must be allocated according to a rigorous priority hierarchy. There is no room for error.
Tier S: Absolute Priority (Unlock Immediately)
These three facility enhancements yield immediate economic returns from the moment they are placed on your territory, providing massive multipliers to material acquisition:
| Facility Node | Official In-Game Enhancement | Practical Territory Advantage | When to Unlock |
|---|---|---|---|
| Electric Mining Drill | +100% mining yield for gold, silver, and Stardust ore | Doubles rare mineral extraction. Gold and silver ingots sell to vendors for maximum Energy Link profits, while Stardust ore is consumed in vast quantities for armor crafting, AP ammo, and weapon calibration — the step-by-step stat tuning process on your gear workbench. | As soon as the drill node opens in the Production branch |
| Disassembly Bench | +10% yield for parts, plastics, rubber, textiles, and electronic components | Passive multiplier on all salvaged scrap. Scrapping junk is your primary source of mechanical and electrical components. Gaining 10% more materials from every salvaged run saves dozens of farming hours over a season. | At Tech Lv. 8 with your very first golden point |
| Advanced Stoves | Cooking takes 60% less time and doubles food shelf life | Food spoilage protection. Prepared dishes in Once Human decay over real time (e.g., roast meat and berries spoil after 24 hours). Doubling shelf life to 48 hours allows you to cook multi-day supplies of combat buffs in a single session. | When gearing up for Securement Silos and Monolith boss runs |
Tier A: Industrial Smelting and Base Automation
Second-priority enhancements activated after securing the essential Tier S trio. They dramatically accelerate intermediate processing queues and relieve territory power limits:
| Facility Node | Official In-Game Enhancement | Practical Advantage |
|---|---|---|
| Electric Furnace | Increases ingot smelting speed and reduces ore consumption during alloy synthesis | Accelerates mass production of steel, aluminum, and tungsten ingots required for Tier 4 and Tier 5 gear before guild raid events. |
| Stardust Resonant Filter | Increases yield of refined Stardust Source and stabilizes filter durability | Guarantees continuous output of refined Stardust materials necessary for crafting high-tier weapon mods and armor calibration. |
| Biomass Generators | Increases total power output capacity and grid transmission limits | Allows territory water pumps, automated greenhouse lights, and perimeter defense turrets to run on fewer generators, preserving territory building budgets. |
Tier B: Auxiliary Quality-of-Life Speed Boosts
Enhancements in this tier streamline routine territory crafting, though they do not provide direct resource multipliers:
- Advanced Supplies Workbench: Reduces item crafting duration by 40% across the Supplies Workbench, Ammunition Workbench, and Medical Workbench. Invaluable when mass-printing thousands of AP bullets and medical injectors ahead of competitive PvP or clan defense events.
Three Tech Upgrade Rules: Avoiding Common Beginner Traps
To maximize the impact of your golden points, keep three practical game mechanics in mind:
- Never upgrade primitive starter benches: Do not waste valuable golden upgrade points on primitive stone furnaces or open campfires. These starter objects become completely obsolete within a few days once electrical facilities are unlocked.
- Always rebuild the physical workbench: Upgrading a technology perk inside the tree does not upgrade objects already standing on your territory. Open build mode (
B), select demolish (R), reclaim 100% of the materials, and reconstruct the workbench. Demolition refunds everything completely. - Hit cumulative Tech Level milestones: Do not hoard blue points aimlessly. Unlock even minor secondary formulas to cross cumulative thresholds of 35, 70, and 125 unlocked technologies — these milestones are the primary source of golden Tech Upgrade Points.
The Mayfly Cradle: Override Screen and Combat Adaptation
Quick Take: The Cradle is the Mayfly's personal combat processor. The "Override" screen is accessed through I → "Tech - Cradle" → "Cradle". At the center stands your character viewed from behind, featuring a transparent glass Deviation container encircled by an orbital socket ring for combat chips. Swapping perks is completely free out of combat. Orbital sockets unlock by clearing Securement Silos (such as Silo Sigma), while the perks themselves unlock at level milestones (10, 20, 30, 40) and seasonal phase gates.
While the Tech Tree establishes material logistics, camp workbenches, and territory crafting, the Cradle governs your direct combat efficiency. It is a portable biomechanical processor mounted to the survivor's backpack, dynamically configuring ballistic multipliers, shield penetration, elemental status explosions, and combat Deviation synergies.
To access the Cradle interface, press "I", navigate to the "Tech - Cradle" tab at the top, and click the right interactive panel labeled "Cradle" (represented by a glowing holographic palm). This opens the active "Override" control console.
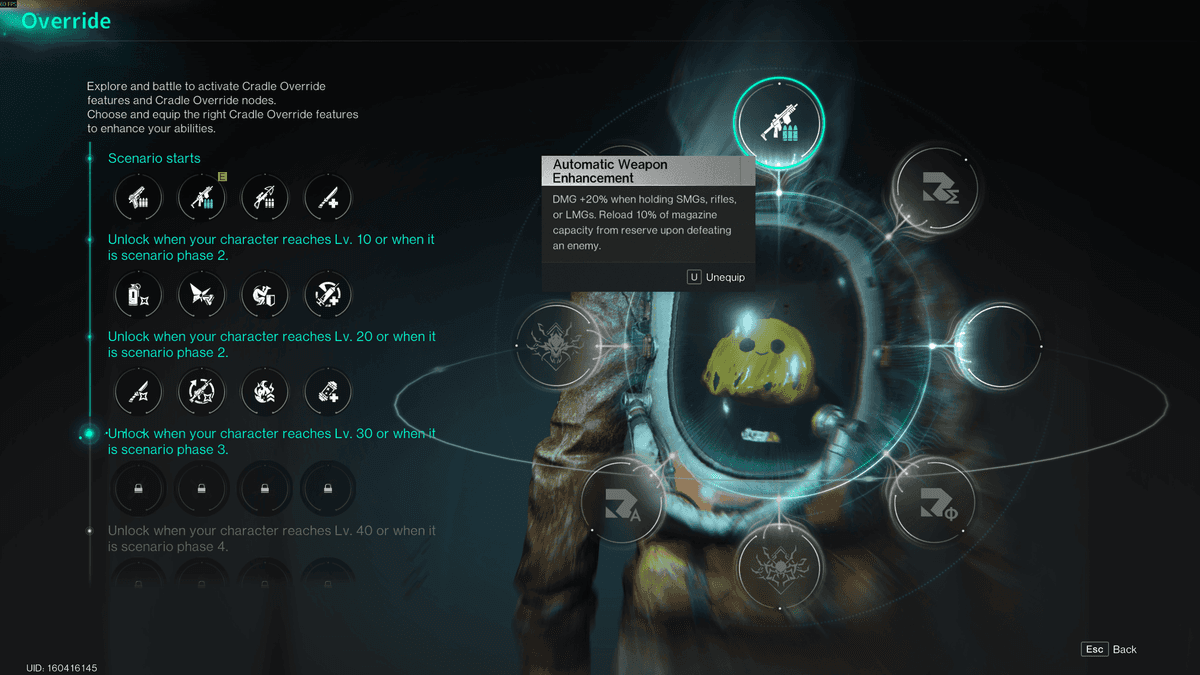
Anatomy of the "Override" Screen: Orbital Sockets and Perk Tiers
The Cradle interface operates on visual and systemic principles distinct from standard talent trees:
- Central Screen: Your character viewed from behind, wearing a transparent containment tank housing your active Deviation. Encircling this glass tank is an orbital ring of circular sockets.
- Left Panel: The full catalog of available combat overrides, organized across sequential progression tiers.
- Orbital Sockets: The active loadout slots where you insert chosen combat perks. The maximum number of concurrently operating passive perks is strictly defined by your unlocked orbital sockets.
The primary advantage of the system is its zero operational cost and unrestricted swapping. Configuring the Cradle consumes neither blue Tech Points nor golden Upgrade Points. There are zero respec fees. You can open the interface at any moment out of combat and completely reconfigure your loadout for an upcoming dungeon boss or raid encounter.
| Cradle System Component | Interface Location | How It Unlocks | Practical Combat Role |
|---|---|---|---|
| Orbital Sockets | Ring encircling the glass Deviation tank | Dungeon completions: hover over any locked socket to view its unlock condition (e.g., "Securement Silo - Sigma: Clear Securement Silo - Sigma on any difficulty") | Dictates the total number of passive combat perks you can equip simultaneously |
| Ability Tiers (Perks) | Left-hand override catalog column | Unlocked as you reach character level thresholds (10, 20, 30, 40) and server Scenario Phase gates (Phases 1, 2, 3, 4) | Provides specialized multipliers for firearms, elemental reactions, and survivability |
The Five Official Cradle Override Categories
Official Cradle overrides from the active game client are grouped across five tactical combat specializations:
| Override Category | Tactical Combat Role | Official In-Game Client Perks | Impact on Gameplay |
|---|---|---|---|
| Weapon Specialization | Direct percentage damage boosts for specific firearm classes (+20% damage and ammo return on kill) | Automatic Weapon Enhancement, Handgun Enhancement, Long-Range Weapon Enhancement, Melee Weapon Enhancement | The core foundation of baseline gunplay DPS as outlined in our Once Human Weapon Tier List |
| Elemental & Status Triggers | Multiplies secondary anomaly damage effects (Shrapnel, Power Surge, Frost Vortex, Burn, Unstable Bomber) | Deadly Combo (+25% bullet effect damage on Shrapnel/Bounce), Tracking Bullet (+35% Shrapnel crit damage), Infernal Steppe (up to +60% fire damage), Sustained Pressure (+60% DoT damage), First Shot (+25% instant Power Surge/Bomber damage), Fleeting Strike (+25% surge damage and +18% shock damage) | The primary scaling multiplier for status-effect and elemental loadouts |
| Tactical Maneuvers & Survival | Dynamic mobility bonuses: dodging, reloading, weapon swapping, healing, and movement speed | Tactical Combo (+25% weapon damage for 4s after reloading/swapping), Steady Hand (+40% weakspot damage under buffs, +20% for Bullseye), Bounty Hunter (+25% weapon and +35% weakspot damage on marked kills), Agility (+15% weapon and status damage reduction after rolling), First Aid (-30% medicine cooldown, +15% healing), Sprint (+5% speed, -15% stamina cost) | Increases survival mobility during raid mechanics and maximizes Bullseye sniper synergies |
| Deviation Synchronization | Massive burst damage multipliers while your active combat companion is deployed | Trainer of Deviants (+50% damage against Great Ones and elite enemies in the presence of a Deviation), Tactical Master (+25% damage against Great Ones for 15s upon using a tactical throwable) | Direct combat synergy with companions from our Once Human Deviations Guide |
| Anti-Elite Shield Overrides | Penetrates anomalous immunity shields on high-tier dungeon elites: Anti-Phase, Anti-Coherence, Anti-Void | Strips 100% damage immunity shields from elite monsters in dungeons | Mandatory for Silos and Monoliths: without the correct override, shielded elite mobs absorb all incoming damage |
Two Critical Beginner Mistakes with the Cradle
To avoid hitting hard walls in high-level endgame content, guard against two common oversights:
- Skipping Securement Silos: If you neglect dungeon progression, the orbital sockets encircling your Deviation tank remain locked. You can unlock level 40 perks, but you will have nowhere to slot them. Clear Securement Silos immediately as they become available on your world map.
- Entering dungeons without Anti-Elite overrides: If a Securement Silo's dungeon modifier indicates the presence of Phase Shielded elites and your Cradle lacks "Anti-Phase," you will deal zero damage to priority targets. Study dungeon modifiers in advance. Always adapt your overrides before crossing the dungeon threshold.
Best Cradle Setups: 8-Socket Matrices for Top Meta Builds
Quick Take: Cradle optimization relies on direct synergy: your passive overrides must multiply the specific elemental or physical trigger of your active weapon. Pure physical Shrapnel setups prioritize Crit Damage and bullet effect scaling ("Deadly Combo", "Tracking Bullet"); Burn and Frost Vortex builds maximize damage-over-time multipliers ("Infernal Steppe", "Sustained Pressure"); Power Surge and Unstable Bomber focus on instant detonation bonuses ("First Shot", "Fleeting Strike", "Steady Hand"). Socket 8 is universally reserved for Anti-Elite shield penetration overrides.
Unlike universal baseline passive perks, Cradle overrides reach their full damage potential only when tailored to a specific firearm archetype. Below are five verified 8-socket Cradle loadout matrices designed for Once Human's top endgame builds, compiled strictly using verified perks from the active game client.
1. Shrapnel Build Cradle Matrix: SOCR – The Last Valor
This setup scales pure physical critical hit damage and high-frequency Shrapnel trigger procs when targeting enemy weakspots. For full armor, mod, and weapon calibrations, read our dedicated Once Human Shrapnel Build Guide.
| Cradle Slot | Verified Client Override Perk | Mechanic and Tactical Build Synergy |
|---|---|---|
| Slot 1 | Deadly Combo | Shrapnel Core: Triggering special bullet effects (Shrapnel) increases bullet effect damage by +25% for 4 seconds. |
| Slot 2 | Tracking Bullet | Crit Burst Scaling: Defeating an enemy with weapon damage increases Shrapnel damage by +25% and Shrapnel Crit Damage by +35% for 15 seconds. |
| Slot 3 | Automatic Weapon Enhancement | Provides +20% flat weapon damage for the SOCR assault rifle; enemy kills automatically reload 10% of the active magazine. |
| Slot 4 | Tactical Combo | Increases weapon damage by +25% for 4 seconds after reloading or swapping weapons. |
| Slot 5 | Trainer of Deviants | Grants +50% bonus damage against Great Ones (bosses) and elite enemies whenever an allied combat Deviation (such as Lonewolf's Whisper) is active on the field. |
| Slot 6 | Tactical Master | Throwing any tactical consumable grants +25% damage against Great Ones for 15 seconds. |
| Slot 7 | Agility | Dodge rolls grant +15% incoming weapon damage reduction and +15% status damage reduction for 4 seconds. |
| Slot 8 | Anti-Phase / Anti-Coherence Override | Strips immunity barrier shields from elite targets inside high-tier Securement Silos and Monoliths. |
2. Burn Build Cradle Matrix: KVD – Boom! Boom!
This setup maximizes fire damage-over-time duration, chain-ignition radius across clustered mobs, and direct synergy with your combat Pyro Dino companion. Check out weapon calibration and gear choices in our Once Human Burn Build Guide.
| Cradle Slot | Verified Client Override Perk | Mechanic and Tactical Build Synergy |
|---|---|---|
| Slot 1 | Infernal Steppe | Build Engine: Fire damage increases by +15% for each nearby enemy suffering from Burn (capping out at +60% bonus fire damage). |
| Slot 2 | Sustained Pressure | Defeating an enemy with continuous damage (Burn ticks) boosts damage-over-time by +20% for 10 seconds (stacks up to 3 times for a massive +60% DoT multiplier). |
| Slot 3 | Status Enhancement | Grants +25% status damage for 3 seconds after striking an enemy weakspot. |
| Slot 4 | Automatic Weapon Enhancement | Boosts KVD light machine gun damage by +20%; enemy kills automatically reload 10% of your heavy drum magazine. |
| Slot 5 | Tactical Combo | Increases weapon damage by +25% for 4 seconds after reloading the LMG or swapping firearms. |
| Slot 6 | Trainer of Deviants | Grants +50% damage against bosses and elites while your Pyro Dino companion breathes fire on targets. |
| Slot 7 | Tactical Master | Throwing a tactical grenade or Molotov grants +25% damage against Great Ones for 15 seconds. |
| Slot 8 | Anti-Phase / Anti-Void Override | Breaks anomalous elite shields in high-level dungeon encounters. |
3. Frost Vortex Build Cradle Matrix: KAM – Abyss Glance
Focuses on continuous cryo vortex area damage, consistent crowd control, and sustained defensive survivability in crowded dungeons. For complete blueprint and mod recommendations, read our Once Human Frost Vortex Build Guide.
| Cradle Slot | Verified Client Override Perk | Mechanic and Tactical Build Synergy |
|---|---|---|
| Slot 1 | Sustained Pressure | Cryo Core: Defeating an enemy with continuous damage (Frost Vortex) increases damage-over-time by +20% for 10 seconds (stacks up to 3 times = +60% vortex damage). |
| Slot 2 | Status Enhancement | Increases status damage by +25% for 3 seconds after landing a weakspot strike. |
| Slot 3 | Automatic Weapon Enhancement | Provides +20% weapon damage for the KAM assault rifle; enemy kills automatically replenish 10% of the active magazine. |
| Slot 4 | Tactical Combo | Grants +25% weapon damage for 4 seconds after completing a reload or switching firearms. |
| Slot 5 | Trainer of Deviants | Provides +50% bonus damage against Great Ones and elites while your Polar Jelly companion is out in combat. |
| Slot 6 | Tactical Master | Using a tactical throwable grants +25% damage against Great Ones for 15 seconds. |
| Slot 7 | Agility | Dodge rolls grant +15% incoming weapon and status damage reduction for 4 seconds. |
| Slot 8 | Anti-Coherence / Anti-Phase Override | Penetrates anomalous elite barriers inside seasonal Securement Silos. |
4. Power Surge Build Cradle Matrix: MPS7 – Outer Space
Optimized for the blazing fire rate of the MPS7 submachine gun and explosive chain-lightning burst procs. Detailed mod setups and armor sets are covered in our Once Human Power Surge Build Guide.
| Cradle Slot | Verified Client Override Perk | Mechanic and Tactical Build Synergy |
|---|---|---|
| Slot 1 | First Shot | Surge Engine: Instant anomaly damage (Power Surge) increases by +25% for 4 seconds after every reload. |
| Slot 2 | Fleeting Strike | Defeating an enemy increases Power Surge damage by +25% and Shock elemental damage by +18% for 15 seconds. |
| Slot 3 | Automatic Weapon Enhancement | Boosts MPS7 SMG weapon damage by +20%; enemy kills automatically reload 10% of the magazine. |
| Slot 4 | Tactical Combo | Grants +25% weapon damage for 4 seconds after reloading or quick-swapping to a secondary weapon (such as the ACS12 – Corrosion shotgun). |
| Slot 5 | Status Enhancement | Increases status damage by +25% for 3 seconds after striking an enemy weakspot. |
| Slot 6 | Trainer of Deviants | Grants +50% damage against Great Ones and elite targets while a combat companion is active. |
| Slot 7 | Agility | Dodge rolls grant +15% damage mitigation against incoming ballistic and status attacks for 4 seconds. |
| Slot 8 | Anti-Phase / Anti-Void Override | Shatters anomalous elite immunity shields in endgame dungeons. |
5. Unstable Bomber Build Cradle Matrix: DE.50 – Jaws
Engineered for high-damage explosive detonations with the DE.50 "Jaws" pistol, paired with critical Bullseye sniper markings. Learn the full rotation in our Once Human Unstable Bomber Build Guide.
| Cradle Slot | Verified Client Override Perk | Mechanic and Tactical Build Synergy |
|---|---|---|
| Slot 1 | First Shot | Detonation Core: Instant anomaly damage (Unstable Bomber) increases by +25% for 4 seconds after reloading. |
| Slot 2 | Steady Hand | Bullseye Scaling: Under Fortress Warfare or Fast Gunner status, weakspot damage increases by +40%, and Bullseye weakspot damage increases by +20%. |
| Slot 3 | Bounty Hunter | Defeating a marked enemy increases weapon damage by +25% and weakspot damage by +35% for 15 seconds. |
| Slot 4 | Handgun Enhancement | Boosts DE.50 pistol damage by +20%; enemy kills immediately reload 1 round directly from reserve ammo. |
| Slot 5 | Tactical Combo | Grants +25% weapon damage for 4 seconds after swapping from an AWS.338 sniper rifle to the DE.50 pistol. |
| Slot 6 | Trainer of Deviants | Grants +50% bonus damage against bosses and elite enemies when an allied companion is summoned. |
| Slot 7 | Tactical Master | Throwing a tactical item grants +25% damage against Great Ones for 15 seconds. |
| Slot 8 | Anti-Coherence / Anti-Phase Override | Bypasses anomalous defense shields on high-difficulty elite enemies. |
To compare the overall combat performance of these archetypes across raids, dungeons, and PvP, consult our comprehensive Once Human Weapon Tier List.
Seasonal Transitions, Eternaland, and Permanent Progress: Why Mistakes Don't Brick Your Build
Quick Take: In Once Human, unlocked technologies remain permanently learned throughout the entire scenario — there is no right-click respec mechanic, but the game provides more than enough Tech Points to max out all essential branches. When a scenario concludes, you do not lose your accumulated core wealth: weapon and armor blueprints, gear mods, Starchrom, and cosmetic skins carry over permanently across seasons, while character levels, the Tech Tree, and Cradle overrides reset to ensure an even competitive playing field.
One of the biggest concerns for new survivors is the fear of committing points to the "wrong" technologies. In the current release of Once Human, technologies are unlocked permanently: there is no individual node refund (respec) mechanic via right-click. However, the game's economy is deliberately balanced so that bricking a character's progression is virtually impossible. Points are abundant. Do not panic.
The total pool of Tech Points earned across 50 character levels, scenario phase goals, and first-time Deviation captures is far more than sufficient to unlock all fundamental crafting workbenches, while salvaged world items can be reverse-engineered without spending Tech Points at all.
The Seasonal Cycle: What Carries Over and What Resets
Every server in Once Human operates within a seasonal Scenario (typically lasting around 6 weeks). Upon completing a scenario, your character transitions to an extradimensional personal sanctuary — Eternaland, where you can prepare and register for your next scenario (such as the sub-zero "Way of Winter").
To avoid confusion regarding seasonal wipes, keep this verified asset progression rule in mind:
| In-Game Asset | Seasonal Transition Status | Where It Goes and How It Works |
|---|---|---|
| Weapon & Armor Blueprints | Permanent Account Unlock | All unlocked blueprints, their star ratings, and fragment enhancement levels carry over permanently across all future seasons. |
| Gear Modifications (Mods) | Permanent Account Unlock | Your complete inventory of looted mods, including legendary suffixes and calibration upgrades, transfers with zero loss. |
| Starchrom Currency | 100% Retained | The premium currency used to pull blueprint fragments in the Wish Machine via our Starchrom Wish Machine Guide never expires or resets. |
| Cosmetics, Skins & Territory Blueprints | Permanent Account Unlock | Weapon skins, armor cosmetics, vehicle wraps, and saved base house templates can be immediately deployed on your new server. |
| Tech Tree & Tech Level | Seasonal Reset | Resets back to level 1 baseline. The Tech Tree is relearned in the new scenario, guaranteeing fair and equal early-game competition for all players. |
| Character Level & Cradle Overrides | Seasonal Reset | Character level resets to 1, and the Cradle catalog refreshes with climate-specific overrides tailored to the theme of the new season. |
| Raw Materials, Workbenches & Camp Gear | Transferred to Eternaland | All stockpiled ores, ingots, components, and camp facilities are deposited into your Eternaland Depot. In the new season, you can selectively withdraw high-value items using seasonal logistics points. |
FAQ: Common Player Questions
Can I permanently ruin my character by unlocking the wrong technologies?
No. The available Tech Points in the game are more than sufficient to reach total self-sufficiency. Even if you unlock non-essential decorative furniture early on, you will still have ample points to secure high-tier cooking stoves, smelting furnaces, water purification systems, and ammunition crafting. Furthermore, salvaged world appliances can be reverse-engineered at your camp workbench for free recipe unlocks.
How do I transfer gear and materials from Eternaland into a new season?
At the start of each new scenario, every survivor receives a dedicated quota of Material Points (Logistics Points). Through the seasonal backpack menu, you can spend these points to withdraw essential survival tools from your Eternaland vault — such as your favorite Advanced Electric Mining Drill, high-yield agricultural seeds, or critical building materials.
Do Cradle override abilities change between different scenarios?
Yes. The Cradle module is engineered as an adaptable seasonal combat processor. While the default temperate scenario "Manibus" features classic elemental scaling and standard anti-elite shield breakers, sub-zero scenarios like "Way of Winter" introduce specialized thermal regulation overrides, hypothermia mitigation, and cold-weather firearm synergies.
For a complete overview of character progression, meta build calibrations, and weapon tier rankings, explore our comprehensive Once Human Weapon & Build Tier List.